This article was co-authored by wikiHow Staff. Our trained team of editors and researchers validate articles for accuracy and comprehensiveness. wikiHow's Content Management Team carefully monitors the work from our editorial staff to ensure that each article is backed by trusted research and meets our high quality standards.
wikiHow marks an article as reader-approved once it receives enough positive feedback. In this case, 82% of readers who voted found the article helpful, earning it our reader-approved status.
This article has been viewed 224,997 times.
Learn more...
Fleece is a wonderful material to make baby blankets out of. Not only is it warm and soft, but it also comes in lots of colors and patterns. Best of all, the edges do not need finishing or serging because fleece does not fray. There are lots of ways in which to make a fleece baby blankets, and not off of those ways require sewing! Whichever version you choose to make, you are sure to end up with something truly unique.
Steps
Making a Tied Blanket
-
1Cut two pieces of 40 by 40-inch (101.6 by 101.6-centimeter) fleece. Your finished blanket will by 36 by 36 inches (91.44 by 91.44 centimeters) with a 4-inch (10.16-centimeter) long fringe. You can use the same color for each piece of fleece, or you can use two contrasting colors. You can also use a solid color for one piece, and a matching pattern for the other.
-
2Stack the fleece pieces on top of each other, then cut a 4-inch (10.16-centimeter) square out of each corner. Cut through both pieces of fleece as the same time to ensure that the squares match up.
- If you are using a patterned piece of fleece, make sure that the right side is facing out.
Advertisement -
3Cut 1-inch (2.54-centimeter) wide, 4-inch (10.16-centimeter) long slits into all four edges. Once again, try to cut through both layers of fleece at the same time. This will ensure that your tassels match up.
-
4Start tying the top tassels to the bottom tassels in tight, double-knots. Starting in the lower left-hand corner, take the first tassel from the top and bottom pieces of felt. Tie the two tassels together into a tight, double-knot.
-
5Continue tying the tassels together on all four sides of the blanket. Finish the bottom row, then work your way around the side, top, and other side. Once you have finished tying all of the tassels, your blanket is ready to use!


Making a Looped Blanket
-
1Cut two 40 by 40-inch (101.6 by 101.6-centimeter) pieces of fleece. They can both be the same color, or they can be two different colors. You can even use a solid color for one piece, and a pattern for the other. Your finished blanket will measure 36 by 36 inches (91.44 by 91.44 centimeters) with a 4-inch (10.16-centimeter) fringe on all four sides.
-
2Stack the two pieces of felt, then cut a 4-inch (10.16-centimeter) square out of each corner. Try to cut through both layers of fleece at the same time. This will ensure that all of your edges match up.[1]
- If you are using patterned fleece, make sure that the right side is facing out.
-
3Cut a 1½-inch (3.81-centimeter) wide, 4-inch (10.16-centimeter) long tassels into all four sides of your blanket. Once again, be sure to cut through both layers of fleece at the same time.[2]
-
4Cut a ¼-inch (0.64-centimeter) long slit into the top edge of each tassel.[3] Make sure that you are making the slits right next to the body of the blanket, and not the narrow/raw end of the tassels.
-
5Pull the tassels through each slit. Starting from the bottom left corner, take the first tassel from the top and bottom pieces of fleece. Holding them together, push them through the 1/4-inch (0.64-centimeter) slit you made. Gently tug on the tassels to tighten them.
-
6Continue pulling the tassels through the slits on all four edges of the blanket. This blanket is similar to the traditional tied, no-sew blanket, but because you are not tying the tassels together, you won't get as much bulk.


Making a Folded-Edge Blanket
-
1Cut a 37 by 37-inch (93.98 by 93.98-centimeter) piece of felt. The finished blanket will by 36 by 36 inches (91.44 by 91.44-centimeters) with ½-inch (1.27-centimeter) hems.
-
2Fold the top and bottom edges of your blanket down by ½ inch (1.27 centimeters), then pin them in place.[4] If you are using a patterned blanket, make sure that the wrong side is facing you.
-
3Sew the hems down using a zigzag stitch. If you have a fancier sewing machine, adjust the stitch length so that it is long and wide. Do not use any seam allowances; simply sew right over the seam.[5] Remove the pins as you sew.
- Use a thread color that matches the blanket.
-
4Fold and sew the s ide edges. Fold the side edges down by ½ inch (1.27 centimeters) as before, and pin them in place. Sew right over the seam using a long, wide, zigzag stitch.
-
5Finish the blanket. Carefully go over your blanket. Remove any pins and trim off any loose threads. Your blanket is now ready to use!


Making a Bound-Edge Blanket
-
1Cut a 36 by 36-inch (91.44 by 91.44-centimeter) piece of fleece. If you'd like the blanket to be double-sided, cut two pieces of fleece instead: one that is solid-colored, and one that is patterned.
-
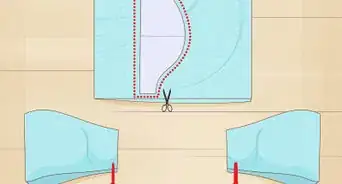
2Use a bowl to trace and cut rounded edges onto the corners of your blanket. Trace the corners first using a pen, then cut the corners out using a sharp pair of scissors.[6] Not only does this give your blanket a unique touch, but you won't have to sew Mildred corners when adding the bias tape.
- You can also use a plate or a lid.
-
3Sew the bias tape together, if needed. Unless you made your own bias tape, or bought it already the right length, you will have to sew two or more lengths of bias tape together to make one long, continuous strand.[7] Open up both ends of the bias tape, then pin them together, with the wrong sides facing out. Sew the two strands together using a ¼-inch (0.64-centimeter) seam allowance.
-
4Pin the bias tape all the way around the edge of the blanket. Nestle the raw edge of the blanket right into the fold of the bias tape. Place a sewing pin ever 3 inches (7.62 centimeters).
-
5Fold the end of the bias tape under itself to conceal the raw edge. Trim off the excess bias tape until you have about 1 inch (2.54 centimeters) left. Overlap it by ½ inch (1.27 centimeters), then fold the excess under itself. Press it flat with an iron, then pin it in place.
-
6Sew around the bias tape, using a ⅛-inch (0.32-centimeter) seam allowance. Use a thread color that matches the bias tape. Remove the pins as you sew.
-
7Finish the blanket. Go over your blanket and double-check for any missed pins, then carefully trim off any loose threads. Your blanket is now complete, and ready to use!


Community Q&A
-
QuestionWhat kind of fleece is best? I notice there are about 10 different kinds at my local fabric store.
 MicheleTop AnswererIt’s a matter of personal preference. Pick something you like, something soft and not too heavy, in a color you think might appeal to whomever you’re gifting.
 -
QuestionAfter I pin the bias tape around the blanket-how do I know the thread will catch both sides, equally?
 Community AnswerSew for about four inches and then turn the fabric back to make sure it catches. It helps to glue it with washable glue, using tiny dots on both sides of the fabric, then ironing the glue very carefully. After the glue is set, make a quarter-inch seam down the edge of the bias tape.
 -
QuestionCan satin ribbon be used for edging?
 Community AnswerYes, it can. I recommend you check out a video on YouTube called "How to Make a Baby's Ribbon Edged Fleece Blanket" by Jo Amethyst.
Things You'll Need
Making a Tied Blanket
- 2 different colors/patterns of fleece, 40 inches (101.6 centimeters)
- Scissors
- Ruler
Making a Looped Blanket
- 2 different colors/patterns of fleece, 40 inches (101.6 centimeters)
- Scissors
- Ruler
Making a Folded-Edge Blanket
- 1 yard fleece
- Sewing pins
- Sewing machine
- Thread
- Fabric scissors
Making a Bound-Edge Blanket
- 1 yard fleece
- 6 yards (5.49 meters) of ⅞-inch (2.23-centimeter) double fold bias tape
- Bowl, plate, or lid (for rounding the corners)
- Sewing pins
- Sewing machine
- Thread
- Fabric scissors

-Step-24-Version-5.webp)

References
- ↑ http://pinkpolkadotcreations.com/crafts/fringed-fleece-blankets/
- ↑ http://pinkpolkadotcreations.com/crafts/fringed-fleece-blankets/
- ↑ http://pinkpolkadotcreations.com/crafts/fringed-fleece-blankets/
- ↑ http://www.scatteredthoughtsofacraftymom.com/2014/12/easy-fleece-blanket-tutorial.html
- ↑ http://www.scatteredthoughtsofacraftymom.com/2014/12/easy-fleece-blanket-tutorial.html
- ↑ http://seekatesew.com/easy-fleece-bias-tape-blanket-tutorial-with-rounded-corners/
- ↑ http://seekatesew.com/easy-fleece-bias-tape-blanket-tutorial-with-rounded-corners/
- ↑ http://www.mamainastitch.com/blanket-sizing-guide/
About This Article