This article was co-authored by Quynh La. Quynh La is a Professional Baker and the Owner of Sugar Bakery & Cafe in Seattle, Washington. With over seven years of experience, she specializes in baking cakes, cookies, croissants, and bread. Quynh holds an AAS in Culinary Arts from South Seattle College and a second AAS in Specialty Desserts & Bread from Seattle Central College.
There are 7 references cited in this article, which can be found at the bottom of the page.
This article has been viewed 107,641 times.
If you have a very special birthday coming up for a little girl, a beautifully decorated cake can help make your girl feel like a princess. A princess cake is easy to make, but it will look like you commissioned a professional baker to prepare it!
Ingredients
- 2 boxes of cake mix
- Water (amount called for on the cake batter box)
- Vegetable oil (amount called for on the cake batter box)
- Eggs (amount called for on the cake batter box)
- Your choice of frosting
- Food coloring (optional)
- Edible cake decorations (optional)
- A fashion doll (approximately 11 ½ inches tall)[1]
Steps
Making The Cake Bases
-
1Mix the cake batter. Depending on your chosen cake base, follow the recipe and directions on the cake box to make the cake batter. Be sure you have all the necessary ingredients that the recipe calls for. Both boxes of cake batter can be made at the same time, but don’t increase the beating time.[2]
- Don’t make more than two boxes of cake batter together. If you plan to make more cake batter, prepare them in separate batches.
-
2Prepare your cake pans and bowl. Preheat the oven to 325°F. Grease your three, round, 8-inch wide cake pans and one, 8-inch wide, 1½ quart ovenproof glass bowl, by rubbing the inside of the pans and bowl with approximately ½ tablespoon of vegetable shortening.[3] Sprinkle flour over the coated pans and bowl, and tap out any extra flour.[4]
- The bowl will function as a cake pan for the top portion of the cake, which will be rounded, and serve as the top of the princess’ dress.
- The width of the bowl should relatively match the width of your cake pans. A same sized bowl will make the cake alignments a lot more uniform.
- Don’t use cooking spray to grease the pans.[5]
- When the cake batter is mixed and the pans and bowl are ready, pour 3¼ cups of batter into the ovenproof bowl, and split the remaining cake batter amongst the three remaining cake pans.[6]
- There will be a little less than 2 cups for each remaining cake pan.[7]
Advertisement -
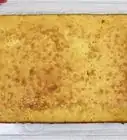
3Bake the cakes. Bake the pans together in the oven for about 23 – 30 minutes and bake the bowl separately for about 47 – 53 minutes.[8] The bowl cake will be completely baked when you can insert a toothpick into the cake, and it comes out clean.[9]
- If your cakes are stuck to the pan, no worries! Use a paring knife or a spatula to gently guide them out.
- Allow the cakes to cool for about 10 minutes before you turn them over and remove them from their baking containers. Let the cakes cool completely for about 45 minutes – 1 hour before you start working with them.[10] [11]
- Set the cakes on a cooling rack to help them cool faster.
- Allowing the cakes sufficient enough time to cool will help them crumble less as you cut and frost them.
-
4Level off the tops of the cakes. Use a large, serrated knife to slice off the very top portion of the various cake layers. You should only be slicing off about ¼ inch of cake from the different cake layers. This leveling off of the cake layers will help the cakes stick together when you frost and stack them. Cut the bowl cake layer in half, horizontally to make two even portions.[12]
- Consider using a spinning pedestal to rotate the bowl cake as you cut through the middle of the cake.[13]
-
5Prepare your frosting. You can decorate your cake with colored, commercial frosting, white, commercial frosting dyed with food coloring to the color of your choice, or you can make your own frosting. Buttercream frosting is a very popular and common frosting choice for homemade cakes.[14] Whichever you prefer, have approximately 4 – 5 cups of frosting mixed and ready to be used in a separate bowl.
- The frosting amount really depends on how much frosting you plan to use on your cake, but it also allows for enough extra frosting to decorate and pipe the rest of the cake. For a typical frosting formula, consider doubling the recipe.[15]
- If you plan to purchase white, commercial frosting and dye it with food coloring, you will only need a couple drops of food coloring to change the color of the frosting. For example, if you want to dye white frosting green, consider adding one drop of blue dye, and two drops of yellow dye.
- Start will less dye, and build upon it. You can always add more dye to darken the shade of the frosting.
- Whip your frosting up before putting it on your cake because the fluffier it is, the easier it’ll be to spread.


Frosting The Princess Cake
-
1Cut holes in the middle of the cake layers. Use a pastry cutter to cut a 1¾ diameter hole into the center of all the different cake layers.[16] Simply place a round, 1¾ diameter pastry cutter on the center of a cake layer, and push the cutter down through the cake. Gently pull the pastry cutter up from the cake, and remove the cake portion in the center of the cutter. Continue to cut a hole in the center of all the cake layers.
- These center holes are where the princess doll’s legs will fit into the cake.
-
2Frost and stack the cake layers. Place a cardboard round (the same size as your cake) underneath your cake before you start frosting and decorating it. That way, the cardboard can easily be moved when you’re ready to present your cake.[17] Also, consider placing the cardboard round and the cake on a spinning pedestal, so it’s easier to manipulate as you decorate and frost the cake. When you’re ready to frost, scoop a dollop of cake frosting (about 1/3 cup), and use a knife or an offset spatula to evenly spread out the frosting on top of the cake.[18] [19] Place another cake layer on top of the frosting, with the cut off, leveled surface of the cake layer facing down. Again, use your spatula to spread out a thin layer of frosting on top of the cake.
- Keep stacking the layers of your cake until you place the final, rounded bowl cake layer on top. Once all the cake layers are “glued” together with the frosting, cover the entire cake with a preliminary crumb coat layer of frosting.
-
3Spread out a frosting crumb coat. Scoop up dollops of frosting, and spread them out all over the entire cake. Use your offset spatula to smooth out the frosting around the cake.[20] You could also try using a piece of paper to smooth out the crumb coat.
- Curve a piece of paper cut into an approximately 2-inch wide strip, and curve the paper to follow the shape of the cake.
- Place the piece of paper at the bottom of the cake, and tilt and draw the paper up the side of the cake to the top, so the paper drags along the cake frosting.[21]
- Wipe off any excess frosting on the side of the frosting bowl, and continue to smooth out the frosting around the rest of the cake.
-
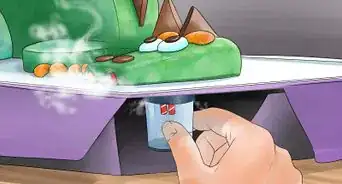
4Place the cake in the freezer. Place the frosted cake in the freezer for about 45 minutes to harden the crumb coat, and make it easier to add the final frosting layer on top of the crumb coat.[22]
-
5Spread the final coat of frosting on the cake. After the cake has had time to set in the freezer, continue to add frosting (one large dollop at a time) to the cake.[23] Use your offset spatula to evenly spread out the frosting all over the cake. Use gentle, steady, even strokes to distribute the frosting all around the cake with your offset spatula. Try to make sure there are no thin areas of the frosting that expose any cake base.
- You can use the same paper dragging method suggested to even out the crumb coat, to even out the final layer of cake. Simply curve a piece of paper at the base of the cake to match the cake curvature, hold the paper from the two bottom corners, and softly drag the edge of the paper over the frosting as you pull the paper up toward the top of the cake.
- Having the cake on a spinning pedestal as you add your final layer of frosting can really help make the application process easier. You can spin the pedestal as you keep your offset spatula still to create an even spread of frosting.
-
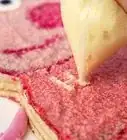
6Texturize the frosting. Along with the paper technique to smooth out the frosting, you can also use your spatula to create patterns in the frosting. Consider using the tip of your spatula to gently press into the frosting and create vertical lines along the cake or little swirl marks, mimicking dress fabric detailing.[24]

Finishing The Princess Cake
-
1Place the princess doll in the center of the cake. Undress the princess doll, or use plastic wrap to cover and protect the princess’ clothing. Lift up the doll’s arms so they don’t poke into the cake, and place the doll into the center of the cake.[25]
-
2Decorate the cake with frosting. If you have a couple of pastry bags and different shaped frosting tips, you can add and pipe frosting designs around the cake (which is now the dress of the princess) with different colored frosting.
- Consider adding frosting detail around the princess’ waist to cover up any imperfections.
- Always squeeze out a bit of frosting from your pastry bag to clear out any air pockets.[28]
-
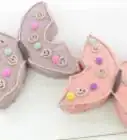
3Decorate the cake with candy. If you don’t have different colored frosting or pastry piping materials, you can simply use edible cake decorations and candy pieces to design and embellish the princess cake.[29]
- Consider using colored sugar sprinkles, jellybeans, or other small, decorative candies to accent the princess’ dress.
-
4Present the cake. Use your cleaned offset spatula to slide underneath the cardboard round, and transfer the princess cake onto to a clean serving platter a little larger than the size of the cake.
- Be very careful not to knock off or smear any frosting or decorations when transferring the cake.

Community Q&A
-
QuestionHow do I do this with a Betty Crocker cake mix?
 Community AnswerYou should follow the directions on the box, then follow the directions above.
 -
QuestionWhat is a preliminary crumb coat?Community AnswerA crumb coat is a thin layer of frosting to lock in the crumbs on your cake. After you apply this layer, refrigerate your cake. After a bit, take it out and put on your final layer. If you do not apply the crumb coat, you will have crumbs in the frosting.
Things You'll Need
- Cake pedestal
- Cardboard round
- Offset spatula
- Serrated knife
- Three, round 8-inch baking pans
- 8-inch wide ovenproof glass bowl
- Princess doll
References
- ↑ http://www.bettycrocker.com/videos/videolibrary/birthday-cakes/fairytale-princess-doll-birthday-cake
- ↑ http://www.bettycrocker.com/recipes/fairy-tale-princess-cake/994aa183-c7da-4b14-8435-7472c513feaf
- ↑ http://www.bettycrocker.com/videos/videolibrary/birthday-cakes/fairytale-princess-doll-birthday-cake
- ↑ http://www.bettycrocker.com/recipes/fairy-tale-princess-cake/994aa183-c7da-4b14-8435-7472c513feaf
- ↑ http://www.bettycrocker.com/videos/videolibrary/birthday-cakes/fairytale-princess-doll-birthday-cake
- ↑ http://www.bettycrocker.com/videos/videolibrary/birthday-cakes/fairytale-princess-doll-birthday-cake
- ↑ http://www.bettycrocker.com/videos/videolibrary/birthday-cakes/fairytale-princess-doll-birthday-cake
- ↑ http://www.bettycrocker.com/recipes/fairy-tale-princess-cake/994aa183-c7da-4b14-8435-7472c513feaf
- ↑ http://www.bettycrocker.com/recipes/fairy-tale-princess-cake/994aa183-c7da-4b14-8435-7472c513feaf
- ↑ https://www.youtube.com/watch?v=vwqaF8f3VW0
- ↑ http://www.bettycrocker.com/recipes/fairy-tale-princess-cake/994aa183-c7da-4b14-8435-7472c513feaf
- ↑ http://www.bettycrocker.com/recipes/fairy-tale-princess-cake/994aa183-c7da-4b14-8435-7472c513feaf
- ↑ https://www.youtube.com/watch?v=vwqaF8f3VW0
- ↑ https://www.howtocookthat.net/public_html/how-to-make-a-princess-cake-using-buttercream/
- ↑ http://www.kingarthurflour.com/recipes/quick-buttercream-frosting-recipe
- ↑ http://www.bettycrocker.com/recipes/fairy-tale-princess-cake/994aa183-c7da-4b14-8435-7472c513feaf
- ↑ http://www.completelydelicious.com/2011/02/how-to-build-a-layered-cake.html
- ↑ http://www.bettycrocker.com/recipes/fairy-tale-princess-cake/994aa183-c7da-4b14-8435-7472c513feaf
- ↑ https://www.youtube.com/watch?v=vwqaF8f3VW0
- ↑ https://www.youtube.com/watch?v=vwqaF8f3VW0
- ↑ https://www.youtube.com/watch?v=vwqaF8f3VW0
- ↑ https://www.youtube.com/watch?v=vwqaF8f3VW0
- ↑ https://www.youtube.com/watch?v=vwqaF8f3VW0
- ↑ https://www.youtube.com/watch?v=vwqaF8f3VW0
- ↑ http://www.bettycrocker.com/recipes/fairy-tale-princess-cake/994aa183-c7da-4b14-8435-7472c513feaf
- ↑ http://www.howdini.com/video/7075975/how-to-make-a-princess-cake
- ↑ https://www.youtube.com/watch?v=vwqaF8f3VW0
- ↑ https://www.youtube.com/watch?v=vwqaF8f3VW0
- ↑ https://www.youtube.com/watch?v=vwqaF8f3VW0
About This Article

To make a princess cake, start by pouring cake batter into 3 round pans and 1 ovenproof bowl. Bake the pans for around 25 minutes and bake the bowl separately for about 50 minutes at 325°F. Next, level off the tops and cut holes in the centers. After that, frost and stack each layer and then frost the whole cake. Freeze for 45 minutes, spread on the final coat, and texturize with a spatula. Finally, place a Barbie-sized doll in the center and decorate with designs and candy for the dress. For more tips, like how to do the best frosting techniques, read on!