This article was co-authored by wikiHow Staff. Our trained team of editors and researchers validate articles for accuracy and comprehensiveness. wikiHow's Content Management Team carefully monitors the work from our editorial staff to ensure that each article is backed by trusted research and meets our high quality standards.
There are 9 references cited in this article, which can be found at the bottom of the page.
The wikiHow Video Team also followed the article's instructions and verified that they work.
This article has been viewed 47,935 times.
Learn more...
If you have a guitar or music-lover in your family, surprise them with a guitar-shaped cake for their birthday. They are more unique than your standard round or rectangular cake, and are surprisingly easy to make. Once you bake a sheet cake, all you need to do is cut it in the shape of a guitar, then decorate it with buttercream frosting!
Ingredients
- 1 to 2 unfrosted sheet cakes
- 1 batch of desired cake filling (i.e. ganache, buttercream, whipped cream, etc.)
- 1 batch of buttercream frosting
- Fondant (optional, for details)
Steps
Cutting the Cake
-
1Cut a guitar shape out of poster paper in the size you want your cake. Guitars come in all sorts of shapes, so look up pictures online. Once you've decided on the shape of your guitar, sketch it out on a sheet of poster paper. Cut the guitar out once you’re done.[1]
- This will be your template, so make sure that it’s the same size you want your cake to be.
- Don’t worry about the details on the guitar, such as the sound hole, tuning pegs, and strings. Focus just on the outline.
-
2Bake a sheet cake large enough to fit the body of the guitar. Measure the height and width of the guitar body, sans neck and head, then find a baking pan that matches that size. Find a cake recipe that you like, then bake it using that pan.
- After you cut the guitar body out, you'll use the scraps to make the neck and head of the guitar. If you don’t think you’ll have enough, bake a second sheet cake.
- Use whatever recipe you want: chocolate, white, marble, etc. You could even use a boxed mix!
- The larger the baking pan is, the flatter the cake will be. If you want a taller cake, bake 2 sheet cakes. This way, you can stack them instead of cutting them in half.
Advertisement -
3Set the cake on a cake board, then place the template on top. Let the cake cool for about 10 to 15 minutes first, then slide it out of the pan. Set it on top of a cake board, then place the guitar body template on top.[2]
- A cake board is a large, thick sheet of cardboard typically covered in silver foil. You can find it in the baking section of a craft store.
- Don't worry about the neck and head of the guitar just yet. Place the template so that you'll have enough scraps to use for the neck and head.
-
4Cut around the template, then remove the scraps. Hold the template down with 1 hand while you use the other to cut around it. Remove the scraps so that you have just the body of the guitar left. Peel the template off as well.[3]
- If you made 2 sheet cakes for a taller cake, do this step twice, once for each cake layer.
-
5Cut the rest of the cake to create the neck and head. Depending on how much scrap cake you have leftover, you may need to cut the neck and head in several parts, which is fine. Just work with what you have and try your best.
- Eat the rest of the scraps or save them to make cake pops!
- Repeat this step if you made 2 sheet cakes for a taller guitar cake.

Filling and Frosting the Cake
-
1Slice the cake in half using a long knife, a cake slicer, or thread. Place your hand on top of the cake to hold it steady. Use your other hand to hold a knife parallel to the table and slice the cake in half. Carefully lift the top half of the cake and set it aside.[4]
- You're slicing the cake in half to create 2 thin cakes. Don't chop it in half lengthwise or widthwise.
- Skip this step if you baked 2 sheet cakes to make a tall guitar cake. You'll be stacking them together instead.
-
2Assemble the pieces to create your guitar shape. Move the guitar body towards 1 end of the cake board. Place the neck just above the guitar body, then add the head. Make sure that all of the pieces are touching.
-
3Coat the bottom layer of the cake with cake filling. Use whatever type of frosting or filling you want for this: ganache, buttercream, jam, etc. You can even add some sliced strawberries on top of frosting! Be sure to apply a nice, thick layer of frosting, from edge-to-edge.[5]
- If you baked 2 sheet cakes, coat the top of your first cake with frosting.
- The filling should be thick enough so that you can't see the texture of the cake beneath it. You should be able to tap it with a spatula and make peaks.
-
4Set the other half of the cake on top. If you baked 2 sheet cakes, then simply set the second sheet cake on top. Make sure that the edges and corners are aligned, then gently press down on the cake so that it sticks.[6]
- Don't press down so hard that the frosting gushes out. A light touch is all you need.
-
5Spread buttercream frosting over the top and sides of the cake. Prepare a batch of buttercream frosting, then use an oil-based food coloring to tint it the color you want. Use a cake decorating spatula to spread a thick layer of frosting across the top of the cake, then down the sides.
- Make sure that the cake has completely cooled before you do this, otherwise the frosting will melt.
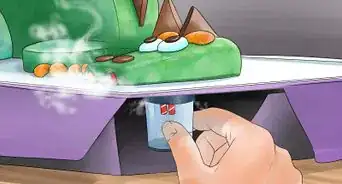
- If you’re having trouble frosting the cake, apply a thin coat of frosting first. Refrigerate the cake for 20 to 30 minutes, then apply the rest of the frosting.[7]
-
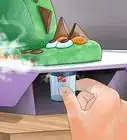
6Smooth the frosting with a paper towel after 15 to 20 minutes, if desired. Wait about 15 to 20 minutes for the frosting to develop a crust. Once that happens, place a smooth, pattern-less paper towel against the side, and smooth it down with your hand. Repeat this all over the top and sides of the cake until the frosting is all smoothed out.
- You don’t have to do this if your frosting is smooth enough or if you don’t want to.
- If the paper towel sticks to the cake, dust the paper towel with powdered sugar first.
Decorating the Cake
-
1Draw designs onto the frosting with toothpicks or cookie cutters. Think of this as creating a coloring book page. Use a large, round cookie cutter or glass to create the outline for the sound hole. Next, use a toothpick to sketch out details, like the fret and bridge.
- Don't worry about sketching out the strings. Draw the horizontal lines (fret) on the neck, however.
- Add "painted" designs onto your guitar with shaped cookie cutters. Use cookie cutters or toothpicks to indent these designs onto the body of the guitar.
-
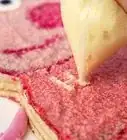
2Outline your sketched designs with colored buttercream frosting. Fit a piping bag with a small, round, decorator's tip, then fill the bag with your desired color of frosting. Pipe the frosting onto the outlines of your designs.
- Make the designs any color you want. Black is a good color for the sound hole, however.
- Don't worry about the strings yet. Pipe the fret, however. Black or white are good options.
-
3Fill the outlines in with more frosting, then smooth the frosting out. Switch out the small round tip for a larger one. Pipe the frosting into your outlines, then use a cake decorating spatula to smooth out any bumps or ridges.
- Use the same color of frosting for the filling as for the outline. For example, if you outline the sound hole in black, use black for the filling.
- Consider adding outer details, like painted flowers.
-
4Create the strings using white frosting. Fit a piping bag with a small, round decorator's tip, then fill it with white buttercream frosting. Pipe the frosting onto the neck and head in long, straight, vertical lines. Extend these lines past the sound hole and onto the bottom bridge.
- Alternatively, cut long pieces of floral wire and use those instead. Remember to remove these before serving the guitar, however.[8]
-
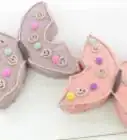
5Create tuning keys out of fondant, then add them to the head. Sculpt 6 tuning keys using fondant, then stick them onto toothpicks. Let the fondant dry, then push the toothpicks into the top (head) of the guitar. Place 3 keys on each side of the head.[9]
- Look up pictures of guitar keys online to get an idea of what they should look like. Most keys look a little like flattened ovals.
- White, black, or gray fondant is a great choice for this. You can also tint the keys silver with cake decorating dust.
- Alternatively, pipe the keys directly onto the cake board to either side of the head.
Things You'll Need
- Cake recipe or boxed mix
- Cake board
- Cake pans
- Long, thin knife
- Piping bags
- Decorating tips
- Cake decorating spatula
- Toothpicks
- Cookie cutters
References
- ↑ https://www.youtube.com/watch?v=Ctc_Pl9MOZM
- ↑ https://www.youtube.com/watch?v=Ctc_Pl9MOZM&t=25s
- ↑ https://www.youtube.com/watch?v=Ctc_Pl9MOZM&t=30s
- ↑ https://www.youtube.com/watch?v=Ctc_Pl9MOZM&t=1m14s
- ↑ https://www.youtube.com/watch?v=Ctc_Pl9MOZM&t=1m30s
- ↑ https://www.youtube.com/watch?v=Ctc_Pl9MOZM&t=1m45s
- ↑ https://www.craftsy.com/cake-decorating/article/how-to-crumb-coat-a-cake/
- ↑ https://www.youtube.com/watch?v=Xzn3tqRd-8g&t=7m2s
- ↑ https://www.youtube.com/watch?v=Xzn3tqRd-8g&t=6m33s
About This Article