This article was co-authored by wikiHow Staff. Our trained team of editors and researchers validate articles for accuracy and comprehensiveness. wikiHow's Content Management Team carefully monitors the work from our editorial staff to ensure that each article is backed by trusted research and meets our high quality standards.
There are 9 references cited in this article, which can be found at the bottom of the page.
wikiHow marks an article as reader-approved once it receives enough positive feedback. In this case, 95% of readers who voted found the article helpful, earning it our reader-approved status.
This article has been viewed 42,719 times.
Learn more...
Cakes have been a traditional treat for celebrating birthdays and other life events for years. While people have been practicing the art of cake decorating for hundreds of years, this art is becoming more and more creative. One unique way to decorate a cake is to make it into a volcano, and the fun thing about a volcano cake is that you can use dry ice to make it smoke!
Ingredients
Mud Cake
- 1 cup (227 g) unsalted butter
- ¾ cup plus 2 tablespoons (198 grams) dark chocolate, chopped
- 2 cups (450 g) sugar
- ½ cup (59 g) cocoa powder
- 1¼ cups (296 ml) strong hot coffee
- 1 tablespoon (15 ml) vanilla extract
- 3 large eggs
- 2 cups (250 g) all-purpose flour
- 1 teaspoon (4 grams) baking powder
- 1½ teaspoons (7.5 grams) baking soda
- ½ teaspoon (3 grams) salt
Chocolate Buttercream Frosting
- 2 cups (454 g) salted butter, softened
- 2 tablespoons (30 ml) of vanilla
- 8 cups (1 kg) icing sugar
- 1½ cups (177 g) cocoa powder
- 2 to 4 tablespoons (30 to 60 ml) milk
Piping Gel
- ½ cup (119 ml) cold water
- ½ cup (56 g) corn starch
- 1 cup (237 ml) light corn syrup
- Red food coloring
Steps
Making the Cake and Frosting
-
1Gather your equipment. To make a volcano cake, you will need a few different supplies, including three greased cake pans: one 10-inch, one eight-inch, and one six-inch. Mud cake is one of the best types of cake for this project, because it’s less delicate than a sponge cake, and will hold its shape better. To make the volcano cake, you'll also need:
- Oven preheated to 350 F (177 C)
- Small saucepan and a medium glass bowl
- Large mixing bowl
- Whisk
- Electric beaters
- Rubber spatula or spoon
- Three wire cooling racks
- Round cookie cutter, about three inches in diameter
- Knife
- Frosting knife
- Plastic shot glass
- Tongs
- Dry ice and water
-
2Melt the butter and chocolate. Fill the bottom of a saucepan with an inch (2.5 cm) of water. Place the glass bowl on top of the saucepan, making sure the water doesn’t touch. Add the butter and chocolate. Heat the mixture over medium heat.
- Whisk the butter and chocolate as they melt, and then whisk vigorously for about 30 seconds until they are completely incorporated.[1]
Advertisement -
3Mix in the sugar and cocoa. Remove the saucepan from the heat and place the bowl on a heat-proof surface. Add the sugar and cocoa, and whisk the mixture to fully combine all the ingredients.
- Make sure there are no lumps in the mixture, and whisk until it’s smooth.
-
4Add the wet ingredients. Add the hot coffee in thirds, whisking in each addition until combined before adding more coffee. When you add the final third of coffee, whisk in the vanilla as well. Finally, add the eggs, beating them in one at a time.
- Whisking in the ingredients separately like this will help ensure a smooth and moist cake, because it will help incorporate air into the batter.
-
5Combine the dry ingredients. Whisk together the flour, baking powder, baking soda, and salt in a large mixing bowl. Whisk for about 30 seconds to remove lumps and stir air into the ingredients.[2]
- Adding air to the mixture will help ensure the cake is light and not too dense.
-
6Add the chocolate mixture to the dry ingredients. Place the electric beaters into the bowl with the dry ingredients. Turn the beaters on low, and slowly pour in the chocolate mixture. After a minute, increase the speed to medium-high and beat for one minute.
- After a minute, stop the mixer. Scrape down the sides of the bowl with the rubber spatula, and then beat the batter again for another 30 seconds on medium speed.
-
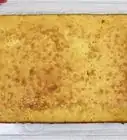
7Bake the cakes. Divide the batter among the three greased cake pans, filling each pan about three-quarters full. Mud cake doesn’t rise as much as regular cake batter, so you can fill the pans a little more. Bake the cakes for 35 to 40 minutes.
- You know the cakes are ready when a toothpick inserted into the center comes out clean, or with a few fudge-covered crumbs attached.[3]
-
8Cool the cakes. Remove the cakes from the oven and let them rest in the cake pans for 10 minutes. Then turn them out onto wire cooling racks, and allow them to cool completely before assembling and frosting the volcano cake.[4]
- The cakes should be room temperature before you start frosting them, otherwise the frosting will melt off.
-
9Make the frosting. Combine the butter, vanilla, icing sugar, cocoa powder, and 2 tablespoons (30 ml) of the milk in a medium mixing bowl. Beat everything with electric beaters for three to four minutes, until the frosting is light, creamy, and smooth.
- If the frosting is too dense and thick, add another tablespoon of milk and beat for another minute. Add the fourth tablespoon if necessary
- When ready, the frosting will be light and easily spreadable.


Assembling the Volcano
-
1Cut a hole for the lava. Take the smallest cake (the six-inch) and position the round cookie cutter in the very center of the cake. Press down as far as you can, and then twist the cookie cutter as you pull upward. This will remove the center of the cake.
- The hole in the center of the cake will be used as a reservoir for the lava, and it will also hold the shot glass containing the dry ice.
-
2Assemble the cake layers. Place the large 10-inch cake on a cake plate or serving platter. Use the frosting knife to cover the top with a generous and even layer of buttercream frosting. Place the medium eight-inch cake on top of it, centering it on the larger cake. Spread a layer of frosting on the top of the medium cake.
- Finally, place the smallest cake on top of the medium cake, making sure the hole in the middle of the cake is at the center of the volcano.
-
3Shave down the sides. Because there's a two-inch difference in the diameter of the cakes, the volcano would be jagged if you frosted it as is. To make the volcano smooth, use a knife to shave the excess off the sides of the cake, making a smooth transition between the layers.[5]
- When you're done, the cake should look like a smooth cone without the pointed top.


Decorating the Cake
-
1Make the piping gel. Piping gel is often used as an edible glue for baking, but in this recipe, it will be used to create the lava for the volcano. In a small saucepan, whisk together the cornstarch and water until there are no lumps. When the mixture is smooth, whisk in the corn syrup. Bring the mixture to a boil over medium heat, stirring regularly. Boil the gel for two to three minutes, and the mixture will take on the consistency of gel.[6]
- Remove the pan from the heat and whisk in 10 drops of red gel food coloring. If necessary, whisk in another 10 drops, until the gel is a deep and bright red.
- Set the gel aside to cool.
-
2Give the cake a crumb coat. Use the frosting knife to cover the entire outside of the cake with a generous layer of frosting. Spread the frosting in an even layer, and smooth it down with the knife.
- Place the cake in the fridge for about an hour to let the frosting set. This crumb coat will trap any crumbs, and make the final layer of frosting smooth and even.
-
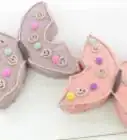
3Frost the cake. When the crumb coat has had time to set, remove the cake from the fridge. Apply a second layer of frosting to the cake, making sure it’s evenly distributed over the whole cake. Because it’s a volcano cake, you don’t actually have to worry about the frosting being smooth.[7]
- To give the volcano some definition, use the butt end of a knife to carve some vertical curved lines into the frosting. This will replicate the jagged and uneven lines of rocks.
-
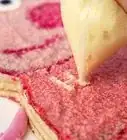
4Add the lava. Pour the red piping gel into the hole in the center of the top cake. If the reservoir fills up, let the excess run down over the outside of the volcano like lava.[8]
- If there isn't enough gel to fill the reservoir, use a spoon to drizzle extra lava over the sides.
-
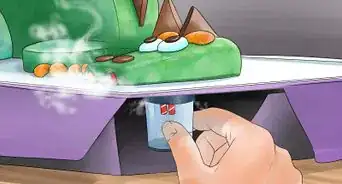
5Activate the dry ice right before serving. Just before serving the cake, use tongs to fill the shot glass half full with dry ice. Place the shot glass into the center of the lava reservoir.[9] Pour in enough hot water to make the dry ice create smoke.[10]
- For an extra fiery effect, use sparklers instead of candles on the volcano cake.


Community Q&A
-
QuestionWhat size cake pan should I use?
 Community AnswerIt depends on how shallow or deep you want your cake to be.
 -
QuestionDo I freeze the cake before carving it?
 Community AnswerA frozen cake would be very difficult to carve. I do recommend letting the cake sit for at least an hour after it comes out of the oven before you slice it, to let it set.
 -
QuestionIs there any way to make it explode without using dry ice? I'm doing this for a school project, and they think that dry ice is too dangerous for students to bring to school.Community AnswerThey are right to not want general messing about with dry ice, so that's a plus! You could instead use a mixture of baking soda and vinegar or put a cup of boiling water inside the cake to create steam. For each case, cut a round hole in the cake's middle to fit the cup, then add the soda/vinegar or hot water inside the cup and place the cup into the center of the cake just at the moment it is needed to be placed out on display. Use raspberry or strawberry jam for the lava running down the sides.


References
- ↑ http://www.cakepaperparty.com/2014/02/american-mud-cake/
- ↑ http://www.cakepaperparty.com/2014/02/american-mud-cake/
- ↑ http://www.chelsea.co.nz/browse-recipes/chocolate-mud-cake-chocolate-ganache-icing/
- ↑ http://www.bestrecipes.com.au/recipe/easiest-mud-cake-L2918.html
- ↑ https://www.youtube.com/watch?v=brMTHzcLsKc
- ↑ http://www.craftsy.com/blog/2015/06/how-to-make-piping-gel/
- ↑ http://www.foodnetwork.com/recipes/volcano-cake-recipe.html
- ↑ https://www.youtube.com/watch?v=kD7egzgNWQg
- ↑ https://www.youtube.com/watch?v=ogh8yqKUdtc
About This Article