This article was co-authored by wikiHow Staff. Our trained team of editors and researchers validate articles for accuracy and comprehensiveness. wikiHow's Content Management Team carefully monitors the work from our editorial staff to ensure that each article is backed by trusted research and meets our high quality standards.
The wikiHow Video Team also followed the article's instructions and verified that they work.
This article has been viewed 27,293 times.
Learn more...
A Minnie Mouse cake can be a cute addition to a child's birthday party, especially one that's Disney-themed. The process can be a little time consuming and usually takes two days to complete as you need to let your cakes cool overnight. However, after assembling and decorating your cake, you will have an adorable baked good for a party.
Ingredients
Cake Batter
- 2 cups (475 mL) sugar
- 1 cup (240 mL) butter
- 2 large eggs
- 2 teaspoons (10 mL) fresh lemon juice
- 1 teaspoon (5 mL) vanilla
- 2 1/2 (595 mL) cups cake flour
- 1/2 teaspoon (2.5 mL) baking soda
- 1 cup (240 mL) buttermilk
Buttercream Frosting
- 4 cups (950 mL) of powdered sugar
- 1 cup (240 mL) butter
- 3 teaspoons (15 mL) of vanilla
- 2 tablespoons (30 mL) of milk
Chocolate Frosting
- 2 and 3/4 cups (655 mL) confectioners' sugar
- 6 tablespoons (90 mL) unsweetened cocoa powder
- 6 tablespoons (90 mL) butter
- 5 tablespoons (75 mL) evaporated milk
- 1 teaspoon (5 mL) of vanilla extract
Steps
Making Your Batter
-
1Beat the sugar and butter on medium speed. Place your butter and sugar in a mixing bowl. Using an electronic mixer set to medium speed, beat the sugar and butter together. Keep beating the mixture until it's smooth, creamy, and even.[1]
-
2Beat in the eggs one at a time. Beat in each egg, keeping the mixer at medium speed. Beat each egg into the batter until it is smooth and uniform throughout.[2]Advertisement
-
3Beat in the lemon juice and vanilla. Measure out your lemon juice and vanilla. Add this to your mixture. Again using medium speed, beat in the vanilla and lemon juice until you have a smooth, even mixture.[3]
-
4Mix the flour and baking soda in a separate bowl. In a small mixing bowl, add your flour and baking soda. Use a fork or wire whisk to mix the dry ingredients together until everything's even.[4]
-
5Alternate adding small amounts of the dry ingredients and buttermilk. Measure out your buttermilk. Add a small amount of flour to the mixture and beat it in with the electronic mixer until it's completely incorporated in the dough. Then, beat in a small amount of the buttermilk until it's fully incorporated as well. Continue this pattern until everything is mixed together in an even, consistent mixture.[5]
-
6Repeat the process but halve the ingredients. After making your batter, repeat this process from start to finish exactly as you did before. However, use half the amount of each ingredient.
- You will use this to make a smaller cake later, so keep this portion separate from the other batter.
Baking the Cakes
-
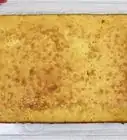
1Fill one 9 by 13 inch (23 by 33 cm) cake tray. Spray down the tray on the bottom and all sides with a non-stick spray. Take the first batch of batter you made. Transfer this batter to your cake tray.
-
2Pour the remaining batter into a circular glass pie tin. Use the batter you made with the ingredients halved. Pour this into a glass pie tin, greased with either butter of a nonstick spray. This will be Minnie's head.
- If you have leftover batter, you can use it to make cupcakes.
-
3Bake both cakes 350 °F (177 °C) for 30 to 35 minutes. Place your pans in the oven. Bake the cake for 30 to 35 minutes. When the cakes are done, the tops should spring back up when pressed down. If you stick a fork or toothpick in center of either cake, it should come out clean.[6]
-
4Remove the cakes from the trays. Run a knife along the side of each cake. One at a time, flip the cake tray over onto a tray or plate big enough to contain the cake.
-
5Let the cakes cool overnight. Keep the cakes covered in aluminum foil or plastic wrap. Let them cool on the counter or in a pantry overnight.
- If you're making the cake on the same day, let it cool to room temperature before frosting it. Times vary depending on the heat of your kitchen, but it will generally take an hour or more.[7]


Making the Frosting
-
1Measure out your buttercream frosting ingredients. Take a large mixing bowl. Measure out all the buttermilk frosting ingredients and place them in a bowl.
-
2Beat your buttermilk frosting on high or medium speed. Use an electronic mixer on high or medium speed. Beat your buttermilk frosting ingredients until you have a smooth, creamy frosting.
- Set this frosting aside for now.
-
3Sift your cocoa powder and confectioner's sugar. In a small mixing bowl, mix together the confectioner's sugar and cocoa powder you're using for the chocolate frosting. Set this aside for now.[8]
-
4Cream the butter. Place your butter in a large mixing bowl. Use your electronic mixer to beat the butter until it's smooth and creamy.[9]
- For best results, use room temperature butter.
-
5Add the sugar mixture and evaporated milk. Add a small amount of the sugar/cocoa powder mixture. Beat it in with the electronic mixer. Then, add a small amount of evaporated milk and beat it in. Continue this pattern until all the evaporated milk and sugar mixture are incorporated into the frosting.[10]
-
6Add the vanilla. Add your vanilla to the mixture. Beat your ingredients together until you have a thick, creamy chocolate frosting.[11]
Assembling the Minnie Cake
-
1Use a pie tin to cut two circles out of the rectangle cake. Place a pie tin on one side of the 9 x 13 inch (23 x 33 cm). Run a knife around the corners of the pie tray to cut out one circle. This is one of Minnie's ears. Then, cut out a second circle the same way, leaving a small gap of cake between the two circles. This is Minnie's second ear.
- Make sure the pie tin you use is slightly smaller than the circular cake, as the circles are Minnie's ears.
-
2Place your ears by Minnie's head. Remember, the circular cake is Minnie's head. Carefully transfer the two small circles you just cut out to the same tray as the circular cake. Place the ears on either side of Minnie's head.
-
3Cut out your bow. Use the remaining 9 inches (23 cm) by 13 inches (33 cm) cake to cut out a bow. You can cut out the bow freehand or cut out a template first using cardboard paper. To make the bow, cut out two triangle-shaped pieces of cake and one small circular piece of cake.
-
4Assemble the bow between Minnie's ears. Place the small circle between Minnie's ears. Then, add your triangles on either side of the circle with the pointed ends of the triangles touching the circle. When they're done, there should be a bow shape between Minnie's ears.


Frosting the Cake
-
1Frost the ears with chocolate icing. Use a knife from your kitchen to gently brush the ears with chocolate frosting. Cover the ears completely, including the sides, with frosting.
-
2Make a hairline with chocolate frosting. Use a picture of Minnie as a reference. Draw a hairline on Minnie using your chocolate frosting. Frost on a thin semi-circle shape with the base near Minnie's ears.
-
3Divide your buttercream icing into three bowls. Take three bowls of roughly even size. Separate your buttercream frosting so you have a more or less even amount in each bowl.
-
4Add food coloring to two of the bowls of frosting. Add one to two drops of red food coloring to one bowl and mix it into the frosting to create a mild pink hue. Then, mix in three to four drops of red food coloring to the second bowl to create a darker shade of pink.
-
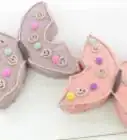
5Frost the bow in dark pink. Frost Minnie's bowl in the dark pink colored frosting. Frost both the top and sides of the bow.
-
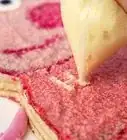
6Cover the remainder of the cake with your light pink frosting. Any cake that's unfrosted should now be coated with light pink buttercream frosting. Coat the surface and sides of the cake in frosting.
-
7Draw on her mouth. Use a butter knife for the most precision. Use the chocolate frosting to draw a semi-circle towards the bottom of Minnie's face. Then, add a heart-shaped tongue using the dark pink frosting.
-
8Add the eyes. Use a butter knife again for precision. Make two ovals just above the mouth and near the hair line with the white buttercream frosting. Then, add two smaller black ovals inside the white ovals with your chocolate frosting. Use your chocolate frosting to add three triangle-shaped eyelashes on top of either eye.
-
9Draw on the nose. Between the mouth and eyes, make a round, sideways oval. This is Minnie's nose. Your cake is now complete.
-
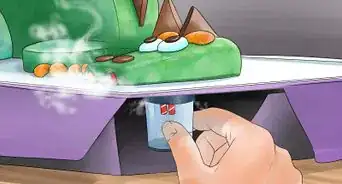
10Cover the cake until it's time to cut it. Cake can be kept at room temperature for four to five days. Use a cake keeper or overturned bowl to protect the cake and keep it stored somewhere safe in your kitchen until it's time to eat.[12]


References
- ↑ http://www.myrecipes.com/recipe/graduation-cake
- ↑ http://www.myrecipes.com/recipe/graduation-cake
- ↑ http://www.myrecipes.com/recipe/graduation-cake
- ↑ http://www.myrecipes.com/recipe/graduation-cake
- ↑ http://www.myrecipes.com/recipe/graduation-cake
- ↑ http://www.myrecipes.com/recipe/graduation-cake
- ↑ http://www.thekitchn.com/why-you-should-chill-your-cake-before-frosting-230667
- ↑ http://allrecipes.com/recipe/26019/creamy-chocolate-frosting/
- ↑ http://allrecipes.com/recipe/26019/creamy-chocolate-frosting/
About This Article

After you've made 2 batches of batter for your Minnie Mouse cake, fill a baking tray with the larger batch and pour the smaller batch into a pie tin to create Minnie's head. Place both in the oven and bake for 35 minutes at 350 degrees F. When the cakes are done, cut 2 circles out of the rectangular cake for the ears. Finish by placing the two circles on either side of the circular cake, before cutting 2 triangles and another circle out of the rectangle so you can make a bow between Minnie's ears. For tips on how to decorate your Minnie Mouse cake, including by using chocolate frosting, read on!