X
wikiHow is a “wiki,” similar to Wikipedia, which means that many of our articles are co-written by multiple authors. To create this article, 17 people, some anonymous, worked to edit and improve it over time.
The wikiHow Video Team also followed the article's instructions and verified that they work.
This article has been viewed 184,304 times.
Learn more...
Do you want to know how to make a basic origami diamond? If you follow these steps correctly, then you will have an origami diamond neat and correctly folded! This model was designed by Jeremy Shafer and taught on his YouTube channel JeremyShaferOrigami
Steps
-
1Get out a square piece of paper. It can be any kind of paper, though origami paper is best.
-
2Fold the paper from left to right or right to left. Crease the fold, then unfold the paper.Advertisement
-
3Fold the paper again, but this time from top to bottom, or bottom to top. Crease the fold, then unfold the paper. The paper should be split into quarters.
-
4Flip the paper. Then make a diagonal fold, bringing the bottom right corner of the paper to the top left corner of the paper. Crease the fold, then unfold the paper.
-
5Make another diagonal fold, this time bringing the bottom left corner of the paper to the top right corner of the paper. Crease the fold, then unfold the paper.
-
6Make sure your paper is now split into triangles. There should be eight total triangles, and 2 triangles in each fourth of the paper. Anyway, there should be a fold starting from the left side of the paper all the way to the right side of the paper. Not a vertical line, not a diagonal line, but a horizontal line. It doesn't matter which way you place the paper. There should be a line from exactly left to right on the paper. If you didn't crease hard enough, you may have trouble identifying this line. But if you creased correctly, this line should be easy to spot.
-
7Once you have found this line, you should also find a line going up and down, splitting the line in half, so there should be a left part and a right part to the horizontal line. Next, bring both parts of the horizontal line together, forming a 3D figure.
-
8Identify the two triangles on your paper. Push one of the triangles down on a flat surface, then bring the top triangle down on the bottom triangle. Keep on pushing until both triangles come together into one triangle. You should not be able to push the top triangle further down into the bottom triangle.
-
9Notice that the paper has two flaps. Well, you are going to make more flaps! Before you make more flaps, you should see a crease in the center of the triangle, giving a right part and a left part to the triangle. Get hold of the right part of the flap, then fold up that flap to meet the crease in the center. After that, get hold of the left part of the flap, then fold that flap to meet the crease in the center.
-
10Flip the paper over, then repeat the previous step.
- You should have a basic diamond shape right now, but there are still more steps.
-
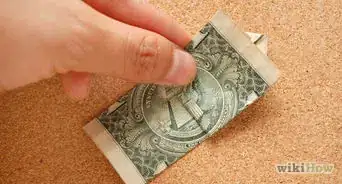
11Find the two Side flaps on one side of the diamond and fold them into the middle.
-
12Flip the diamond over and repeat step 11.
-
13Flip the paper over, and repeat the last two steps. This time, use the second part of the diamond instead of the first part of the diamond.
-
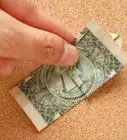
14Flip the "diamond" upside down and notice the two pockets on each side of the "diamond". Extend the pockets with your fingertips, then notice the two flaps on each side of the diamond at the very top of the diamond. Slide each of the flaps at the very top of the diamond into each of the pockets.
-
15Flip the paper over, then repeat the previous step again.
-
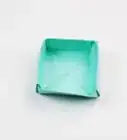
16Blow gently into the bottom of the diamond, extending the top. Make sure you keep the flaps down with your fingers because sometimes if you don't tuck the flaps in very well, the flaps might come out and you may have to start over.
-
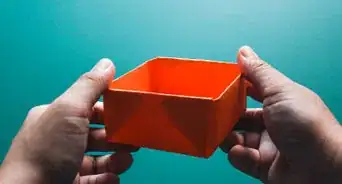
17Finished.


Advertisement
Community Q&A
-
QuestionWhat are the materials?
 Community AnswerThe only material needed is simply some origami paper, or any paper cut into a square.
 -
QuestionDo I have to crease them really well?
 Community AnswerIt's your choice, but making good creases will improve the quality of your finished work.
 -
QuestionWhere do I put the flaps for the origami diamond in step 14?Community AnswerTuck it into the little flaps. It's in the shape of a kite; the tip of the structure is where you'd tuck it inside.
Advertisement
Warnings
- Make sure you don't turn the paper upside down when bringing the flaps up to the center of the paper because if you do, you won't have any "pockets" to tuck the flaps into when the time comes.⧼thumbs_response⧽
- When blowing to extend top of diamond, make sure you blow gently or else the paper might puff up too much, unfolding everything so you'd have to start over.⧼thumbs_response⧽
Advertisement
About This Article
Advertisement


-Step-19-Version-4.webp)