This article was co-authored by wikiHow staff writer, Travis Boylls. Travis Boylls is a Technology Writer and Editor for wikiHow. Travis has experience writing technology-related articles, providing software customer service, and in graphic design. He specializes in Windows, macOS, Android, iOS, and Linux platforms. He studied graphic design at Pikes Peak Community College.
This article has been viewed 5,473 times.
Learn more...
Do you want to get a higher frame rate on your computer monitor without having to buy an expensive gaming monitor? Having a higher frame rate can give you a competitive edge in online gaming. Plus it makes the motion look smoother. Luckily most monitors can be overclocked by at least a little. The amount you are able to overclock your monitor depends on the capabilities of your monitor. Your hardware may also affect how much you are able to overclock your monitor. You can overclock your monitor using the Nvidia, AMD, or Intel settings. You can also use a third-party tool called Custom Resolution Utility. This wikiHow article teaches you how to overclock your monitor.
Steps
Using an Nvidia Graphics Card
-
1Open your Nvidia Control Panel. To do so, simply right-click your desktop and click Nvidia Control Panel. Alternatively, you can click the Windows Start menu and type "Nvidia" and click the Nvidia Control Panel app.
-
2Click Change Resolution. It's the first option below "Display" in the menu panel to the left.Advertisement
-
3Click Customize. It's the button at the bottom of the page. This displays a list of any custom displays that have been created.
-
4Click the checkbox next to "Enable resolutions not exposed by the display". It's the checkbox below the box that contains a list of custom displays. This allows you to set any resolutions and frame rates that are not part of the standards set by your monitor's manufacturer.
-
5Click Create Custom Resolution. It's the button at the bottom of the pop-up panel. This displays a legal disclaimer.
-
6Read the legal disclaimer and click Accept. The legal disclaimer informs you that you are enabling a utility that allows you to operate your monitor outside the manufacturer's design specifications. Some of these features may cause damage to your monitor, computer or BIOS and/or void your warranty. Nvidia does not offer support for this utility, and you are using it at your own risk.
- Is it safe to overclock your monitor? It's pretty rare that overclocking your monitor causes any permanent damage to your monitor or computer. However, it can reduce the life span of your monitor, as well as void your warranty. [1]
-
7Increase the refresh rate. Use the box next to "Refresh Rate (Hz)" to enter a new custom refresh rate. The refresh rate corresponds to the number of frames per second. 60 Hz is equal to 60 frames per second.
- It is recommended that you increase your refresh rate in increments of 5 and then test to see if your monitor can handle the refresh rate. If it can, increase it further. If it cannot, reduce the refresh rate by increments of 1 until you find the exact refresh rate your monitor is able to handle.
-
8Click Test. It's in the lower-right corner. This tests to see if your monitor can handle the new refresh rate.
- If your monitor is able to handle the refresh rate, you will see a pop-up informing you the test was successful and asking if you want to save the custom display. If your monitor cannot handle the new refresh rate, your monitor will go blank for about 20 seconds before reverting back to the previous setting.
- Generally, a 60 Hz monitor can push anywhere between 70 - 80 Hz.
-
9Click Yes. If the test was successful, you will see a pop-up asking if you want to save the resolution. Click Yes to save the resolution.
-
10Click Ok. You should see your new custom resolution in the list of custom resolutions. Ensure there is a checkmark next to your custom resolution and click Ok.
-
11Select your preferred refresh rate and click Apply. Use the drop-down menu below "Refresh rate" to select your preferred refresh rate. It's in the "Change Resolution" menu in the Nvidia Control Panel. Then click Apply to apply the new refresh rate.[2]


Using an AMD Graphics Card
-
1Open the AMD Radeon Settings app. To do so, right-click your desktop and click AMD Radeon Settings. Alternatively, you can click the Windows Start menu and type "AMD". Then click the AMD Radeon Settings app.
- Is it safe to overclock your monitor? It's pretty rare that overclocking your monitor causes any permanent damage to your monitor or computer. However, it can reduce the life span of your monitor, as well as void your warranty.
-
2Click Display. It's the fourth tab at the top of the AMD Radeon Settings app.
-
3Click + Create next to Custom Resolution. It's the last option at the bottom of the menu. Click Create on the far right side.
-
4Change the refresh rate and click Save. Locate the box that says "Refresh Rate (Hz)" and enter a new refresh rate. Then click Save in the upper-right corner. The refresh rate corresponds to the number of frames per second. 60 Hz is equal to 60 frames per second.
- It's recommended that you increase the refresh rate in increments of 5 and then test it to see if your monitor can handle the new refresh rate.
-
5Open your Windows Display Settings. To do so, simply right-click on your desktop and click Display Settings. Alternatively, you can use the following steps to open the Display Settings in your Windows Settings.
- Click the Windows Start icon.
- Click the Gear/Settings icon.
- Click System.
- Click Display.
-
6Click Advanced display or Advanced display settings. It's near the bottom of the display menu. If you are using Windows 10, it's the small text that says "Advanced display settings". If you are using Windows 11, it's the large button that says "Advanced display."
-
7Click Display adaptor properties for Display 1. It's at the bottom of the menu. This opens the adaptor properties for your monitor.
- On Windows 11, you can just use the drop-down menu next to "Refresh Rate" to select your preferred refresh rate.
-
8Click the Monitor tab. It's the second tab at the top of the Properties menu.
-
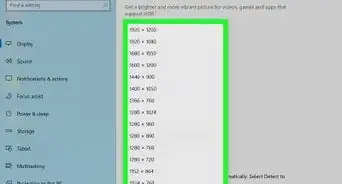
9Select your preferred refresh rate. Use the drop-down menu below "Screen refresh rate" to select your preferred refresh rate.
-
10Click Apply. This applies the new refresh rate. If your monitor is able to handle the new refresh rate, it will continue on as normal, but with a higher refresh rate. If your monitor is not able to handle the new refresh rate, it will go black for about 20 seconds before reverting back to the previous settings.
- If your monitor is not able to handle the new refresh rate, scale it back by just a little and try again. Figure out the exact frame rate your monitor is able to handle.


Using an Intel Graphics Card
-
1Open the Intel HD Graphics Control Panel. To do so, right-click your desktop and click Intel Graphics Settings. Alternatively, you can click the Windows Start menu and type "Intel." Then click the Intel HD Graphics Control Panel app.
- Is it safe to overclock your monitor? It's pretty rare that overclocking your monitor causes any permanent damage to your monitor or computer. However, it can reduce the life span of your monitor, as well as void your warranty.
-
2Click Display. It's the first button on the right. It has an icon that resembles a laptop and a computer monitor.
-
3Click Custom Resolution. It's the last option in the panel to the left.
-
4Change the refresh rate. Enter the new refresh rate in the box next to "Refresh rate." The refresh rate corresponds to the number of frames per second. 60 Hz is equal to 60 frames per second.
- It is recommended that you increase the refresh rate by increments of 5 and test it to see what your monitor can handle.
-
5Click Add. It's in the lower-right corner. This applies the new refresh rate. If your monitor is able to handle the refresh rate, it should change immediately. If it cannot handle the new refresh rate, your screen will go black for about 20 seconds before reverting back to the previous settings.[3]
- If your monitor cannot handle the new refresh rate, it is recommended that you dial it back in increments of 1 and try again to see exactly how many frames per second your monitor can handle.


Using Custom Resolution Utility
-
1Download Custom Resolution Utility. Custom Resolution Utility (CRU) is a third-party tool that allows you to create a custom resolution on nearly any Windows computer. Use the following steps to download CRU.
- Go to https://www.monitortests.com/forum/Thread-Custom-Resolution-Utility-CRU in a web browser.
- Click cru-1.5.1.zip at the top of the page next to "Download."
- Open the CRU ZIP file in your Downloads folder or web browser.
- Copy the contents of the ZIP folder to a location you can remember.
-
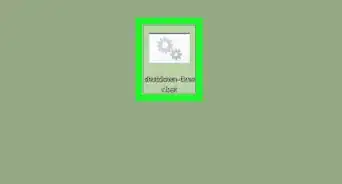
2Open the "CRU.exe" file. It'll be in the location you extracted the ZIP file contents to. This opens CRU.
- Is it safe to overclock your monitor? It's pretty rare that overclocking your monitor causes it any permanent damage to your monitor or computer. However, it can reduce the life span of your monitor, as well as void your warranty.
- If you receive a message informing you that Windows Defender prevented you from running an unrecognized app because it might put your PC at risk, simply click More Info. Then click Run Anyway.
- The first time you run CRU, you will be asked if you want to allow the program to make changes to your system. Click Yes to continue.
-
3Click Add below "Detailed resolutions." This allows you to create a new custom resolution.
- If you want to edit an existing custom resolution, click Edit instead.
-
4Enter a new refresh rate. It's the first option below "Frequency." Enter a new refresh rate in the box next to "Refresh Rate." The refresh rate corresponds to the number of frames per second. 60 Hz is equal to 60 frames per second.
- It's recommended that you increase the refresh rate in increments of 5 and then test it to see if your monitor can handle the new refresh rate.
-
5Click Ok. This saves the new custom resolution.
-
6Move the new custom resolution to the top of the list. To do so, click the new custom resolution to select it. Then click the up arrow below the list of resolutions to move it to the top. This makes the new custom resolution the priority resolution.
-
7Reset your graphics drivers. To do so, click the "Restart64.exe" file in the folder you extracted the contents of the CRU ZIP file to. Your screen should blink a couple of times. This indicates your graphics drivers have been reset.
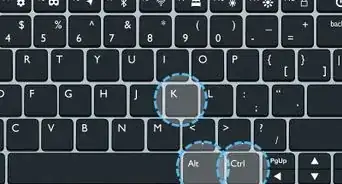
- Alternatively, you can reset your graphics drivers by pressing "Windows Key + Ctrl + Shift + B".
-
8Open your Windows Display Settings. To do so, simply right-click on your desktop and click Display Settings. Alternatively, you can use the following steps to open the Display Settings in your Windows Settings.
- Click the Windows Start icon.
- Click the Gear/Settings icon.
- Click System.
- Click Display.
-
9Click Advanced display or Advanced display settings. It's near the bottom of the display menu. If you are using Windows 10, it's the small text that says "Advanced display settings". If you are using Windows 11, it's the large button that says "Advanced display."
-
10Click Display adaptor properties for Display 1. It's at the bottom of the menu. This opens the adaptor properties for your monitor.
- On Windows 11, you can just use the drop-down menu next to "Refresh Rate" to select your preferred refresh rate.
-
11Click the Monitor tab. It's the second tab at the top of the Properties menu.
-
12Select your preferred refresh rate. Use the drop-down menu below "Screen refresh rate" to select your preferred refresh rate.
-
13Click Apply. This applies the new refresh rate. If your monitor is able to handle the new refresh rate, it will continue on as normal. If your monitor is not able to handle the new refresh rate, it will go black for about 20 seconds before reverting back to the previous settings.
- If your monitor is not able to handle the new refresh rate, scale it back by just a little and try again. Figure out the exact frame rate your monitor is able to handle.


References
About This Article

1. Navigate to https://www.monitortests.com/forum/Thread-Custom-Resolution-Utility-CRU.
2. Download the CRU 1.5.1 zip file and extract it.
3. Open the CRU app.
4. Click Add below "Detailed resolutions.
5. Enter a new refresh rate and click Ok.
6. Move the custom refresh rate to the top of the list.
7. Open the Windows Settings and go to System > Display > Advanced display settings.
8 Click Display adaptor properties for Display 1.
9. Click the Monitor tab.
10. Select your desired refresh rate and click Apply.