This article was co-authored by Jeff Huynh. Jeff Huynh is the owner of Moseybolt, a full service solution in home services, renovations, and repair in the Greater Seattle area. He has over five years of handyman experience. He has a BS in Business Administration from the San Francisco State University and his Certificate in Industrial Electronics Technology from North Seattle College.
wikiHow marks an article as reader-approved once it receives enough positive feedback. In this case, 89% of readers who voted found the article helpful, earning it our reader-approved status.
This article has been viewed 296,416 times.
The color of your ceiling has a large effect on the overall ambiance, outlook, and lighting of your home or apartment. Giving your ceiling a fresh paint of coat is a great way to brighten up your home and give your living spaces a sense of character and comfort. Regardless of whether you’re painting a flat ceiling or one that’s a little trickier to paint (e.g., textured or angled), prepare to paint by purchasing supplies, moving or covering furniture, and applying a coat of primer.
Steps
Prepping Your Ceiling
-
1Purchase a lambswool roller and extension pole. The best tool to use when painting your ceiling is a thick-nap roller with an extension pole. You can find all of the supplies that you’ll need at a local paint-supply store. Most large hardware stores will also sell paint and painting supplies.[1]
- While you could use a paint brush, it’d make for a messy job. High-quality lambswool paint rollers will ensure a smooth layer of paint without bumps or bubbles.
- The length of extension pole that you’ll need depends on the height of your ceiling. If your ceiling is a standard 8 feet (2.4 m), you’ll only need a 2 ft (0.61 m) pole. If you have a higher, 12 ft (3.7 m) ceiling, opt for a 6 ft (1.8 m) pole.
-
2Choose a flat paint formulated for use on ceilings. This style of paint is different than standard wall paint. Flat paint is the best type of paint for ceilings because of its smooth viscosity. Flat paint will also hide any imperfections in the ceiling.[2] You will also need to choose a color of paint for your ceiling. Most ceilings are painted white because the color makes a room seem bright and large.
- When selecting a tone of white, consider which particular shade of white will go best with the color of your walls.
Advertisement -
3Move your furniture out from under the ceiling. Relocate the majority of your furniture out from under the ceiling and into a different room in your apartment, since paint may drip on un-moved furniture. For example, if you’re painting the ceiling in your living room, move sofas, chairs, and tables into your kitchen or bedroom.[3]
- Moving your furniture may not be possible if you live in a small apartment or have extremely heavy pieces of furniture.
- If you find yourself in that scenario, drape drop cloths over furniture to protect the upholstery from dripping paint.
-
4Cover your floor with a drop cloth. Lay a thick drop cloth evenly across your floor once you’ve moved your furniture out of the way. This will protect the floor and prevent ceiling paint from staining your carpet or tile. Also cover your windows and windowsills with drop clothes if you’re concerned that paint may drip on them.[4]
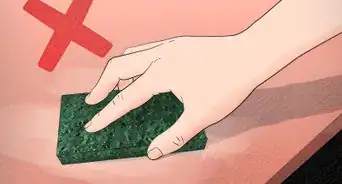
- Do not use a plastic sheet on your floor, as it will bunch, crinkle, and shift. Plus, thin plastic will hardly protect the floor from paint.
-
5Sand and wipe down your ceiling before painting. Purchase a 180-grit sandpaper sponge from your local hardware store. Run the sandpaper sponge lightly across your entire ceiling using a circular motion. This will remove any dust and grime that has built up naturally over time. Then, dampen a rag and run the damp rag across the surface of the ceiling to clean up the dust from sanding.[5]
- If you do not wipe off the sanding dust before you begin to paint, you’ll apply paint to this dust instead of to the ceiling itself.
- Do not sand a textured ceiling.
-
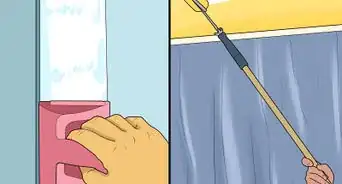
6Mask the area around the trim with painter’s tape. Stick the adhesive side of the painter’s tape firmly against the edge of the trim where it meets the ceiling. If your wall has no trim, butt the edge of the tape directly up against the corner where the wall meets the ceiling. Applying a layer of painter’s tape to the wall beneath the trim will prevent you from accidentally applying paint to the top of your wall. [6]
- If you're going to paint your walls after you paint your ceiling, you should still mask the trim. This will preserve an even finish to the ceiling paint.
-
7Wrap painter’s tape around light fixtures before painting near them. Press the adhesive side of a strip of painter’s tape tightly against the metal sides of the light fixtures. Make sure that the upper edge of the tape is pressed against the ceiling, or paint may leak through and stick to the light fixture.
- When painting in these areas, use an angled brush to paint as close as possible to the fixture itself so that there won’t be any un-painted gaps beside the fixture once you remove the tape.
- If you decide to remove the light fixtures before you paint, be sure to turn off the power at the breaker.[7]
-
8Apply a coat of stain-blocking primer to the ceiling before you paint. Use a primer with stain-blocker for best results. Pour the primer into a paint tray and glide the roller across the top until it’s covered in primer. Then apply a single, even coat to the ceiling by rolling the primer on in straight lines. Allow 30 minutes for the stain-blocking primer to dry before you proceed to painting the ceiling.[8]
- Priming ensures that you'll only have to give the ceiling one coat of paint. A primer will help stick to the ceiling and absorb the coat of paint.
- Stain-blockers cover up unsightly stains on a ceiling, such as watermarks, smoke, and nicotine, and keep them from bleeding through into the paint after the primer has been applied.


Painting Your Ceiling
-
1Cut in along the corners with an angled brush if you’re not using tape. If you're not covering the top edges of the wall with painter's tape, you'll want to use an angled brush to cut in along the edges of the ceiling, where the trim meets the wall. This brush will allow you to paint more precisely so you won’t risk getting paint on the wall with your paint roller.[9]
-
2Pour the paint into a tray and dip your roller in. Begin by only pouring about 2 cups (470 mL) of paint into a paint tray. Do not submerge the entire roller head, or it will become saturated with paint. Instead, lightly graze the roller across the surface of the paint 3-4 times until the roller is coated.[10]
-
3Set up a stepladder if you have a ceiling higher than 8 ft (2.4 m). If you can’t reach every part of your ceiling when standing on the floor, you’ll need to stand on a stepladder. Set up the stepladder under the first section of ceiling you plan to paint. Then, once you’ve covered the roller in paint, stand on the second or third step of the ladder to reach the ceiling.[11]
- Purchase a stepladder at your local hardware store. Paint-supply stores may also sell stepladders.
-
4Paint the ceiling in zigzag lines with your roller. Dip your roller into the paint tray and coat evenly, making sure that excess paint has been driven from the roller. Cover the ceiling with a layer of paint. Do this by creating "W" or "V" shapes without ever removing the roller from the surface of the ceiling. Maintain even pressure on your roller as you move it across the ceiling. Uneven pressure may cause uneven textures to blot along your ceiling.[12]
- Make sure you paint the ceiling before the cut-in line dries. Paint while the cut in line is still wet to prevent a clear line from forming between the edge and the center of the ceiling.
-
5Paint in sections until the entire ceiling is covered with zigzags. When you're done with painting zigzags across 1 section of the ceiling, move on and paint another section. Overlap with the previous section to blend the new part with the paint you’ve already applied.[13]
- Don't worry too much about creating a uniform look just yet. Just make sure that you’ve covered the entire ceiling with zigzags of paint.
-
6Paint over the zigzags with straight lines of paint. For this layer, move your roller across the ceiling in straight lines. The lines should overlap by about 1 inch (2.5 cm) so there aren’t visible gaps between broad lines when the paint dries. This will help even out the paint and give your ceiling a uniform color and texture. Once the ceiling is covered, let the paint dry overnight.[14]
- If you've applied a primer coat, you shouldn't need to apply a second coat of paint.
- If you do need more coverage, be sure to let the paint dry completely between coats.[15]
-
7Clean up and wash your supplies once you’ve finished the paint job. Tear down the painter’s tape from the walls and light fixtures, and throw away any drop cloths that you put down on the floor. Wash the paint roller in hot, soapy water.[16]
- Also remove drop cloths from your furniture in the room.


Painting Atypical Ceilings
-
1Repair damaged drywall before painting. If you have a drywall ceiling that's in need of repair, it must be touched up before you paint over the ceiling. If you want to handle the task on your own, pick up supplies at a home-improvement store and repair drywall yourself. Or, if you’re not comfortable handling the patch-up on your own, hire a drywall contractor to repair the damaged drywall.
- Ask the drywall contractor to do a skim coat to smooth out the ceiling once it’s repaired. Applying a skim coat to the drywall before you paint will make the ceiling glisten after the coat of paint has been applied.
-
2Roll on a single light coat of paint for textured ceilings. If your ceiling is textured, gently paint a single layer by making straight top-to-bottom strokes with your roller brush. Overlap the strokes by about 1 inch (2.5 cm). Do this delicately so that you don’t end up knocking the textured material off of your ceiling.[17]
- Applying a skim coat to the drywall before you paint will make the ceiling glisten after the coat of paint has been applied.
- If you try to paint the textured ceiling on your own and the job goes poorly, call a contractor to repair the paint job. Find a contractor in your area by searching online. For example, search for “professional painter business near me.”
-
3Paint a vaulted ceiling from top to bottom. Start in an upper corner of the ceiling and work your way down to the wall in straight lines. Each consecutive line must slightly overlap the previous stroke by at least 1⁄2 inch (1.3 cm). Be smooth and consistent with all of your strokes so there are no curving roller marks on the wall.
- Essentially, you’ll paint your vaulted ceiling as if it were a wall.


Expert Q&A
Did you know you can get expert answers for this article?
Unlock expert answers by supporting wikiHow
-
QuestionHow do I safely remove the existing light fixture before I paint?
 Jeff HuynhJeff Huynh is the owner of Moseybolt, a full service solution in home services, renovations, and repair in the Greater Seattle area. He has over five years of handyman experience. He has a BS in Business Administration from the San Francisco State University and his Certificate in Industrial Electronics Technology from North Seattle College.
Professional HandymanThe first thing to do is absolutely to turn off the power. Turn the switch off, but also turn the power off at the breaker. If you're not certain which breaker turns it off, just shut the whole panel off.
Support wikiHow by unlocking this expert answer.
Things You’ll Need
- Sanding sponge
- Primer
- Paint
- Paint tray and liner
- Painter’s tape
- Roller brush
- Angled brush
- Drop cloths
- Ladder (optional)


References
- ↑ https://www.familyhandyman.com/painting/tips/how-to-paint-a-ceiling/view-all/
- ↑ https://www.familyhandyman.com/painting/tips/how-to-paint-a-ceiling/view-all/
- ↑ https://www.bobvila.com/articles/2393-how-to-paint-a-ceiling/
- ↑ https://www.bobvila.com/articles/2393-how-to-paint-a-ceiling/
- ↑ https://www.prettyhandygirl.com/painting-ceilings-like-a-pro/
- ↑ https://www.prettyhandygirl.com/painting-ceilings-like-a-pro/
- ↑ Jeff Huynh. Professional Handyman. Expert Interview. 30 April 2019.
- ↑ https://www.familyhandyman.com/painting/tips/how-to-paint-a-ceiling/view-all/
- ↑ https://www.familyhandyman.com/painting/tips/how-to-paint-a-ceiling/view-all/
- ↑ https://www.bobvila.com/articles/2393-how-to-paint-a-ceiling/
- ↑ https://www.bobvila.com/articles/2393-how-to-paint-a-ceiling/
- ↑ https://www.bobvila.com/articles/2393-how-to-paint-a-ceiling/
- ↑ https://www.bobvila.com/articles/2393-how-to-paint-a-ceiling/
- ↑ https://www.bobvila.com/articles/2393-how-to-paint-a-ceiling/
- ↑ Jeff Huynh. Professional Handyman. Expert Interview. 30 April 2019.
- ↑ https://www.bobvila.com/articles/2393-how-to-paint-a-ceiling/
- ↑ https://www.familyhandyman.com/painting/tips/how-to-paint-a-ceiling/view-all/
About This Article
To paint a ceiling, first move as much furniture out of the room as possible. Use a wet mop to wipe down the ceiling and remove any dust and grime. Then, take down any ceiling fixtures so they don’t get in the way while you’re painting. You should also cover the floor and any leftover furniture with drop cloths to protect them from paint. Apply painter’s tape to the tops of the walls so they don’t get paint on them. With everything prepped, apply interior latex drywall primer to the ceiling using a roller and an extension pole. Let the primer dry completely, around 1 hour. Then, use a paintbrush to paint the edges where the ceiling meets the wall since they’ll be hard to reach with a roller. Use ceiling paint for an easy, low-maintenance option, or use flat latex paint if you want to use the same paint for the walls. Use a roller to paint the ceiling in 3-5 square foot (¼-½ square meter) sections. Let the first coat of paint dry for 1-2 hours or until it’s completely dry to the touch, then apply a second coat if needed. Finally, remove the painter’s tape, reinstall the ceiling fixtures, and clean up all of your supplies. To learn how to know when to call a contractor, keep reading!