This article was co-authored by wikiHow Staff. Our trained team of editors and researchers validate articles for accuracy and comprehensiveness. wikiHow's Content Management Team carefully monitors the work from our editorial staff to ensure that each article is backed by trusted research and meets our high quality standards.
There are 10 references cited in this article, which can be found at the bottom of the page.
The wikiHow Video Team also followed the article's instructions and verified that they work.
This article has been viewed 11,867 times.
Learn more...
Whether you're hoping to display a finished piece of cross stitch or you're just starting one, it's easy to put the fabric in the hoop. All you'll need is your fabric, a hoop, and a little patience as you tighten and tug on the fabric once it's in the hoop for an even and taut finished piece. You can even hide the extra fabric behind the hoop easily, if you'd like!
Steps
Putting the Fabric in a Hoop
-
1Unscrew your hoop to take the two pieces apart. Your hoop comes in two separate pieces: a smaller hoop and a slightly larger hoop that has the tightener on it. Gently separate the hoops by loosening the tightener so they’re ready to be used.[1]
- If you don’t already have a hoop, you can purchase one at a craft store or online.
- Embroidery hoops come in all different sizes, so choose a hoop that's big enough to display your entire piece of artwork with a little room to spare.
-
2Lay the inner hoop piece on a flat surface. Clean off a flat surface so your hoop and fabric piece don’t get dirty. Place the inner hoop, which is the smaller one, flat on the surface.[2]Advertisement
-
3Lay your fabric on top of the inner hoop and center it. Place your cross stitch piece on top of this inner hoop and line it up so the cross stitch artwork or wording is centered in the hoop. If your piece of fabric is blank because you haven’t started it yet, you don’t need to worry as much about centering it perfectly.[3]
- Make sure there’s at least 1 in (2.5 cm) of fabric around the outside of the hoop.
-
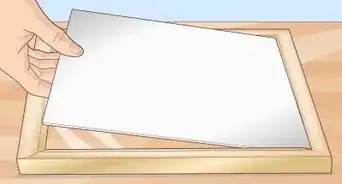
4Place the outer hoop on top to slide it over the inner hoop. Gently slide the larger outer hoop over the fabric so that it’s hugging the inner hoop. Push down until both hoops are flat on the surface.[4]
-
5Twist the tightener while pulling the edges of the fabric. Tighten the hoop with just a couple twists at a time. Pull gently on each side of the fabric coming out of the hoop as you tighten it so the fabric stretches out evenly.[5]
-
6Stop tightening the hoop once the fabric is taut and even. Check that the fabric is straight and even as you’re tightening and pulling it so you don’t end up with a saggy or uneven piece of artwork. Keep tightening it until you can tap gently in the middle and it feels taut.[6]
- Aim for a tautness similar to a drum.
- If you tighten your hoop fully and it isn't tight enough, loosen the tightener and start pulling and tightening it over again.


Hiding a Finished Project's Extra Fabric
-
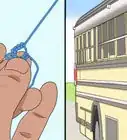
1Cut a piece of thread that’s two times the circumference of your hoop. Choose a thread in a similar color to your fabric and use sharp scissors to cut a long length of it. You’ll only be weaving it in and out around the hoop’s circumference, so you should be left with plenty of extra length.[7]
- Wrap a piece of thread around the outside of your hoop twice to find the right length.
-
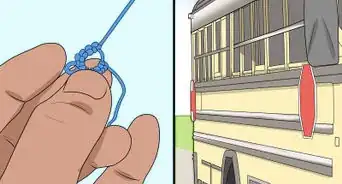
2Tie the thread to the fabric outside the hoop using a strong knot. Thread your needle and pull the needle and thread through a spot on the extra fabric that’s about 1 cm (0.39 in) away from the edge of the hoop. Tie a strong knot in that spot with the thread.[8]
- Give the knot a couple tugs to make sure it’s stable and won’t move.
-
3Add horizontal stitches around the entire hoop using a sewing needle. Starting where you placed the knot, weave your needle in and out of the fabric going all the way around the hoop. Sew roughly 1 cm (0.39 in) away from the hoop the entire time so you’re not too close to it.[9]
- Space the stitches roughly 1 cm (0.39 in) from each other all the way around the hoop.
- Stop sewing stitches when you get to the knot you formed.
- Unthread the needle and leave the thread loose once you get to the knot.
-
4Cut the fabric edges into a circle 2 cm (0.79 in) from the stitches. Leave roughly 2 cm (0.79 in) of space between the stitches you made in the extra fabric and your cut. Go all the way around the circle cutting off the excess fabric and leaving the 2 cm (0.79 in) of space so that your circle is even.[10]
- Use sharp scissors that will cut through the fabric easily to prevent tearing or fraying.
-
5Pull the loose end of the thread to tighten the extra fabric. Tug on the loose thread next to the knot so the fabric bunches near the center of the back of the hoop. Keep pulling gently until all of the fabric is hidden behind the hoop in a circle and is evenly tightened.[11]
-
6Tie a knot to keep the extra fabric behind the hoop. Tie a bow or knot in the thread near the fabric so it stays bunched behind the hoop. It’s okay if this knot isn’t super tight—as long as the fabric stays tightened behind your work, it’ll look good.[12]
- Use scissors to cut off the extra thread length, if needed.
-
7Sew a round piece of felt over the hoop’s back to cover the fabric, if you’d like. Since your hoop will likely be hung, you can place it on the wall just as it is with the fabric hidden behind the hoop. If you’d rather cover up the back of your hoop, cut a piece of felt that’s the same size as your inner hoop. Sew this piece of felt onto the back of the hoop to hide the bunched fabric, and your hoop is done![13]
- Trace the inner hoop on a piece of felt to get the right size.
- Cut a piece of thread that’s roughly 3 times the circumference of the hoop to make sure you have enough to sew it into the extra fabric on the back.


Things You'll Need
Putting the Fabric in a Hoop
- Embroidery hoop
- Cross stitch fabric
Hiding a Finished Project's Extra Fabric
- Scissors
- Thread
- Sewing needle
- Ruler (optional)
- Felt (optional)

References
- ↑ https://www.youtube.com/watch?v=4Q4ieJCFBMo#t=15s
- ↑ https://www.youtube.com/watch?v=uUP0Jg_r6bU#t=13s
- ↑ https://www.youtube.com/watch?v=uUP0Jg_r6bU#t=15s
- ↑ https://www.youtube.com/watch?v=uUP0Jg_r6bU#t=19s
- ↑ https://www.youtube.com/watch?v=4Q4ieJCFBMo#t=40s
- ↑ https://www.youtube.com/watch?v=4Q4ieJCFBMo#t=1m
- ↑ https://medium.com/two-little-kits/how-to-finish-a-cross-stitch-in-an-embroidery-hoop-c6e912c8ee8
- ↑ https://medium.com/two-little-kits/how-to-finish-a-cross-stitch-in-an-embroidery-hoop-c6e912c8ee8
- ↑ https://medium.com/two-little-kits/how-to-finish-a-cross-stitch-in-an-embroidery-hoop-c6e912c8ee8
About This Article