This article was co-authored by wikiHow Staff. Our trained team of editors and researchers validate articles for accuracy and comprehensiveness. wikiHow's Content Management Team carefully monitors the work from our editorial staff to ensure that each article is backed by trusted research and meets our high quality standards.
This article has been viewed 228,380 times.
Learn more...
Standard concrete mixes are usually strong enough for most jobs, but in some instances, you may want to increase the durability of your concrete by reinforcing it. If you simply want your concrete to be more resistant to environmental factors like cold weather and water, then you may just want to change its mixture to make your concrete stronger. Otherwise, the best way to reinforce concrete is to install steel rebars or cheaper steel mesh before you pour the concrete.
Steps
Changing Your Concrete Mixture
-
1Alter the cement-to-sand ratio if you’re mixing your own cement. Concrete is made by mixing cement and water with other aggregate materials like sand and gravel. To make your concrete stronger, increase the amount of cement that you’re using in relation to the amount of sand and other aggregates that you’re using.[1]
- For example, if the concrete mixture’s instructions typically call for 4 parts sand to 1 part water (i.e., 80% sand and 20% water) for most construction projects, go with 3 parts sand to 1 part water (75% sand and 25% water) instead to make your concrete more durable.
-
2Add an air-entrainment additive to prevent cracking during cold weather. This type of additive is used to introduce microscopic air bubbles into your concrete, which prevents the concrete from cracking due to frost action. Add this admixture to your concrete during the mixing process, following the manufacturer’s instructions.[2]
- You can buy this admixture at any home improvement store.
- Air-entrainment additives also increase cohesion in your concrete, which is very important for increasing its overall durability.
Advertisement -
3Use shrinkage-reducing admixture to prevent the loss of water. Concrete naturally loses water over time, which causes it to shrink and thus become weaker. Pour shrinkage-reducing admixture into your concrete, per the manufacturer’s instructions, to prevent cracking or curling caused by this water loss.[3]
- You can purchase shrinking-reducing additives at any store that sells concrete mixtures.
- This type of admixture is best used in projects where concrete cracking has to be prevented for aesthetic reasons (e.g., public buildings).
-
4Go with a corrosion-inhibiting additive in concrete exposed to chlorides. Chlorides are found in seawater and many marine facilities that are involved in regulating the quality of water. Chlorides also corrode steel, so adding a corrosion-inhibiting admixture to your concrete is an important step in reinforcing any concrete that is exposed to chlorides on a regular basis.[4]
- Buildings that would benefit from concrete reinforced with this additive include highway bridges, marine facilities, parking garages, and any buildings that are in close proximity to seawater.
- Most home improvement stores will make this admixture available for purchase.


Placing Steel Rebars in Your Concrete
-
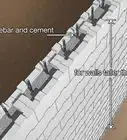
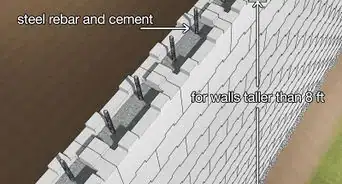
1Check your state and local building codes to see how much rebar to use. Your local codes will dictate the size and placement of the rebars you’ll need to use for whatever project you’re doing. You can find these codes by getting in touch with the branch of your local government that is responsible for city planning and housing. Once you’ve checked these codes, purchase the amount and type of rebar you’ll need from a home improvement store.[5]
- In particular, find out how much spacing you need to have in between the individual rebars you’ll use to reinforce your concrete.
- You should also ask what specifications you need to follow regarding the dimensions of your rebar (e.g., what diameter your rods need to have).
-
2Cut the rebar to be 1 inch (2.5 cm) away from the forming edge. Measure the length and width of the area that you’re pouring concrete into. Then, cut your pieces of rebar to be 2 inches (5.1 cm) less than these dimensions. That way, when you go to lay the rebar in the forming, it will be 1 inch (2.5 cm) away from the edge in each direction.[6]
- For example, if the area of your concrete forming measured 24 by 36 inches (61 by 91 cm), then cut your short-dimension rebar pieces to be 22 inches (56 cm) and the long-dimension pieces to be 34 inches (86 cm).
- Use a grinder fitted with an abrasive metal-cutting blade to cut your rebar.
-
3Tie the rebar pieces together in a grid pattern using tie wire. Lay the pieces of rebar on top of each other going in perpendicular directions to create a grid, following the spacing specifications identified in your local area’s building codes. Then, slip a piece of tie wire under the area where 2 bars overlap, pull the 2 ends of the wire upwards, and twist the 2 ends tightly together. Do this in every spot where 2 pieces of rebar overlap.[7]
- Use pliers when twisting the tie wire to make sure that you’re twisting it as tightly as possible.
- Tying the rebar together this way will ensure that the grid pattern remains intact throughout the rest of the concrete installation process.
-
4Place the rebar grid on chairs in the concrete forming for support. For best results, place a chair every 2 feet (0.61 m) in the forming to ensure that the rebar grid is adequately supported. The chairs will keep the grid in place when you go to pour the concrete over it, while also making sure that the steel rebar is not located at the bottom of your concrete slab.[8]
- For your concrete to be adequately reinforced, the rebar needs to be positioned closer to the center of your slab rather than the bottom of it.
- Use chairs that will position your rebar about in the middle of your slab. For example, if you plan to pour 4 inches (10 cm) of concrete, use chairs that are 2 inches (5.1 cm) high.
-
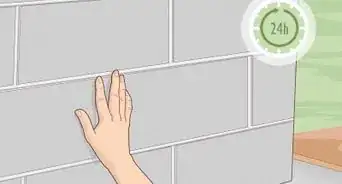
5Mix and pour your concrete into the forming. Pour the concrete slowly and evenly throughout the forming. Watch the rebar grid as you do so to make sure that it doesn’t become moved and none of the tie wires become untied during the pouring process.[9]
- Once you’ve poured the concrete, use a metal rake to even out the top surface.
- Your concrete should be completely dry after about 48 hours.


Using Steel Mesh
-
1Roll out your steel mesh and cut it so that it will fit in your forming. If your steel mesh was rolled up when you purchased it, you’ll need to unroll it before you can work with it. Use wire cutters to cut the mesh so that it will sit 2 inches (5.1 cm) away from each edge inside the concrete forming.[10]
- For example, if the length and width of your concrete forming is 12 by 12 inches (30 by 30 cm), then cut your wire mesh to be 8 by 8 inches (20 by 20 cm).
- You can buy steel mesh at most home improvement stores. If possible, buy steel mesh in a flat sheet instead of in a roll, since it can be a little difficult to unroll sometimes.
- If you need to use more than 1 sheet of steel mesh, have the sheets overlap by about 1 foot (0.30 m) and tie them together with wire rebar ties.
-
2Place a 2 in (5.1 cm) chair under the steel mesh in the forming. Position a mesh chair every 2 feet (0.61 m) in the concrete form, going both horizontally and vertically. Then, lay the steel mesh on top of these chairs in the forming.[11]
- These chairs will provide support for your steel mesh when you go to pour the concrete over it, keeping it from becoming displaced. They will also ensure that the steel mesh is in the middle of your concrete slab rather than at the bottom of it.
- Mesh chairs are available to purchase wherever steel mesh is sold.
-
3Mix and pour your concrete into the concrete forming. Pour the concrete slowly, keeping an eye on the steel mesh as you do so to make sure that it doesn’t become displaced. Use a metal rake to make sure the concrete is evenly spread throughout the entire forming.[12]
- It should take about 24-48 hours for your concrete to dry and set.


Community Q&A
-
QuestionWhat do I use to add an eighth of an inch to an inch to level out an area of existing concrete patio?
 Community AnswerA patio needs to be sloped for rainwater to flow downhill away from the home. It is possible to pour new concrete over the top of an existing concrete slab, but you should drastically rough up to top surface first so that it is like jagged rocks to secure the slab and prevent it from moving around, especially during freezing winters. Thin layers are susceptible to cracking. If your old slab prevents you from pouring at least 2 inches, then you should break up enough existing concrete to allow for that minimal thickness to be poured. No need for gravel for the thin pours: stick to sand and high PSI concrete (4000-5000 PSI). Add lignosulphonate or 0.5% molasses to increase the curing time.
 -
QuestionWhat is the strongest mix of concrete to make in order to prevent rats?
 Community AnswerMix 1 part cement, 3 parts sand, 3 parts gravel, and 2 parts small broken glass. The glass stops the rats from digging into the slab.
 -
QuestionWhat size gravel should be used for a stronger beam pier?
 Community AnswerA 1 :3:5 ratio of cement - sand - gravel is suggested with 311 of water per 5O kg sack of cement and size of gravel should be small.
Things You’ll Need
Changing Your Concrete Mixture
- Cement
- Aggregate materials
- Water
- Air-entrainment additive
- Shrinkage-reducing admixture
- Corrosion-inhibiting additive
Placing Steel Rebars in Your Concrete
- Steel rebar
- Measuring tape
- Grinder fitted with an abrasive metal-cutting blade
- Tie wire
- Pliers
- Support chairs
- Metal rake
Using Steel Mesh
- Steel mesh
- Wire cutters
- Measuring tape
- Support chairs
- Metal rake


References
- ↑ https://job-prices.co.uk/mortar-guide/
- ↑ https://constructionreviewonline.com/2017/05/concrete-additives/
- ↑ https://constructionreviewonline.com/2017/05/concrete-additives/
- ↑ https://constructionreviewonline.com/2017/05/concrete-additives/
- ↑ https://www.concreteconstruction.net/how-to/construction/placing-reinforcing-steel_o
- ↑ https://www.concreteconstruction.net/how-to/construction/placing-reinforcing-steel_o
- ↑ https://www.constructionprotips.com/jobsite-tips/prep-crack-free-concrete/
- ↑ https://www.constructionprotips.com/jobsite-tips/prep-crack-free-concrete/
- ↑ https://www.constructionprotips.com/jobsite-tips/prep-crack-free-concrete/
About This Article