This article was co-authored by wikiHow staff writer, Travis Boylls. Travis Boylls is a Technology Writer and Editor for wikiHow. Travis has experience writing technology-related articles, providing software customer service, and in graphic design. He specializes in Windows, macOS, Android, iOS, and Linux platforms. He studied graphic design at Pikes Peak Community College.
This article has been viewed 837,984 times.
Learn more...
Adobe Illustrator is a graphic design program that specializes in the creation of vector graphics. It is part of the Adobe Creative Cloud family of applications. Unlike Photoshop, Adobe Illustrator is not typically to edit and manipulate photographs. However, there are a few techniques you can use to remove the background from an image. The best technique to use depends on the complexity of the image. This wikiHow teaches you how to remove a background from an image in Adobe Illustrator.
Steps
Using a Clipping Mask
-
1Open Illustrator. Illustrator has a yellow icon that says "Ai". Click the icon to open Adobe Illustrator. Adobe Illustrator requires a subscription to Adobe Creative Cloud to download and use. An individual subscription to Adobe CC costs $20.99 per month for a single app. It costs $52.99 per month for an individual subscription to all apps. A free 7-day trial is available here. There are also different pricing plans for businesses and students.
-
2Open your image in Adobe Illustrator. Use the following steps to open an image in Illustrator:
- Click File in the menu bar at top.
- Click Open to open a new image or Place to insert an image into an existing file.
- Select a file you want to open.
- Click Open.
Advertisement -
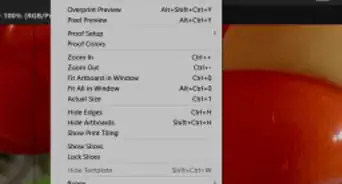
3Zoom in on your image. To zoom in on the image, click the icon that resembles the magnifying glass in the toolbar or press Z. Click the area of the image you want to zoom in on.[1] To remove the background of an image from a photograph, you’ll have to create a precise outline around the part of the photo you wish to preserve. Using the Zoom tool is the best way to get that level of precision.
- If the image you’re working with is simpler, like a single shape or outline, use the Magic Wand tool instead.
-
4Select the Pen Tool. Click the icon that resembles a fountain pen in the toolbar to the left or press P. [2] This tool allows you to create shapes and outlines with a series of clicks. Each click will drop one “anchor point.” As additional anchor points are dropped, a line will appear, connecting the new point to its predecessor.
-
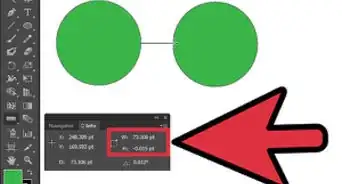
5Click once on the edge of the foreground object. This will place the first anchor point. The end goal is to surround the foreground object of the image. Notice there is a line from the first anchor point to your mouse cursor.
-
6Click another spot along the edge of the foreground object. This places another anchor point along the edge of the object you want to trace along with a line from one anchor point to the next.
- Creating curved lines: To create a curved line with the Pen tool, click and drag when placing an anchor point. This causes the line to curve in the opposite direction you drag the mouse. The curve will continue when you create rest of your anchor points. To create another straight line or change the direction of the curve, click the last anchor point before adding another anchor point. Don't worry if the curves aren't perfect. You can adjust them later.
-
7Use the Pen Tool to trace the foreground object of your image. Use the technique of clicking to create lines and anchor points, or clicking and dragging to create curved lines to trace an outline around the foreground object of your image.
- You can press the Space key to move the image so that off-screen areas become visible. This will be helpful if you’re zoomed in far enough that you can’t see the entire image. The cursor will turn into a small hand—use it to drag the image in any direction, bringing other areas into view without breaking the continuity of the Pen tool outline.
- If there are colored spaces blocking the image, click the colored square in the upper-left corner (the Fill color). Click the white swatch with a red line through it to turn the color fill off.
-
8Click the first anchor point (again) to complete the outline. The object is now completely surrounded by a dotted outline.
-
9Use the sub-selection tool to adjust the outline around the foreground object. Click the icon that resembles a white mouse cursor or press A to select the sub-selection tool. You can use the sub-selection tool to move the anchor points in your outline. When you click an anchor point, you will see two lines with dots extend from the anchor point. These are called "Bezier curve handles". Click and drag the bezier curve handles with sub-selection tool to adjust the curve of your lines.
-
10Click the Select tool. The select tool is used to select and move objects. Click the icon that resembles a black mouse cursor in the toolbar to the left, or press V to select the Select Tool.
-
11Select the image and the outline around the foreground object. To select both the image and image outline, hold Shift and click the image and then click the outline you created using the Pen Tool around the object.
-
12Right-click the outline and select Create Clipping Mask. The clipping mask will remove all except the foreground object inside the outline.
-
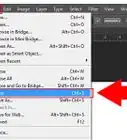
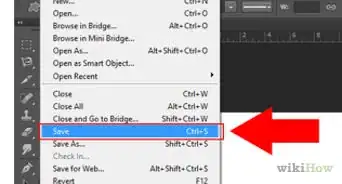
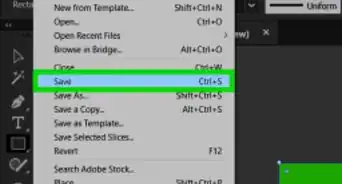
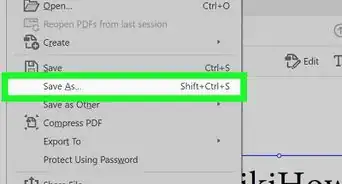
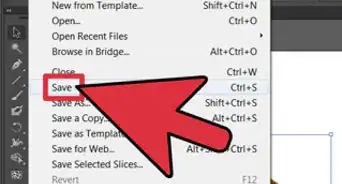
13Save your image. Adobe Illustrator can save the image as an AI file, EPS file, SVG or PDF.[3] The .EPS format is widely used in almost all graphic applications and word processing programs. You can also save the image as a PDF. Use the following steps to save your image:
- Click File.
- Click Save as
- Type a name for the file next to "File name".
- Use the drop-down menu next to "File format" to select the image format.
- Click Save.
-
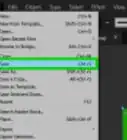
14Export the image as a PNG file.[4] PNG files are high-quality web images that support transparent backgrounds. This file type works best for photos, as they can support up to 16 million colors and allow images with transparent background images. You can also save the image as a JPEG image, but this format doesn't allow transparent backgrounds. Use the following steps to export the image.
- Click File.
- Click Export.
- Type a name for the file next to "File name".
- Use the drop-down menu next to "File format" to select the image format.
- Click Save.


Using Image Trace
-
1Determine if Image Trace will work for your image. This works best on images that only have a few solid colors. Logos and cartoon images should work pretty well with this technique. Complex images with lots of colors, such as photographs will be too complex to trace in Adobe Illustrator. For these images, try using a clipping mask to delete the background. You can also use Photoshop to remove a background from an image.
-
2Open Illustrator. Illustrator has a yellow icon that says "Ai". Click the icon to open Adobe Illustrator. Adobe Illustrator requires a subscription to Adobe Creative Cloud to download and use. An individual subscription to Adobe CC costs $20.99 per month for a single app. It is $52.99 per month for an individual subscription to all apps. A free 7-day trial is available here. There are also different pricing plans for businesses and students.
-
3Open your image in Adobe Illustrator. Use the following steps to open an image in Illustrator:
- Click File in the menu bar at the top.
- Click Open to open a new image or Place to insert an image into an existing file.
- Select a file you want to open.
- Click Open.
-
4Click the Select Tool and select the image. The Select Tool has an icon that resembles a black mouse cursor in the toolbar to the left. Click the Select Tool or press V. Then click the image in the artboard to select it.
-
5Open the Image Trace panel. Use the following steps to open the Image Trace window:[5]
-
Illustrator CC:
- Click Window in the menu bar at the top.
- Click Image Trace.
-
Older Versions of Illustrator:
- Click Object in the menu bar at the top.
- Click Live Trace.
- Click Tracing Options.
-
Illustrator CC:
-
6Select "Color" for the mode. To do so, click the drop-down menu next to "Mode" and click Color.
-
7Select the maximum number of colors in the image. Use the slider bar next to "Colors" to set the maximum number of colors in your image. You can also type the number of colors in the space next to the slider bar. If your image has too many colors, this process will take a long time, and your computer may not be able to convert all the colors into vector objects.
- On older versions of Adobe Illustrator, click Max Colors to reveal the slider bar.
-
8Click Trace. It's in the lower-right corner of the panel. This scans the image and creates outlines that can be converted into vector objects.
-
9Click Expand. It's in the panel at the top of the screen. This converts your image into vector objects. You should now see outlines around the different colors in the image. You can also select them with Select tool.
-
10Ungroup the objects in your image. Now the shapes in your image have been converted to vector shapes. However, you must ungroup the shapes in the image to be able to select them individually. Use the following steps to ungroup the shapes in the image:
- Click the image with the Select Tool to select it.
- Click Object in the menu bar at the top.
- Click Ungroup.
-
11Select background objects with the Select Tool and press Delete. Click the Select Tool in the toolbar or press "V". Then click an object in the background. Press the Delete key to remove the object. If your background is one solid color, you should only have to click the background and press the Delete key. If there is more detail in the background, you may have to select and delete multiple objects.
- To select multiple objects, hold the Shift key while clicking all the objects you want to select.
- If there are multiple objects in the background that have the same color, you can select all objects of the same color using the Magic Wand Tool. It's the tool that resembles a wand with sparks at the tip in the toolbar to the left.
-
12Save your image. Adobe Illustrator can save the image as an AI file, EPS file, SVG or PDF.[6] The .EPS format is widely used in almost all graphic applications and word processing programs. You can also save the image as a PDF. Use the following steps to save your image:
- Click File.
- Click Save as
- Type a name for the file next to "File name".
- Use the drop-down menu next to "File format" to select the image format.
- Click Save.
-
13Export the image as a PNG file.[7] PNG files are high-quality web images that support transparent backgrounds. This file type works best for photos, as they can support up to 16 million colors and allow images with transparent background images. You can also save the image as a JPEG image, but this format doesn't allow transparent backgrounds. Use the following steps to export the image.
- Click File.
- Click Export.
- Type a name for the file next to "File name".
- Use the drop-down menu next to "File format" to select the image format.
- Click Save.


Our Most Loved Articles & Quizzes


Community Q&A
-
QuestionHow do I change an image to appear black and white?
 Community AnswerIn order to change your image to black and white you may do one of two things. Either click on the Black and White icon in the Adjustments panel or select "Choose Layer," "New Adjustment Layer," and then "Black & White."
References
- ↑ https://www.youtube.com/watch?annotation_id=annotation_3990252369&feature=iv&src_vid=RILOu90Zij4&v=h3JCPRNxGGM
- ↑ https://helpx.adobe.com/illustrator/using/drawing-pen-pencil-or-flare.html
- ↑ https://helpx.adobe.com/illustrator/using/saving-artwork.html
- ↑ https://helpx.adobe.com/illustrator/how-to/illustrator-saving-artwork-for-web.html
- ↑ https://www.youtube.com/watch?v=SDsH36UuNCY
- ↑ https://helpx.adobe.com/illustrator/using/saving-artwork.html
- ↑ https://helpx.adobe.com/illustrator/how-to/illustrator-saving-artwork-for-web.html
About This Article

1. Click the pen tool.
2. Click repeatedly along the edge of the foreground object.
3. Click the selection tool.
4. Click the foreground object.
5. Press Shift as you click the background.
6. Right-click the foreground object.
7. Click Make Clipping Mask.
8. Open the magic wand tool.
9. Click the background and press Delete.