This article was co-authored by Allen Lee. Allen Lee is a Home Improvement Specialist and the Owner of Honest Lee Handyman Services, a licensed and insured handyman business servicing Sacramento, California, and surrounding areas. Working with homeowners and businesses to get their small repairs done in a timely and efficient manner, Honest Lee Handyman Services provides gutter and dryer vent cleaning along with fixture, fence, drywall, and toilet repairs.
There are 9 references cited in this article, which can be found at the bottom of the page.
This article has been viewed 63,370 times.
With a few tools and a bit of practice, you will be able to remove light fixtures in your own home both quickly and safely. Before you begin working on a light fixture, always turn the power off first. Remove the light shade or bowl, unscrew the light bulbs, and take off the fixture plate to expose the wires. Then work on installing the new fixture. Live wires are dangerous, so always use a voltage detector to test any wires first and contact an electrician at any stage if you don't feel confident.
Steps
Removing the Light Fixture
-
1Get a ladder, screwdriver, headlamp, and non-contact voltage detector. You will need all of these supplies to safely remove the light fixture. Make sure that the ladder stands properly and that the feet grip the ground. Check that the non-contact voltage detector works properly by holding it near a light bulb that is on to ensure that it glows. Switch on the headlamp and replace the batteries if required.[1]
- Working with electrical wiring can be a dangerous task. It's essential that all of your equipment is in good working order to keep yourself safe.
-
2Turn off the power at the fuse box.[2] Open the fuse box and locate the breaker that corresponds to the circuit that powers the light fixture. The circuits in the fuse box are often labeled by room. If the circuits are not labeled or if you don’t know the switch for the circuit that you will be working on, turn off the power for the entire home to be on the safe side.[3]Advertisement
-
3Test the light switch to make sure that the power is turned off. Once you have turned off the circuit at the fuse box, double check that it was the correct circuit before you begin working. Press the light switch into an on and off position several times. Ensure that the light doesn’t turn on and that it remains off for the entire time. Never work on a light fixture if the power is on.[4]
- If you cannot find the switch for the individual circuit that you will be working on, either turn off the power for the entire home or contact an electrician to remove the light fixture for you.
- Wear a headlamp if it is too dark to see what you are doing without the light on.
-
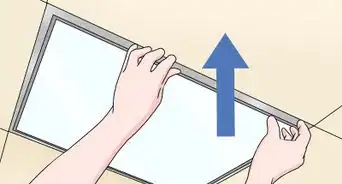
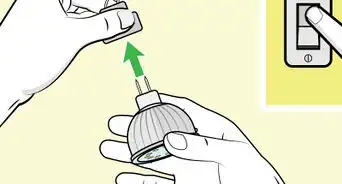
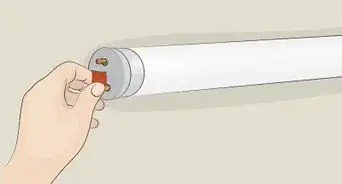
4Unscrew the light bulbs if they are exposed. Place the ladder on a flat, stable surface either directly below or next to the fixture. Twist each bulb counterclockwise to remove them from chandeliers and Hollywood light fixtures. For fluorescent light boxes, slide the cover out of place if there is one. Then rotate each bulb counterclockwise until it loosens and can be lifted out of place.[5]
- Chandeliers, Hollywood lights, and fluorescent light boxes all have bulbs that need to be removed before you can remove the fixture cover.
-
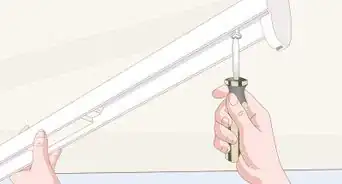
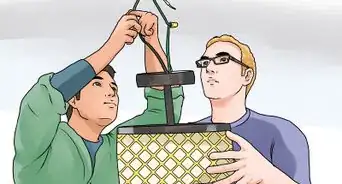
5Remove the knob, screws, or bolts to extract the fixture cover. For flush-mount lights, gently twist the knob in the center of the fixture cover counterclockwise to unscrew it. For Hollywood lights and chandeliers, use a screwdriver or a drill to remove the screws on the base of the fixture. For lights with bolts, unscrew each bolt while supporting the cover to lift it down from the ceiling.[6]
- Always support the fixture cover during the process. Lift it away from the fixture plate once it is loose to stop it falling. Get another person to help you hold the fixture if it's heavy.
- Some light fixtures require you to twist the cover to remove it from the fixture plate. Try this method if simply unscrewing the knob or screws doesn't work.[7]
- Sometimes light covers can stick to the ceiling due to paint. Use a flat screwdriver to carefully pry the light shade free from the ceiling, just as you would open the lid of a paint can.[8]
- Move your head so that it’s not directly underneath the light cover as you remove it, as sometimes dust or dead bugs may fall out.
-
6Remove the light bulbs from the fixture plate for flush-mount fixtures. Gently twist each light bulb counterclockwise to unscrew it. Set the bulbs to one side as you may be able to use these for your new light fixture.[9]
- Hollywood lights and chandeliers don't have bulbs in the fixture plate as these are located on the light cover and have already been removed.[10]
-
7Unscrew the mounting bracket to remove the fixture plate. Use a screwdriver to remove the screws that hold the mounting bracket to the fixture plate. Hold the fixture plate as you loosen the screws in the mounting bracket to prevent it falling from the ceiling. Since the light fixture is now fully removed, keep the power switched off until a new fixture is safely installed.[11]
- The mounting bracket is a long, thin piece of metal that runs across the fixture plate to mount it onto the ceiling.
- You will see many exposed wires once the fixture plate is removed. Don't touch these until you have used a voltage detector to test them first.


Wiring and Installing a New Light Fixture
-
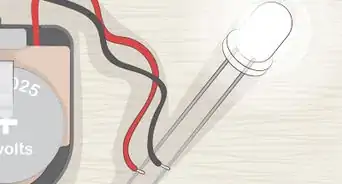
1Use a non-contact voltage detector to test the voltage of each wire.[12] Place the tip of the non-contact voltage detector on the insulation of each wire that you can see. Ensure that the non-contact voltage detector doesn’t glow as this means that it is safe to continue working. The non-contact voltage detector will glow or make a chirping sound whenever it is close to a live wire. If you find a live wire, stop working on the light fixture immediately and contact an electrician, as live wires are dangerous due to the risk of shock.[13]
- If you haven't used the non-contact voltage detector for a while, test that it works properly first. Hold it near a light bulb that is on and check that it indicates a voltage. Replace the batteries in the non-contact voltage detector if necessary.
- Always follow the directions that come with your non-contact voltage detector. For your reference, the white wire is neutral, the black wire is hot, and the copper or green wire is ground.[14]
-
2Separate the wires by removing any electrical tape or wire nuts. It is necessary to separate the wires so that you can easily install a new light fixture. If there is a wire nut holding the wires together, turn it counterclockwise to unscrew it by hand. Unwrap each wire and make sure that they aren’t tangled. Sometimes wires are bundled together with electrical tape, so remove this if necessary to separate the wires.[15]
-
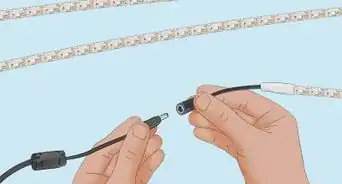
3Install a new light fixture. Follow the directions closely that come with the new light fixture. Connect the wires in the ceiling to the new fitting as per the instructions, taking care to match up the right ones. Bundle the appropriate wires together using a wire nut and then cover the wire nut in electrical tape. Screw the fixture plate, light bulbs, and light shade onto the ceiling according to the manufacturer's instructions.[18]
- Although it’s uncommon, some light fittings have several wires rather than just 3. Contact an electrician if this is the case, rather than trying to install a new fixture yourself as it can be easy to make a mistake.[19]
- Turn the wire nut clockwise to tighten it.
- After assembling the new light fixture, turn the power back on to test it out.


Expert Q&A
Did you know you can get expert answers for this article?
Unlock expert answers by supporting wikiHow
-
QuestionDo I need to use a voltage tester?
 Allen LeeAllen Lee is a Home Improvement Specialist and the Owner of Honest Lee Handyman Services, a licensed and insured handyman business servicing Sacramento, California, and surrounding areas. Working with homeowners and businesses to get their small repairs done in a timely and efficient manner, Honest Lee Handyman Services provides gutter and dryer vent cleaning along with fixture, fence, drywall, and toilet repairs.
Home Improvement SpecialistIt's optional, but I strongly recommend using one just to be totally sure there's no electricity reaching the wires.
Support wikiHow by unlocking this expert answer.
Warnings
Things You’ll Need
- Headlamp
- Ladder
- Screwdriver
- Non-contact voltage detector
- Needle nose pliers
- New light fixture
- Wire nuts
- Electrical tape


References
- ↑ https://www.familyhandyman.com/electrical/how-to-use-cheap-electrical-testers/view-all/
- ↑ Allen Lee. Home Improvement Specialist. Expert Interview. 10 July 2020.
- ↑ https://www.apartmenttherapy.com/how-to-remove-a-light-fixture-176020
- ↑ http://www.planitdiy.com/how-to/electrical/how-to-replace-a-light-fixture/
- ↑ https://www.familyhandyman.com/electrical/fluorescent-light/how-to-replace-a-fluorescent-light-ballast/view-all/
- ↑ http://www.planitdiy.com/how-to/electrical/how-to-replace-a-light-fixture/
- ↑ https://www.apartmenttherapy.com/how-to-remove-a-light-fixture-176020
- ↑ https://manoffamily.com/how-to-open-a-paint-can/
- ↑ https://www.apartmenttherapy.com/how-to-remove-a-light-fixture-176020
- ↑ https://www.prettyhandygirl.com/how-to-install-a-chandelier/
- ↑ https://www.prettyhandygirl.com/changing-out-a-light-fixture-bye-bye-hollywood-strip-light/
- ↑ Allen Lee. Home Improvement Specialist. Expert Interview. 10 July 2020.
- ↑ https://www.familyhandyman.com/electrical/how-to-use-cheap-electrical-testers/view-all/
- ↑ https://www.apartmenttherapy.com/how-to-remove-a-light-fixture-176020
- ↑ https://www.apartmenttherapy.com/how-to-remove-a-light-fixture-176020
- ↑ http://www.planitdiy.com/how-to/electrical/how-to-replace-a-light-fixture/
- ↑ Allen Lee. Home Improvement Specialist. Expert Interview. 10 July 2020.
- ↑ http://www.planitdiy.com/how-to/electrical/how-to-replace-a-light-fixture/
- ↑ https://www.finehomebuilding.com/membership/pdf/20751/021190076.pdf/
- ↑ Allen Lee. Home Improvement Specialist. Expert Interview. 10 July 2020.
- ↑ https://www.apartmenttherapy.com/how-to-remove-a-light-fixture-176020
About This Article