X
This article was co-authored by wikiHow staff writer, Jack Lloyd. Jack Lloyd is a Technology Writer and Editor for wikiHow. He has over two years of experience writing and editing technology-related articles. He is technology enthusiast and an English teacher.
The wikiHow Tech Team also followed the article's instructions and verified that they work.
This article has been viewed 255,487 times.
Learn more...
This wikiHow teaches you how to remove a check-in location from a Facebook post. You can do this both on the desktop version of Facebook and in the Facebook mobile app.
Steps
Method 1
Method 1 of 3:
Removing a Post's Location on Desktop
-
1Open Facebook. Go to https://www.facebook.com/ in your computer's web browser. This will open the News Feed page if you're logged into your Facebook account.
- If you aren't logged into Facebook, enter your email address and password in the top-right side of the page in order to log in.
-
2Click your name tab. It's in the top-right corner of the Facebook page. Doing so takes you to your Facebook profile page.Advertisement
-
3Find the post with the location that you want to remove. Scroll through your profile page until you find the Check-In post from which you want to remove the location.
-
4Click ⋯. This option is in the top-right corner of the post. Clicking it prompts a drop-down menu.
-
5Click Edit Post. It's in the drop-down menu. Doing so opens the post's Edit window.
-
6Click the location. The location's name will be at the bottom of the Edit window. Clicking it prompts a drop-down menu.
-
7Remove the location. Click x in the bottom-right corner of the post window (not the drop-down menu) to do so.
-
8Click the post's main window. Doing so will close the drop-down menu.
-
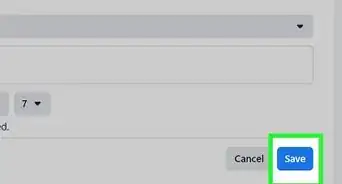
9Click Save. It's in the bottom-right corner of the window. This saves your post and removes the location from it.


Advertisement
Method 2
Method 2 of 3:
Removing a Post's Location on Mobile
-
1Open Facebook. Tap the Facebook app icon, which resembles a white "f" on a dark-blue background. This will open your News Feed page if you're logged in.
- If you aren't logged into Facebook, enter your email address (or phone number) and password before proceeding.
-
2Tap ☰. It's in the bottom-right corner of the screen. A pop-out menu will appear.
- On Android, this option is in the top-right corner of the screen.
-
3Tap your name. You'll see it at the top of the menu. Doing so takes you to your Facebook profile page.
-
4Find the post with the location that you want to remove. Scroll down through your profile page until you find the post for which you want to remove the check-in location.
-
5Tap ⋯. It's in the top-right corner of the post. A menu will open.
-
6Tap Edit Post. This option is in the menu. Doing so opens the Edit window.
-
7Tap Check In. You'll find this option near the bottom of the window.
- You may have to scroll down to see Check In.
- On Android, you may have to tap the pink "Check In" icon in the lower-right side of the Edit window.
-
8Remove the location. Tap X to the right of the location that you want to remove. Doing so will immediately remove the location from your post.
-
9Tap Done. It's in the top-right corner of the screen.
- Skip this step on Android.
-
10Tap Save. This is in the top-right corner of the screen. Doing so will save your post and remove the location from it.


Advertisement
Method 3
Method 3 of 3:
Removing a Location from Check-Ins
-
1Open Facebook on a computer. Go to https://www.facebook.com/ in your computer's web browser. While you can't delete places from your map like you used to be able to do, you can remove posts directly from the Check-Ins page.
- If you aren't signed in, enter your email address and password in the upper-right side of the page.
- You can only remove the location from a post that you created, though you can remove other people's location-tagged posts from your timeline.
- You cannot remove locations from Check-Ins in the Facebook mobile app. If you're using the mobile app, try removing an individual post's location instead.
-
2Click your name tab. It's in the top-right side of the Facebook page. Doing so opens your Facebook profile page.
-
3Open the Check-Ins page. Select More near the top of your profile page, then click Check-Ins in the resulting drop-down menu. Doing so opens a page with a list of all of your check-ins.
- If you don't see Check-Ins in the More menu, do the following: select More > click Manage Sections > check the "Check-Ins" box > click Save > select More and click Check-Ins.
-
4Click the Cities tab. You'll find it near the top of the page, just below the "Check-Ins" heading.
-
5Select a city. Near the top of the page, click the name of the city from which you want to remove a check-in post.
- You can see additional cities into which you've checked by selecting More to the right of the right-most city.
-
6Select a location. On the map in the middle of the page, click the purple location marker that you want to remove. Doing so opens a pop-up window.
- You'll notice a number on the marker if you have more than one post from this city (e.g., a 3 denotes three posts from the selected location). You'll need to delete all of the posts in the selected location in order to remove it from your map.
-
7Click the Check-In post's date. You'll see the date below your name near the top of the pop-up window. This will take you to the post.
- You can scroll through different posts in your selected location by clicking ► in the upper-right side of the pop-up window.
-
8Click ⋯ for a post or Edit for a photo. It's to the right of the post or photo from which you want to remove the location.
- If you didn't create the post with the location, you can instead click ⋯, click Remove Tag in the drop-down menu, and click OK when prompted.
- For a photo post that you didn't create, you'll click Allowed on timeline and then click Hidden from timeline in the resulting drop-down menu.
-
9Remove the location. This step will vary depending on whether you're removing the location from a post or a photo:
- Post - Click Edit in the drop-down menu, then click the X to the right of the location and click Done. You may first need to click the location's name and then click x to the right of the location.
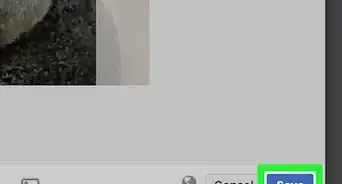
- Photo - Click the large X to the right of the location's name in the upper-right side of the page, then click Done Editing.
-
10Repeat this process with other posts in your selected location. Once you've removed every post that has a check-in from a specific location's window, the location will disappear from your Check-Ins page.


Advertisement
Community Q&A
-
QuestionHow do I delete the chat box on the bottom right corner of my page?
 Community AnswerThere should be a "delete" button that pops up or an "x" in the top right corner of the chat box. You simply click on that and the chat box will disappear.
Advertisement
Warnings
- Remember to set location privacy options to "Friends" or "Only Me" if you don't want a location to be public.⧼thumbs_response⧽
Advertisement


About This Article
Jack Lloyd
wikiHow Technology Writer
This article was co-authored by wikiHow staff writer, Jack Lloyd. Jack Lloyd is a Technology Writer and Editor for wikiHow. He has over two years of experience writing and editing technology-related articles. He is technology enthusiast and an English teacher. This article has been viewed 255,487 times.
How helpful is this?
Co-authors: 13
Updated: May 6, 2021
Views: 255,487
Categories: Featured Articles | Facebook Profiles
Advertisement