This article was co-authored by wikiHow staff writer, Nicole Levine, MFA. Nicole Levine is a Technology Writer and Editor for wikiHow. She has more than 20 years of experience creating technical documentation and leading support teams at major web hosting and software companies. Nicole also holds an MFA in Creative Writing from Portland State University and teaches composition, fiction-writing, and zine-making at various institutions.
There are 12 references cited in this article, which can be found at the bottom of the page.
The wikiHow Tech Team also followed the article's instructions and verified that they work.
This article has been viewed 92,614 times.
Learn more...
No matter your platform, there’s no shortage of ways to send a Microsoft Word document to anyone on the Internet. Most cloud services (such as Google Drive and Dropbox) feature the ability to send documents directly from their desktop and mobile apps. You can also attach a document to an email or Facebook chat. And if you have mail program set up on your computer, you can even send your document without leaving Microsoft Word.
Steps
Attaching a Document to a Gmail or Yahoo! Message
-
1Sign in to your Gmail or Yahoo! Mail account. You can attach your Word document to a message in Gmail or Yahoo! Mail on a computer or by using either service’s app for mobile devices.
- Most free mail sites and apps are similar. These instructions may also help you use providers other than Gmail and Yahoo.
-
2Click or tap “Compose”. In both mobile apps, the “Compose” icon is a pencil.[1] A new message window will appear.Advertisement
-
3
-
4Tap “Attach File” or “Insert from Drive”. You can skip this step if you’re not using the Gmail app on a mobile device.
- Choose “Insert from Drive” if the document is saved to your Google Drive.
- Choose “Attach File” if the document is saved to your phone or tablet.
-
5Navigate to the document you want to attach. Browse to the location of your Word document and double-click (or tap) to attach it.
- If you’re attaching from Google Drive, tap the file you want to attach, and then tap “Select”.
-
6Address the email to the recipient. Enter the desired recipient’s email address into the “To:” field, then add your subject and message content.
-
7Click or tap “Send”. When the recipient opens the email, they’ll find the option to open or download the file to their computer or mobile device.


Attaching a Document in Mail for iPhone or iPad
-
1Open the Mail app on your device. To use this method, make sure Mail is properly configured to send mail from your email account.[4]
- You’ll be able to attach a document that’s on your device or in your iCloud Drive.
- If you have the Dropbox, Google Drive, or OneDrive apps installed on your device, you’ll have the option to attach a document from one of those accounts.
-
2Tap the “Compose” icon. The icon looks like a square with a pencil.
-
3Type an email address into the “To:” field. This should be the address of the person to whom you’ll be sending the document.
-
4Type your message. Enter a subject into the “Subject” field and type a note to the recipient in the main text area.
-
5Touch and hold your finger in the body of the message. A black bar will appear containing several options from which to choose.[5]
-
6Tap “Add Attachment”. The file navigator will open to your iCloud drive by default.
-
7Tap “Locations” to switch to another location. If the document is not located in your iCloud drive, choose it from any of the folders listed (including Google Drive, Dropbox, or OneDrive, if applicable).
- If you don’t see an icon for the cloud service you use, tap “More,” and then select your service. Flip the switch to the “On” position to enable it, and then use the back button to return to the Locations screen.
-
8Select the file and tap “Add Attachment.” You’ll be returned to the email message you previously composed. This message now has your document attached.
-
9Tap “Send.” The file will be delivered to the appropriate email account.


Attaching a Document in Mail for Mac
-
1Launch the Mail app on your Apple device. To use this method, you’ll need to have the Mail app configured to send mail through your email account. If you haven’t already done so, do it now.
-
2Press ⌘ Cmd+N to compose a new message. You could also click the New Message icon (a square with a pencil) or click File > New Message.[6]
-
3Click the paperclip icon. This icon appears in the upper right area of the New Message Window.
-
4Select the document and click “Choose File”. You can hold down the ⌘ Cmd key as you click if you want to select multiple files.
-
5Address the email to the recipient. Type the recipient’s email address into the “To:” field, a subject in the “Subject:” field, and a note in the large text area.
-
6Send the email. Click the paper airplane icon at the top left corner of the message to send the email and its attached document.


Sharing a Document from Google Drive
-
1Open your Google Drive. If your Word document is located in your Google Drive, it’s easy to share it with others. Accessing your Drive is different depending on your platform:[7]
- Mobile: Launch the Google Drive app on your device.
- Desktop: Log in to http://drive.google.com in your web browser.
-
2Navigate to the document you want to share. If you don’t see it in the main folder, you may have to look in some of the subfolders.
- If you haven’t yet uploaded the document from your computer, click New > File Upload, and then double-click the Word document.[8]
-
3Click the ⋮ icon and tap “Add People.” Skip this step if you’re using the web version of Drive.
-
4Right-click the file and select “Share.” Skip this step if you’re using the mobile app.
- Another way to do this is to single-click the document and then click the Share icon (the outline of a person’s head with a plus sign.)
-
5Type the email address of the person you want to receive your file. If this person is one of your Google contacts, you can just start typing their name and then select the correct person from the search results.
-
6Control whether the person can edit the copy in your Google Drive. By default, Drive gives the person permission to edit the document in your Google Drive.
- Leave this alone if you’re sharing the document with someone and you both plan to make edits.
-
7Change “Can Edit” to “Can View” if you want the person to be able to download their own copy but not edit yours.
-
8Select “Done” or “Share” to share the document. An email will be sent to the recipient containing information on how to access the document. They’ll be able to view it online or download it to their computer.


Sharing a Document from Dropbox
-
1Open Dropbox on your computer or mobile device. If you’re a Dropbox user, you can use the service to share documents with anyone on the web. Using this method will send a message to the recipient that includes a link to the document. The recipient will be able to download the document by accessing that link (and they won’t need a Dropbox account).
- You’ll need to have a Dropbox account to use this method.
- You should also have the application installed on your device. If you’re using a computer, you can use the web version by signing in to http://www.dropbox.com.
-
2Add the document to your Dropbox. If you haven’t uploaded the Word document to your Dropbox, do so now.
- Mobile app: Tap the “+” icon and then select “Upload files.” Navigate to the document you want to upload, and then tap “Upload File.”
- Desktop app: If the folder where the file’s stored is not already synced with Dropbox, drag the file from its current location to the Dropbox folder.
- Dropbox.com: Navigate to the folder where you’d like to store the file, then click the “Upload” icon to select your document.
-
3Open the “Share” window. This step is a little different depending on your platform:[9]
- Mobile: Tap the downward-pointing arrow next to your Document and select “Share.”
- Desktop: Right-click (or Ctrl+Click) the document in the Dropbox application, then click “Share…”
- Dropbox.com: Hover the mouse over the document file and select “Share” (when the menu appears).
-
4Select “Can View” from the permissions options. If you’re using a mobile device, you’ll see this option under “These People”.[10]
-
5Type the email address of the person to whom you’d like to send the file. Enter this into the “To:” field. To add multiple recipients, separate each email address with a comma (,).
-
6Select the “Invite” or “Send” button. The button name depends on your application.[11]
- If you’re using the Dropbox.com site, the button will say “Share.” An email will now be sent to the email address(es) you provided.


Attaching a Document to a Facebook Message
-
1Log into Facebook. If you have a Word document on your computer that you want to send to someone else, you can do so using the web version of Facebook.[12]
- For this method to work, both you and the person to whom you’d like to send the document need to have Facebook accounts.
- The Facebook Messenger app does not support attaching documents saved to your phone, other than photos or videos
-
2Open a chat window with the recipient. You will be attaching the document to a chat message.
- Click the mail icon at the top right area of Facebook and select “New Message.”
- Start typing the person’s name into the “To:” field and then click their name when it appears in the search results.
-
3Click the paperclip icon at the bottom of the chat window. Now you’ll be able to navigate to the Word document on your computer.
-
4Select the document and click “Open”. If you’re using a Mac, the button will say “Choose File.”
-
5Press ↵ Enter or ⏎ Return to send the document. The recipient will be able to download the document by double-clicking the icon that appeared in the chat window.


Sharing in Word Online
-
1Open your document in Word Online. If you’re using the free version of Microsoft Word available online, you can share the document right from the program.
- This method is similar to sharing a document from your OneDrive account. If your document is in OneDrive, navigate to the document to open it in Word Online.
-
2Click the “Share” button. This button is at the top right corner of the screen.
-
3Select “Invite People.” Here you can enter the email address of the person you’re sharing with.
-
4Enter the recipient’s email address in the “To:” field. To add multiple recipients, separate each email address with a comma (,).
-
5Select editing permissions for the document. By default, the recipient of the document will have the ability to make changes to your document. This is noted by the “Recipients can edit” dropdown on the Invite screen.
- If you want to share ongoing access to this document and want everyone on the Invite list to be able to make edits, leave this option alone.
- To share a read-only version of the document (cannot be edited by anyone else), click “Recipients can edit” and select “Recipients can only view.”
-
6Type a note into the “Note” field. Think of this field as the body of an email. Type something here that will alert the recipient to what the email and document are about.
-
7Click “Share.” An email will be sent to the recipient that contains a link to the document. With that link, the recipient can make changes to the document on Word Online (if you gave them permission to do so) or download the file to their computer.


Sharing a Document in Word 2016
-
1Open your document in Microsoft Word. If you’re using Word 2016 for Windows or Mac, you’ll be able to use the built-in “Share” feature to send your document from the app.
- If you’re using an older version of Word, just click the File menu (or Office button in 2007) and select “Send” or “Send To” to send a Document.
-
2Save changes to your document. To avoid sending an outdated version of your document, click “File” and then “Save”.
-
3Click the “Share” icon. You’ll see this icon in the top right corner of Word. It looks like the silhouette of a person with a + sign.[13]
-
4Click “Save to Cloud” if prompted. If you haven’t saved the document to the cloud, you’ll be prompted to do so. Word attempts to save your document to the cloud in case you want to share the document for editing instead of sending it as an attachment (more on this soon).
-
5Click “Send as Attachment.” You may have to click “Share” again to see this option. “Send as Attachment” will allow you to email a copy of the document to a recipient.
- If, instead of sending the file to the recipient, you’d like to be able to share online editing access of the document, choose “Invite People” instead.[14] Type the person’s email address when prompted, then click “Send” to email them an invitation to edit the document.
-
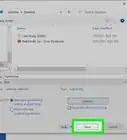
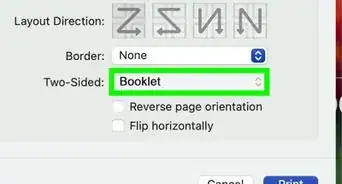
6Select an attachment type. You have two options from which to choose:[15]
- Send a copy: Choose this option if the person to whom you’re sending the document needs to edit or add to the document.
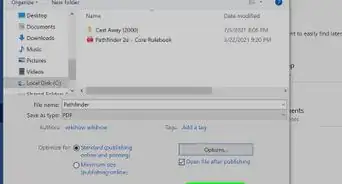
- Send a PDF: Choose this option if you don’t want the document to be modified.
-
7Address the email to the recipient. Once you select an attachment option, a new email message will open in your default email program (e.g., Outlook, Apple Mail). Enter the recipient’s email address into the “To:” field, type a subject line, and a description of the file in the body.
- To send the document to multiple people, separate each email addresses with a comma (,).
-
8Click “Send.” Your document will arrive at its destination in a few moments.


References
- ↑ https://support.google.com/mail/answer/6584
- ↑ https://help.yahoo.com/kb/SLN15987.html
- ↑ https://help.yahoo.com/kb/SLN26422.html
- ↑ http://www.imore.com/how-add-email-attachments-mail-iphone-and-ipad
- ↑ http://www.imore.com/how-add-email-attachments-mail-iphone-and-ipad#shortcut
- ↑ https://support.apple.com/en-us/HT204093
- ↑ https://support.google.com/drive/answer/2494822
- ↑ https://support.google.com/drive/answer/2494822?co=GENIE.Platform%3DDesktop&hl=en&oco=1
- ↑ https://www.dropbox.com/help/167
- ↑ https://www.dropbox.com/help/167
- ↑ https://www.dropbox.com/help/167
- ↑ https://www.facebook.com/help/121288674619000
- ↑ https://support.office.com/en-us/article/Share-your-document-in-Word-2016-for-Windows-d39f3cd8-0aa0-412f-9a35-1abba926d354
- ↑ https://support.office.com/en-us/article/Share-your-file-in-Word-2016-for-Mac-ced5a682-a093-4886-84c9-96fc164b0913
- ↑ https://support.office.com/en-us/article/Share-your-document-in-Word-2016-for-Windows-d39f3cd8-0aa0-412f-9a35-1abba926d354
About This Article