This article was co-authored by wikiHow staff writer, Hannah Madden. Hannah Madden is a writer, editor, and artist currently living in Portland, Oregon. In 2018, she graduated from Portland State University with a B.S. in Environmental Studies. Hannah enjoys writing articles about conservation, sustainability, and eco-friendly products. When she isn’t writing, you can find Hannah working on hand embroidery projects and listening to music.
There are 8 references cited in this article, which can be found at the bottom of the page.
The wikiHow Video Team also followed the article's instructions and verified that they work.
This article has been viewed 45,060 times.
Learn more...
Sculpey clay is a type of polymer clay that can be molded into almost any shape and then hardened in your oven at home. It’s a great material to use in jewelry making, sculpture building, and charm making. Baking Sculpey clay might seem intimidating, but if you mold your clay, bake it at the right temperature, and cool it slowly, you can have professional and glossy looking Sculpey figures in no time.
Steps
Molding Your Clay
-
1Protect your surface with some parchment or wax paper. Clay can be sticky and leave a mess if it touches surfaces like tables or countertops. You will be working on a flat surface, so lay a layer of parchment paper or wax paper down and secure it with tape before you start working with your clay.[1]
- If you do get stubborn clay stuck to your surfaces, rubbing alcohol can help dissolve the clay and makes it easy to clean up.
-
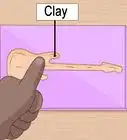
2Knead your clay gently for 3 to 5 minutes until it is soft. When you take your clay out of the package, it will be stiff and hard to mold. Hold a small piece of clay in between your fingers and knead it gently until you can form it into shapes. You can do this one small piece of dough at a time until you have enough to do your project.[2]Advertisement
-
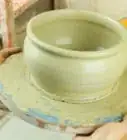
3Create the shapes that you want to bake. Sculpey clay is great for modeling tiny figures, beads, or even small jewelry pieces. You can make items that are as large and as detailed as you’d like. Large and thick clay will take longer to bake than small thin clay.[3]
- There are many specific tools you can buy at craft stores to use on Sculpey clay, like craft knives and rolling tools.
- You can also use kitchen tools like steak knives and rolling pins to help in your clay molding as long as you wash them before using them on food.

Heating Sculpey Clay
-
1Preheat your oven to 275 °F (135 °C). Most Sculpey clay is baked at 275 °F (135 °C), but you should double check on your package to see what it recommends. You should not have your oven at a higher temperature, because you want your clay to bake slowly so it doesn’t burn.[4]
- If you want to be sure that your oven is at the correct temperature, you can use an external oven thermometer to double check. These are available at most home goods stores.
- Sculpey clay does not release toxic fumes as it bakes, so your oven will not be damaged.[5]
-
2Line a baking tray with parchment paper. Parchment paper will provide an extra protective layer for both your clay figures and your baking tray. You can also use wax paper to line your baking tray.[6]
- If you don’t have parchment or wax paper, you can use aluminium foil, but it will leave a shiny mark on whatever part of the clay touches it while baking.
-
3Place your clay figures on the baking tray spaced evenly apart. Depending on the size of your figures, you can bake multiple clay projects at a time. If you do have more than one piece on a baking tray, make sure that they are not touching each other and have about 1 inch (0.025 m) in between them, just in case they fall over in the oven.[7]
-
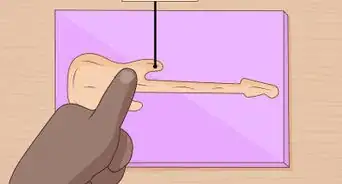
4Bake your sculptures for 15 minutes per 1⁄4 inch (6.4 mm) of thickness. Estimate or measure the thickest part of your sculpture and add 15 minutes to your bake time per 1⁄4 inch (6.4 mm) of thickness. Check on your clay every 10 minutes or so to make sure that it is not burning.[8]
- If your clay starts turning brown or smoking, turn your oven down right away and take your figures out to cool.
-
5Take your clay out of the oven when your timer is done. There is no way to know if your clay has hardened fully until it is cool, so take your clay out of the oven once your timer runs out. It is better to underbake your clay than to overbake it, so you should take it out even if you think it needs more time.[9]


Cooling and Glazing the Clay
-
1Let your clay cool for 10 minutes. Leave your figures on the baking tray and let them cool for about 10 minutes. They might still look soft when they are warm from the oven, but they will harden as they cool down.[10]
- If your clay broke while it was in the oven, you can use Sculpey glue to attach two pieces together and bake them again. Make sure to do this before adding any paint or glaze.
-
2Squeeze your clay figures lightly to test their firmness. Test each of your clay pieces for how hard they are by gently pressing on them to see if they hold up. If your fingers make indents in your clay or your figures bend easily, they are not firm enough and you should put them back in the oven for 2 minutes at a time until they are hard.[11]
-
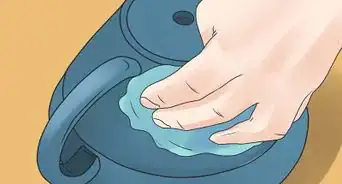
3Apply Sculpey glaze the clay for a glossy finish. If you want your clay figures to look sleek and polished, you can apply a glaze made specifically for Sculpey clay after your figures are baked. Use a paint brush and lightly coat your figure in Sculpey glaze and let it dry for 5 minutes, or until it is no longer tacky to the touch.[12]
- Make sure to wash off your paint brush after you use Sculpey glaze, because it will harden on your brush.

Things You’ll Need
- 2 sheets of parchment paper
- 1 baking tray
- Sculpey glaze (optional)


References
- ↑ http://www.polymerclayweb.com/AboutPolymerClay/TheBasics/GettingStarted.aspx
- ↑ https://www.youtube.com/watch?v=FCIdmU6m8LE&feature=youtu.be&t=56
- ↑ http://www.polymerclayweb.com/AboutPolymerClay/TheBasics/GettingStarted.aspx
- ↑ http://www.earthguild.com/products/riff/rpolymer.htm#targetText=Sculpey%20does%20best%20at%20about,per%20quarter%20inch%20of%20thickness.
- ↑ https://www.youtube.com/watch?v=wZStexRD7HI&feature=youtu.be&t=691
- ↑ https://www.youtube.com/watch?v=wZStexRD7HI&feature=youtu.be&t=711
- ↑ http://www.earthguild.com/products/riff/rpolymer.htm#targetText=Sculpey%20does%20best%20at%20about,per%20quarter%20inch%20of%20thickness.
- ↑ https://www.polymerclayer.com/baking-polymer-clay.html
- ↑ https://www.youtube.com/watch?v=wZStexRD7HI&feature=youtu.be&t=767
About This Article