This article was co-authored by wikiHow staff writer, Nicole Levine, MFA. Nicole Levine is a Technology Writer and Editor for wikiHow. She has more than 20 years of experience creating technical documentation and leading support teams at major web hosting and software companies. Nicole also holds an MFA in Creative Writing from Portland State University and teaches composition, fiction-writing, and zine-making at various institutions.
The wikiHow Tech Team also followed the article's instructions and verified that they work.
This article has been viewed 137,221 times.
Learn more...
This wikiHow teaches you how to change the color of your hair in a realistic way using using Adobe Photoshop. You'll learn how to properly select the hair without including the background (the key to making your color realistic), and how to work with layers to add dimension to your color.
Steps
Selecting the Hair
-
1Open Photoshop on your computer. You'll usually find it in the Start menu (in Windows) or in the Applications folder (on a Mac).
-
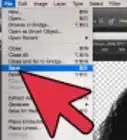
2Open your photo. If you haven't already done so, click the File menu, select Open , and then open the photo you want to edit.
- When selecting a photo, choose one with background that contrasts the hair color (for example, a white background if you're changing dark hair). This makes it easier to select the hair without capturing anything in the background.
Advertisement -
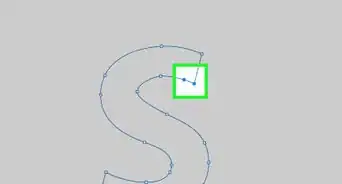
3Select the Magnetic Lasso tool. To do this, click the tiny arrow at the bottom-right corner of the Lasso tool (on the toolbar that runs along the side of Photoshop) to view the options, then click Magnetic Lasso Tool.
-
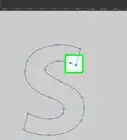
4Draw a selection around the hair. Click a point very close to the hair, release the mouse button, then move the mouse slowly around the entire hairstyle (not including the face). Continue moving the mouse around the hairstyle until you reach the starting point, then click the original dot. The selection should now be outlined with a blinking dashed line.
- Hair is not typically neat and tidy, so it can be challenging to select flyaways, wisps, and other nuances. It may be helpful to zoom in).
- It's okay if you capture a little bit of the background, clothing, or skin in your selection—this can be fixed later.
-
5Press Control+Alt+R (PC) or ⌘ Command+⌥ Option+R (Mac). This opens the Refine Edge dialog box, which should appear on the right side of Photoshop. You'll also notice that you now see only the area that you've selected in the image (and the rest of the image is a solid color).[1]
-
6Click the View menu on the dialog box. It's at the top of the "Refine Edge" dialog box under "View Mode."
- Click Marching Ants. This changes the view back to what you were previously working with.[2]
-
7Use the mouse to fix errors with the selection. When you opened the Refine Edge tool, the cursor turned into a special brush. You can use this brush to modify the selected area:
- To include more hair that wasn't selected, click or drag the mouse over those areas. The blinking selection line will expand as needed.
- To remove parts of the background, clothing, or skin you don't want in the selection, hold the Alt key (PC) or ⌥ Option key (Mac) as you click those areas.
- You may have to click or drag the mouse more than once over more stubborn areas. Also, try playing around with some of the other options on the Refine Edge box to see if you get more precise results.
- If you make a mistake, press Ctrl+Z (PC) or ⌘ Cmd+Z (Mac) to undo.
-
8Click the “Output To” menu. It's at the bottom of the "Refine Edge" dialog box under the "Output" header.
-
9Select New Layer with Layer Mask from the menu and click OK. This creates a new layer that includes only the hair. You'll now see only the hair on a transparent background.[3]
- The next section will explain how to better improve your selection for the most natural results. If you're satisfied with your selection, you can skip it.


Fine-Tuning the Selection
-
1Click the New Layer button. It's the square with an upturned corner at the bottom of the Layers panel. This creates a new layer called Layer 1, which is now on the top.
- The Layers panel is usually on the right side of Photoshop, but if you don't see it, press F7 to toggle it back on.
-
2Drag the new layer down so it's right above the Background layer. Just drag the name of the layer (in the Layers panel) and drop it right above the Background layer.
-
3Paint the background of the new layer black. Once you do this, you'll see the selected area on a black background. Here's how:
- Click the Paint Bucket tool in the toolbar on the left side. It's near the center of the toolbar. If you don't see it but see a Gradient tool, click the small arrow at its bottom-right corner, then select Paint Bucket Tool.
- Select black as your color.
- Click the tool on the background of the image.
-
4Adjust the opacity of the layer so you can see some of the face. To do this, drag the “Opacity” slider at the top-right corner of the Layers panel until you can see some of the face and background details.
-
5Select the layer that contains the hair. Click its name (it's probably called something like “Background Copy”) in the Layers panel.
-
6Remove remaining parts of the background/face. For the most natural results, you'll want to use a soft paint brush to get rid of any remaining background or face elements. Here's how to do this:
- On the layer with the hair (in the Layers panel), click the second tiny preview image. It's the one with a black background. This adds the mask to the “Masks” panel, which is usually right above the Layers panel. You may have to click the Masks tab to see it.
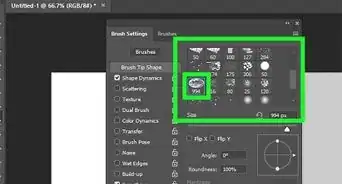
- Select the Brush tool on the toolbar, and select Black as the color. Adjust the brush size to something that you can use to paint the smaller areas. A lower flow makes the strokes look more natural.[4]
- Paint over the places you want to remove from the selection in black. Anything black will be removed.
- Paint over the places you want to include in white. Anything white will be added to the selected area.
-
7Delete the black layer. This is the one you created that is usually called “Layer 1.” To delete it, right-click its name in the Layers panel, then click Delete Layer. You may have to click Yes to confirm.


Adjusting the Hair Color
-
1Make sure all layers are visible. If you just see the hair floating on a transparent or solid background, click the box next to the “Background” layer in the Layers panel. If there is not a tiny eyeball icon in the box next to each layer on the Layers panel.
- The Layers panel is usually on the right side of Photoshop, but if you don't see it, press F7 to toggle it back on.
- These steps will help you change the hue and saturation of the hair color. Another way to modify the hair color is to selective color, which you can learn about in this wikiHow.
-
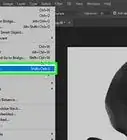
2Click the Window menu. It's at the top of the screen.
-
3Select Adjustments. This displays the Adjustments panel.[5]
-
4Click the Hue & Saturation icon. It's on the Adjustments panel, at the beginning of the second row of icons. This opens the Hue & Saturation panel right on the Adjustments panel. It also creates a new layer.
-
5Press Control+Alt+G (PC) or ⌘ Command+⌥ Option+G (Mac). This ensures that the color change will only affect the selected hair.
-
6Drag the “Hue” slider to change the hair color. The color of the hair will change as you move the slider without affecting the rest of the image.
-
7Use the other sliders to fine-tune the color. Drag the “Saturation” slider to change the intensity of the color, and the “Lightness” slider to adjust the opacity of the color over that of your original.
-
8Add more dimension to the color. If you're not satisfied, you can take the color to another level:[6]
- If the original hair is dark and you want to make it brighter, press Control+J (PC) or ⌘ Command+J (Mac) to create a new adjustment layer, press Control+Alt+G (PC) or ⌘ Command+⌥ Option+G (Mac) to select just the hair, then adjust the sliders as needed.
- You can continue adding more adjustment layers to add dimension to the color, such as highlights.
-
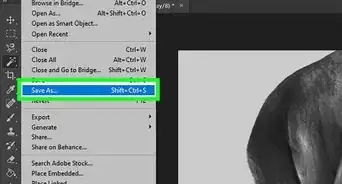
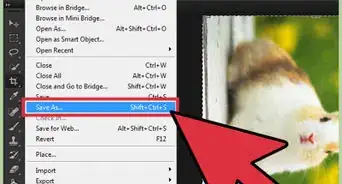
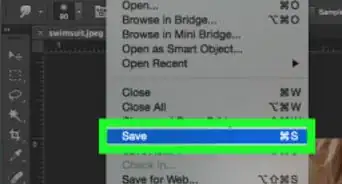
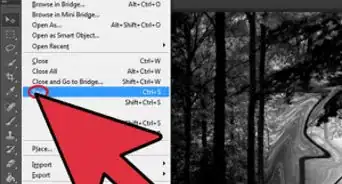
9Save your work. Now that you've changed your hair color, you'll want to save your handiwork as a new file. To do so, click the File menu, select Save As, choose a file format, location, and file name, and then click Save.


References
- ↑ https://helpx.adobe.com/photoshop/using/default-keyboard-shortcuts.html
- ↑ https://www.photoshopessentials.com/photo-editing/selecting-hair/
- ↑ https://design.tutsplus.com/tutorials/how-to-change-hair-and-fur-color-in-photoshop--cms-27994
- ↑ https://design.tutsplus.com/tutorials/how-to-change-hair-and-fur-color-in-photoshop--cms-27994
- ↑ https://design.tutsplus.com/tutorials/how-to-change-hair-and-fur-color-in-photoshop--cms-27994
- ↑ https://design.tutsplus.com/tutorials/how-to-change-hair-and-fur-color-in-photoshop--cms-27994
About This Article