This article was co-authored by Luigi Oppido. Luigi Oppido is the Owner and Operator of Pleasure Point Computers in Santa Cruz, California. Luigi has over 25 years of experience in general computer repair, data recovery, virus removal, and upgrades. He is also the host of the Computer Man Show! broadcasted on KSQD covering central California for over two years.
This article has been viewed 173,714 times.
Anyone who’s worked on a computer knows they heat up during use. A part known as a “heatsink” vents the excess to keep the processor from overheating, and thermal paste is used to conduct that heat from the processor to the heatsink. This paste dries out and needs to be replaced periodically, which is a relatively easy task as far as computer repair goes. First, you need to take some safety precautions to avoid damaging yourself and your computer. Then it’s simply a matter of cleaning out the old paste and applying new paste.[1]
Steps
Working Safely
-
1Switch off all power. If your computer’s on, open the main menu on the home screen. Select “shut down” or equivalent to turn off all power. Don’t trust pushing the “power” button to turn off all power. More often than not, this only puts your computer into “sleep” mode.[2]
-
2Unplug all cords and devices. If your computer is currently plugged into a power outlet, unplug it. If it’s a laptop, unhook it from its charger, too. Detach any other devices that are connected to the computer.[3]Advertisement
-
3Take out the battery. If you have a laptop, turn it over. Find the battery compartment. Release its latch to remove the lid. Take the battery out and set it aside.[4]
-
4Hold the power button down. Expect some amount of electricity to still linger within your computer after you power it off and remove the battery. Press the power button and keep it pressed down for at least ten seconds. Discharge any residual electricity that’s still present.[5]
-
5Wear safety gear. Before you open the computer and start working on its insides, put on a pair of latex gloves. Expect oils from your skin to interfere with the components’ normal operation.[6] Also, wear a pair of anti-static bracelets to prevent your fingers from discharging any static electricity, which can also damage the components.[7]
- Anti-static bracelets can be purchased online or at brick-and-mortar stores like Walmart or Radio Shack.
-
6Work in a dirt- and dust-free environment. Expect dirt and dust particles to also interfere with the computer’s working parts. Choose a clean area to work in. If your workspace needs to be cleaned, wait for any airborne particles to settle before you proceed with opening your computer.[8]


Removing the Old Paste
-
1Refer to your user manual for access. Gaining access to your computer’s heatsink and/or CPU will vary depending on what you have. Refer to its owner’s manual to find out how to identify, access, remove, and reinstall the necessary parts. If you don’t have a hard copy, search the manufacturer’s website for a copy online.[9]
-
2Dust the heatsink’s vents. Once you have safely removed the heatsink, get rid of any dust in its vents. Use a small brush and/or a can of compressed air. Be sure to do this well away from the computer’s other parts so the loose dust doesn’t end up where it doesn’t belong.[10]
-
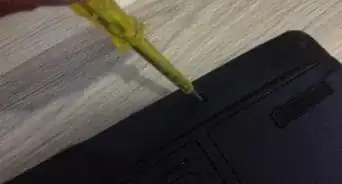
3Scrape off old paste. Find the heatsink’s copper cores. Scrape away as much of the old thermal paste as you can with the flat end of a spudger (a small handheld tool used to manipulate computer components).[11] However, you obviously want to be careful not to scratch any parts, so if you’re nervous about this step, feel free to skip to the next.[12]
- Alternatively, you could use a dry cloth or paper towel to rub off most of it if you're worried about scratching the components.[13]
-
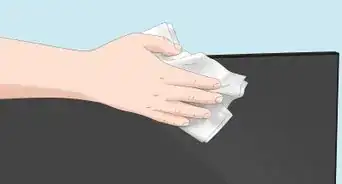
4Rub away the residue. Even if you used a spudger, don’t expect it to get rid of the old paste entirely. Whether you skipped the previous step or not, grab some coffee filters, lint-free cloths, or q-tips. Wet one with either rubbing alcohol or a cleaner specifically designed for thermal materials.[14] Then use the wet end to moisten, loosen, and remove the old paste. Repeat as needed with fresh filters, cloths, or q-tips.[15]
- After all traces have been removed, repeat this step once more to get the surface ready for a new application of thermal paste.
- Cleaners designed for this specific purpose are usually labeled as TIM cleaners (thermal interface material).[16]
-
5Repeat with the processor. Inspect it for any thermal paste where it came into contact with the heatsink. If you find any, use the same steps to clean the surface. However, if you use a spudger to scrape the old paste away, only use a plastic one to reduce the chance of scratching or otherwise damaging parts. If you don’t have one, don’t attempt scraping.[17]
- Be especially mindful about where the old paste ends up. Once it’s loosened, you don’t want to accidentally brush it off so that it ends up lodged elsewhere in the processor.
-
6Do the same anywhere else thermal paste has spilled. If your last application of thermal paste dried to any other parts, use the same method to clean it up. However, use q-tips, paper towels, or other soft material rather than a spudger, since other parts may be more fragile.[18] Additionally, try using a compressed-can of CFC (chlorofluorocarbon)-based automotive electronic contact cleaner if the paste has dried in thin, hard-to-reach gaps.[19]


Applying New Paste
-
1Give the heatsink and processor a chance to dry. Remember: after you remove all traces of old paste, you want to wipe the heatsink and processor with another application of rubbing alcohol or cleaner. Do not apply new paste immediately after doing so. Wait until they have thoroughly air-dried.[20]
-
2Dab the processor’s core with paste. Apply a small bead of new paste directly to its surface. Keep it about the same size as a rice grain. Don’t worry about doing the same to the heatsink, unless your owner’s manual specifically states otherwise.[21]
- Thermal paste is available online and stores selling computers and other electronics.
-
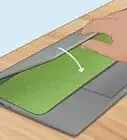
3Spread the paste over the core’s surface. If you’ve been using latex gloves, switch to a clean, fresh pair. Otherwise, wrap some plastic wrap around your finger. Use your fingertip to spread the bead of paste over the core’s surface.[22]
- Try not to get it on the surrounding green area, but don’t freak out if this happens by accident. Your computer will still work fine. You’ll just have more to clean up next time around.
-
4Put your computer together. Once the paste has been spread over the processor’s core, you’re good to go. Reassemble your computer. Refer to your owner’s manual for specific instructions regarding your particular model.[23]


Expert Q&A
-
QuestionShould I clean off thermal paste?
 Luigi OppidoLuigi Oppido is the Owner and Operator of Pleasure Point Computers in Santa Cruz, California. Luigi has over 25 years of experience in general computer repair, data recovery, virus removal, and upgrades. He is also the host of the Computer Man Show! broadcasted on KSQD covering central California for over two years.
Computer & Tech SpecialistIf you're looking at some thermal paste and it looks even a little dried out or old, it's a good practice to get in the habit of cleaning it off and replacing the paste. -
QuestionCan I use water to clean thermal paste?Luigi OppidoLuigi Oppido is the Owner and Operator of Pleasure Point Computers in Santa Cruz, California. Luigi has over 25 years of experience in general computer repair, data recovery, virus removal, and upgrades. He is also the host of the Computer Man Show! broadcasted on KSQD covering central California for over two years.
Computer & Tech SpecialistYou can. I'm pretty fond of isopropyl alcohol and a cotton swab, though. Alcohol isn't conductive so you won't need to worry about something going wrong so long as it's dry when you reassemble the computer. -
QuestionHow much thermal paste should you use?Luigi OppidoLuigi Oppido is the Owner and Operator of Pleasure Point Computers in Santa Cruz, California. Luigi has over 25 years of experience in general computer repair, data recovery, virus removal, and upgrades. He is also the host of the Computer Man Show! broadcasted on KSQD covering central California for over two years.
Computer & Tech SpecialistI usually put a small bit that's the size of a grain of rice right in the center of the heatsink. You really don't need a lot of it.
Things You’ll Need
- Your computer’s user manual
- Clean workspace
- Latex gloves (optional)
- Anti-static bracelets (optional)
- Small brush or compressed air for dusting
- Spudger (preferably plastic)
- Coffee filters, lint-free cloths, or q-tips
- Rubbing alcohol or thermal material cleaner
- Thermal paste
- Plastic wrap


References
- ↑ https://www.ifixit.com/Guide/HP+Probook+6450b+Fan+Cleaning+%26+Thermal+Paste+Replacement/37688
- ↑ https://www.ifixit.com/Guide/HP+Probook+6450b+Fan+Cleaning+%26+Thermal+Paste+Replacement/37688
- ↑ https://www.ifixit.com/Guide/HP+Probook+6450b+Fan+Cleaning+%26+Thermal+Paste+Replacement/37688
- ↑ https://www.ifixit.com/Guide/HP+Probook+6450b+Fan+Cleaning+%26+Thermal+Paste+Replacement/37688
- ↑ https://www.ifixit.com/Guide/HP+Probook+6450b+Fan+Cleaning+%26+Thermal+Paste+Replacement/37688
- ↑ https://www.ifixit.com/Guide/How+to+Apply+Thermal+Paste/744
- ↑ https://www.ifixit.com/Guide/HP+Probook+6450b+Fan+Cleaning+%26+Thermal+Paste+Replacement/37688
- ↑ https://www.ifixit.com/Guide/How+to+Apply+Thermal+Paste/744
- ↑ https://www.ifixit.com/Guide/How+to+Apply+Thermal+Paste/744
- ↑ https://www.ifixit.com/Guide/HP+Probook+6450b+Fan+Cleaning+%26+Thermal+Paste+Replacement/37688
- ↑ https://www.ifixit.com/Guide/How+to+Apply+Thermal+Paste/744
- ↑ https://www.ifixit.com/Guide/HP+Probook+6450b+Fan+Cleaning+%26+Thermal+Paste+Replacement/37688
- ↑ http://www.pcadvisor.co.uk/how-to/desktop-pc/how-to-apply-thermal-paste-cpu-3636146/
- ↑ https://www.ifixit.com/Guide/How+to+Apply+Thermal+Paste/744
- ↑ https://www.ifixit.com/Guide/HP+Probook+6450b+Fan+Cleaning+%26+Thermal+Paste+Replacement/37688
- ↑ http://www.pcadvisor.co.uk/how-to/desktop-pc/how-to-apply-thermal-paste-cpu-3636146/
- ↑ https://www.ifixit.com/Guide/How+to+Apply+Thermal+Paste/744
- ↑ Luigi Oppido. Computer & Tech Specialist. Expert Interview. 13 November 2020.
- ↑ http://www.tomshardware.com/forum/337881-28-spilled-thermal-paste-help
- ↑ https://www.ifixit.com/Guide/How+to+Apply+Thermal+Paste/744
- ↑ https://www.ifixit.com/Guide/HP+Probook+6450b+Fan+Cleaning+%26+Thermal+Paste+Replacement/37688
- ↑ https://www.ifixit.com/Guide/How+to+Apply+Thermal+Paste/744
- ↑ https://www.ifixit.com/Guide/How+to+Apply+Thermal+Paste/744
About This Article

To clean thermal paste, start by shutting down your computer, uplugging all of the cords, and removing the battery if you're working with a laptop. Next, hold the power button down for at least 10 seconds to discharge any residual electricity. Then, before removing the old paste, put on latex gloves and anti-static bracelets to avoid damaging the inside of your computer. You may also want to consult your user manual so you can easily locate the CPU or heatsink. When you're ready, remove the heatsink or CPU and dust the vents. Once this step is complete, use a wet cloth to remove the old paste. To learn how to apply new paste to the processor, keep reading!