This article was co-authored by Luigi Oppido and by wikiHow staff writer, Nicole Levine, MFA. Luigi Oppido is the Owner and Operator of Pleasure Point Computers in Santa Cruz, California. Luigi has over 25 years of experience in general computer repair, data recovery, virus removal, and upgrades. He is also the host of the Computer Man Show! broadcasted on KSQD covering central California for over two years.
There are 8 references cited in this article, which can be found at the bottom of the page.
This article has been viewed 312,834 times.
Are you trying to set up your home network using a Linksys router? You’ll want to make sure that you set it up correctly to prevent unwanted users and protect your personal information. Getting your router up and running only takes a few minutes. This wikiHow teaches you how to get your Linksys home router online and set some basic security settings and preferences. There are many models of Linksys routers—these steps should work great on most modern Linksys routers using its classic configuration interface.
Steps
Connecting to the Admin Panel
-
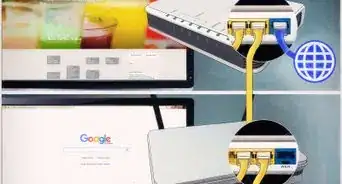
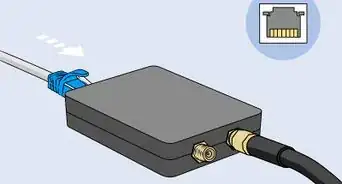
1Connect your computer to your Linksys router. If your Linksys router is Wi-Fi capable, you can connect to it via Wi-Fi. If not, or if Wi-Fi is not configured, you can use an ethernet (network) cable.
- To connect with an ethernet cable, plug one end of the cable into your computer's ethernet port (there should only be one port on your computer that accommodates the cable).
- When connecting via Wi-Fi, get pretty close to the router and connect to the wireless network—when scanning for networks, it should be the first in the list. Check the sticker on the router to find the exact Wi-Fi network name (SSID) and passphrase.
-
2Go to http://192.168.1.1 in a web browser. This is the default web address for all Linksys routers.[1] Unless something has changed in your network, visiting this address in your web browser should take you to a sign-in page. Open any web browser and enter in the router’s address into the address bar.
- If you're using a Linksys Smart Wi-Fi router, you can visit http://myrouter.local instead.[2]
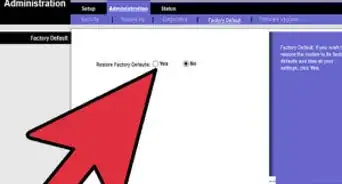
- If that web address doesn't bring up a website, it may be configured to have a different IP address. If you've confirmed that the IP address is correct, web management may be disabled. If this is the case, press and hold the Reset button on the back of your router to reset it to factory defaults.[3]
Advertisement -
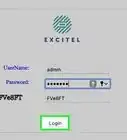
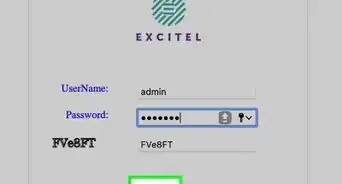
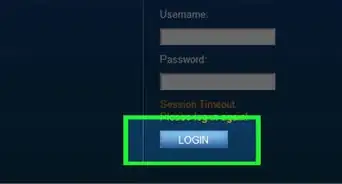
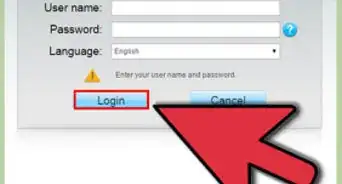
3Log in to your router. The default password is admin. Try entering that password while leaving the username field blank (if there is one) and clicking OK or Log in.[4] If that doesn't work, try admin as both the username and password. Once you're signed in, you'll see the web panel.
- There may be an admin login and password printed on the router or your documentation.
- If the password was changed at some point, you can reset the router by pressing and holding the Reset button


Changing Wi-Fi Settings
-
1Click the Wireless tab. It'll be at the top of the page in the classic Linksys interface.[5] This is where you can configure things like your wireless network name, password, and preferences.
- If you don't see this tab, click the Setup tab at the top-left corner first.
-
2Enter a name for your wireless network. The default name, which often begins with linksys, appears in the "Network Name (SSID)" field. This is the name that appears in the list of available networks when you connect to Wi-Fi. If you want to change it to something else, you can type that name here.
- Make sure you don’t give out any personal information, as anyone can see this name.
- You can keep the Network Mode and Channel set to the default, unless specified otherwise by your ISP.
- If you don't want anyone to see what your wireless network is called, you can choose the option to disable broadcasting, which should be on the same page. If you choose this option, anyone who connects to your network will need to know the exact name of the network and enter it when connecting.
- Click Save Settings if you make any changes.
-
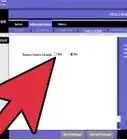
3Click the Wireless Security tab. It's in the menu bar near the top of the page. This is where you can change your Wi-Fi password.
-
4Enter a password into the Passphrase field. This is the password you'll need to enter when connecting to Wi-Fi. Keep in mind that passwords are case-sensitive.
- If the "Security Mode" menu is set to WEP, change it to WPA2/WPA Mixed Mode for the best security.[6] This requires a passcode of 8 characters or more.
- Click Save Settings if you change your password any other details on this page.


Forwarding Ports
-
1Click the Applications & Gaming menu. If you have programs that need unrestricted access to specific ports, you’ll need to open them up through your router’s configuration page. In order to open ports, you’ll need to know the IP address for the device running the program.
- To check the IP address of your computer, see this guide.
- To see a list of devices connected to your router and their respective IP addresses, click the Status tab and then select Local Network. Click the DHCP Client Table button to see the list.
-
2Click Port Range Forwarding. It's another tab at the top of the page.[7]
-
3Enter the product or application name(s) for the port you want to forward. These go into the left panel under "Application name." This is just for your reference.
- For example, if you're going to open ports for your Xbox, enter Xbox on a line. For example, the Xbox requires ports 80-88 and 3074 to be opened. You can forward ports in ranges, so you'll be able to forward 80-88 in one field and 3074 in another. So, in this case, you'd enter xbox into two blanks.
-
4Choose your starting and ending port for each application or product. Type in the port(s) required by the product. If you are only opening one port, enter the same value in both the “Start” and “End” fields.
-
5Select your protocol. Your product should tell you which specific protocol (TCP or UDP) the open port needs to be set for. If you are unsure, select Both.
-
6Enter the IP address that you are forwarding the port to. For example, if you're using an Xbox, you'd enter the Xbox Live IP address (192.168.1.32). This is the address for the device that is running the application.
-
7Check the box next to "Enabled." Every line with port forwarding rules has its own "Enabled" box. Check each box to enable port forwarding for those ports.
-
8Click Save Settings. This saves your changes.


Blocking Apps and Websites
-
1Click the Access Restrictions tab. It's at the top of the admin webpage.[8] This section of the router configuration will allow you to set restrictions for any device on the network. You can block all internet access at designated times, as well as block specific websites or keywords.
- This is useful if you want the kids’ computer to not have access in the evening, or to limit employee access during the day.
-
2Create an access policy. To do this:
- Click the "Access Blocking Policy" menu and select a number (1-10). You can create a name up to 10 different policies, which are sets of blocking settings.
- Enter a name for the policy into the "Set Policy Name" field.
- Select Enabled.
-
3Click Edit List or Edit List of PCs. One of these options will be under your policy's name.
-
4Add devices to the policy. You can add devices by IP address or MAC address.
-
5Click Save Settings. This saves the devices to the list.
-
6Click Close. This closes the devices list and returns you to your policy.
-
7Choose whether to Deny or Allow internet access. For example, if you want to block internet access from 3 PM to 5 PM every weekday, you'd select Deny here.
-
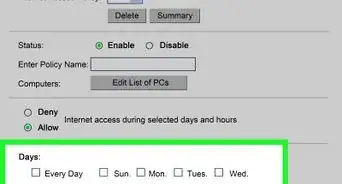
8Set the schedule. Use the Days and Times sections to set when you want internet or websites blocked or allowed.
- If you select 24 Hours, this blocks or allows the entire selected day. For example, if you want to block the internet on Saturdays, you'd select Sat and then 24 Hours.
-
9Block specific websites or services. In the section below the schedule, you can enter specific websites or apps you want the router to block. Websites entered here will be inaccessible to anyone on the policy list. You can also block websites based on keywords contained within the websites, allowing you to block much more than single sites.
- To block a website, enters its URL into one of the URL fields under "Website Blocking by URL address."
- To block an application or service, select it from the "Applications" menu and then click the right-arrow button to move it to the blocked List. You can remove an item from the blocked list by clicking it and then clicking the right arrow button.
- You can enter an application or port manually below the list if you don't see the one you want to block.
- Some models have drop-down menus for selecting applications.
-
10Click Save Settings. Your changes will take effect immediately.


Community Q&A
-
QuestionCan a Linksys_SES_56621 router be connected to a mobile broadband provider in Dublin if I am currently in Cork and connected to a router there?
 sysprogCommunity AnswerIf you mean to ask whether a router that works in Cork is likely to work in Dublin without reconfiguration, yes, it is -- just connect it to the modem that is connected to the broadband provider, then connect your PC to the router. Provided that the broadband service is active, you should be good to go.
 -
QuestionWhere do I find the network security key number?
 Community AnswerThe security key usually comes attached on label or detachable pad located at back of the router.
 -
QuestionI have a WRT 54 GS, and I use the MAC filter for security. If I upgrade to a WRT 3200 ACM, does it also have the option to use a MAC filter to restrict access?
 Community AnswerYes, it will also have MAC filter for security. Usually, this is one of the basic wireless security features, and it is included in almost all the wireless routers.


References
- ↑ https://www.linksys.com/dk/support-article?articleNum=142466
- ↑ https://www.linksys.com/us/support-article?articleNum=140507
- ↑ https://www.linksys.com/pl/support-article/?articleNum=139791
- ↑ https://www.linksys.com/pl/support-article/?articleNum=135561
- ↑ https://www.linksys.com/pl/support-article/?articleNum=132256
- ↑ https://www.linksys.com/us/support-article/?articleNum=139152
- ↑ https://www.linksys.com/us/support-article/?articleNum=136656
- ↑ https://www.linksys.com/us/support-article?articleNum=136710
About This Article

1. Connect your computer to your router.
2. Go to http://192.168.1.1.
3. Sign in with the password "admin" (leave the username blank).
4. Click the Wireless tab.
5. Adjust your Wi-Fi network name and settings.
6. Click Wireless Security.
7. Change your password.
8. Click the Applications & Gaming tab to control port forwarding.
9. Click the Access Restrictions tab to block and allow websites and apps.