This article was co-authored by wikiHow staff writer, Travis Boylls. Travis Boylls is a Technology Writer and Editor for wikiHow. Travis has experience writing technology-related articles, providing software customer service, and in graphic design. He specializes in Windows, macOS, Android, iOS, and Linux platforms. He studied graphic design at Pikes Peak Community College.
This article has been viewed 562,655 times.
Learn more...
Tired of being stuck with run-of-the-mill business card templates? This wikiHow teaches you how to use simple Photoshop tricks to create your own custom business card that is creative, catchy and ready to print!
Steps
Creating a New Business Card Photoshop File
-
1Open Photoshop. It has a blue icon that says "Ps" inside of a square. Click the Photoshop icon on your home screen to open a new Photoshop session.
-
2Click File. It's in the menu bar at the top of the screen. This displays a drop-down menu.Advertisement
-
3Click New. It's the first option in the File drop-down menu. This displays a pop-up window you can use to create a new Photoshop document.
-
4Type 3.75 next to "Width" and 2.25 next to "Height". This creates a document that is 3.5 x 2 inches with a 1/8th-inch 'bleed' area around the edges.
- The unit of measurement should be "Inches". If it is not inches, click the drop-down menu next to "Width" and "Height" and select "Inches".
- If you are using a print service, such as Vistaprint or Moo or a print shop, make sure you use their recommended Photoshop settings. You can even download a blank Photoshop file from their website.
- The bleed area ensures that the colours "bleed" out over the edges when the cards are cut. This prevents the white marks around the border of the card when it is cut.
-
5Type 300 next to "Resolution". This creates a file that has a resolution of 300 pixels per inch. This is standard for most print materials.
-
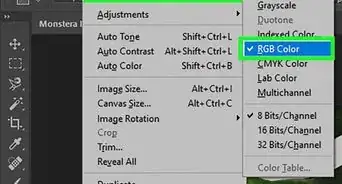
6Select "CMYK" for the color mode. Use the drop-down menu next "Color Mode" to select "CMYK". CMYK is the color mode most commonly used with printed graphics.
-
7Click Ok. This creates a new Photoshop document with the dimensions you set.
-
8Click View. It's in the menu bar at the top of the screen. This displays a drop-down menu.
-
9Click Rulers. It's about halfway down the "View" menu. This turns on Rulers for your documents.
-
10Drag a guideline to 0.125 inches in from all edges. To create a guideline, click on the ruler at the top and left of your document and drag inwards. Do this to create two horizontal guidelines. One at 0.125 inches and one at 2.125 inches. Then create two more vertical lines at 0.125 inches and 3.625 inches. The area outside the guidelines is the bleed area.
-
11Click File. It's in the menu bar at the top of the file.
-
12Click Save As. This opens a new window you can use to save your document.
-
13Type a name for your file. Use the text box next to "File Name" to type a name for your business card document.
-
14Select "PSD" as the file format. PSD is the file format that is native to Photoshop. Saving your files in Photoshop format is the best way to preserve the color detail and editable layers. To select PSD, use the drop-down menu next to "Format" to select "Photoshop" or "PSD".
-
15Click Save. This saves your photoshop document.
- It's a good idea to save frequently while working in Photoshop. To save, click File in the menu bar, and then click Save or press Ctrl+S on PC, or ⌘ Command+S on Mac.


Adding Color to your Business Card
-
1Click the square at the bottom of the toolbar. The toolbar is on the left side. There are two overlapping colored squares at the bottom of the toolbar. The one on top is for the foreground color. The one on the bottom is for the background color.
-
2Pick a color for the background of the card. Use the color picker to select a color for the foreground. Click a color in the rainbow (spectrum) colored bar, and then click the exact hue you want in the large square on the left. Then click Ok.
-
3Click and hold the gradient tool in the toolbar. It has an icon that resembles a square with a white-to-black color fade. This displays a flyout menu with more tools to the right.
-
4Click the paint bucket tool. The paint bucket tool is used to fill an entire area with the foreground color.
-
5Click anywhere in your card. This fills the entire document with the foreground color you chose.
- If you want to create a color-gradient fade, use the background color square to select the color you want the gradient fade to transition to. Then click the gradient tool, and click and drag across the entire area you want the color transition to take place. You can also select different gradient transition types in the upper-left corner of Photoshop.


Adding Text to Your Business Card
-
1Click the Text tool. It's the icon that has a "T" in the toolbar to the left.
-
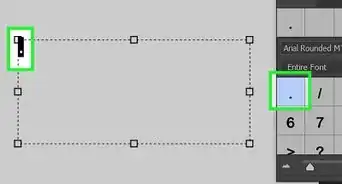
2Select a font for your text. Use the drop-down menu in the upper-right corner to select your font. The text that says "Sample" next to each font in the drop-down menu shows what the font looks like. Select a professional font that is easy to read.
- You can also select the font style (i.e. bold or italic) and text size using the drop-down menu next to the Font menu.
- If the "Sample" text is hard to read, it's probably not a good font for your business card.
- Keep your font consistent throughout your business card. Avoid using fonts that are too different from one another.
-
3Select a color for the font. To select a color for the font, click the colored square at the top of Photoshop. Then use the color picker to pick a color for your font.
- Be sure to pick a color that's easy to read against your background color. If your background color is dark, pick a light colored font. If your background color is light, pick a dark colored font.
-
4Click where you want the text to go in the document. This places a text cursor on the page.
-
5Type your text. This creates the first text item on your business card. Repeat for as many text items as you want on your business card. Your business card should include at least one of the following: Your name, your position, a business phone number, and a business email address. You can also include any other contact information you want to include.
-
6Click the Move tool. The transform tool is the item that resembles a black arrow at the top of the toolbar. This allows to move objects within your document and resize them.
-
7
-
8Adjust the text size and position of your text. Use the following methods to adjust your text position and size.
- To move your text, click your text with the Move tool and drag it to where you want to go.
- To adjust the size of your text, select the Move tool, then click a text item to select it. Click one of the small boxes in the corners around the text and drag it to adjust the size. Hold ⇧ Shift to keep the size proportional. Then click the checkmark icon at the top of Photoshop to apply the changes.
- To align your text. Click the move tool. Hold ⇧ Shift and click all the text items you want to align. Then click one of the icons with a square and a rectangle and a line. Look at how the square and the rectangle are arranged with the line to see how the icon will arrange your text items (i.e. The icon with the line to the left of the square and rectangle will arrange the text items evenly to the left. The one with the line down the center of the square and the rectangle will center the text items).
- Your business card should have your name at the top in large letters. Then add your position below your name in small text. Place your contact information on separate lines using medium-small text. Make sure your text items are properly aligned to whichever side of the card they are on. Keep your text items at least 1/8 of an inch away from the bleed area.


Adding Graphics to your Business Card
-
1Click Layer tab in the sidebar to the right. This displays the Layer menu with a list of layers. You can use layers to separate different elements of your document.
- If you don't see the Layer tab, click Window in the menu bar at the top, and make sure "Layers" is checked.
-
2Click the icon that resembles a sheet of paper. It's at the bottom of the Layer menu in lower-right corner. This creates a new layer. It should appear above the "Background" layer in the list of layers.
-
3Double-click the name of the layer. This allows you to type a new name for the layer. The current layer name is most likely "Layer 1".
-
4Type Grahics as the name of the new layer. This renames the layer to Graphics. Use this layer for all of your graphics and drawings.
-
5Reposition the Graphics layer below all the text layers. To change the position of a layer, click and drag the layer in the Layer menu in the sidebar to the right. Drag the layer below all the text layers, but above the Background layer.
-
6Click the square at the bottom of the toolbar. It's the first colored square at the bottom of the toolbar on the left. The one on top is for the foreground color. The one on the bottom is for the background color. Click the one on top.
-
7Pick a color. Use the color picker to select a color for the foreground. Click a color in the rainbow (spectrum) colored bar, and then click the exact hue you want in the large square.
-
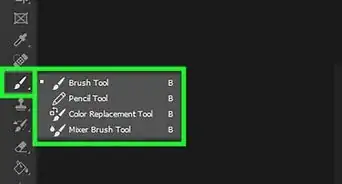
8Click the Brush tool. It's the icon that resembles a paintbrush in the toolbar on the right.
-
9Click the drop-down menu in the upper-left corner. It has an icon that displays the current brush type and the brush size below it. Clicking this icon displays a drop-down menu that allows you to select a brush time and change the size of the brush.
-
10Select a brush type. Click an image in the drop-down menu to select a brush type. The solid circle brushes create solid lines of varying sizes. The faded circle brushes create soft lines of varying sizes. Other brushes can be used to create simple patterns, textures, and simple images.
- You can also download and add new brushes to Photoshop.
-
11Adjust the size of the brush. To adjust the size of the brush, drag the slider bar labeled "Size" at the top of the drop-down menu. Drag it left to reduce the size of the brush. Drag it right to make the brush bigger.
-
12Use the brush tool to create simple graphics. There are a few ways you can use the Brush tool. Click and drag on the document to draw shapes and lines using the circle brushes. If you are using texture or image brushes, you can click once to place an image, pattern or texture item. Be creative and don't be afraid to experiment.
- If you make a mistake, click Edit in the menu bar at the top, and then click Undo to undo what you just did. You can also click the icon that resembles an eraser in the menu bar and use it to erase your work.
-
13Click File. It's in the menu bar at the top of the screen.
-
14Click Place. It's near the bottom of the File menu. This opens a file browser.
-
15Select a photo you want to import. Use the file browser to navigate your computer. You can click folders in the sidebar to the left. When you find a photo you want to import, click it to select it.
-
16Click Place. It's on the left side of the file browser near the bottom. This places the photo in your Photoshop document.
-
17Drag the photo to where you want it. You can reposition the photo by clicking and dragging it.
-
18Adjust the size of the photo. To adjust the size of the photo, click the corner and drag to change the size. Hold ⇧ Shift while dragging to keep the image dimensions proportional.
-
19Click the checkmark icon. It's at the top of Photoshop. This confirms the position of the photo and places it as a new layer. You can use this to add a picture of yourself, a company logo, or even an image to use a background.
- If the image is placed on top of any text, click the layer that contains the image in the Layer menu to the right. Drag the layer below all text layers in the Photoshop file.


Printing Your Business Card
-
1Click File. It's in the menu bar at the top of Photoshop. This displays a drop-down menu.
-
2Click Print. It's near the bottom of the "File" drop-down menu. This prints your card. It's always a good idea to print your work to get a better idea of how it looks when printed. The colors may not look the same on paper as they do on your computer screen.
- You can also press Ctrl+P to print on PC, or ⌘ Command+P on Mac.

Warnings
- Make sure you use your own images or have permission to use others' images in your design.⧼thumbs_response⧽
- If you use custom brush sets or other artwork in your design, credit the creator if possible and get their permission for using it on print.⧼thumbs_response⧽


-Step-9-Version-2.webp)
About This Article

1. Create a new 3.75 x 2.25 inch high resolution Photoshop file in CMYK color mode.
2. Turn on Rulers and drag a guideline 1/8th of an inch in from all the edges.
3. Select a color using the squares at the bottom of the tool bar on the left.
4. Use the color bucket or gradient tool to create a background color.
5. Use the text tool to add your name, position, phone number, email address, and other contact info.
6. Use the Move tool to adjust the size and position of the text.
7. Use the brush tool to add drawings, textures, and patterns to your business card background.
8. Select Place from the "File" menu.
9. Place an image in your business card.
10. Click and drag to adjust the position of the image.
11. Click and drag the corners of the image to adjust the image size.
12. Select Save As from the "File" menu.
13. Type a name for your business card file and click Save.