X
This article was co-authored by wikiHow staff writer, Nicole Levine, MFA. Nicole Levine is a Technology Writer and Editor for wikiHow. She has more than 20 years of experience creating technical documentation and leading support teams at major web hosting and software companies. Nicole also holds an MFA in Creative Writing from Portland State University and teaches composition, fiction-writing, and zine-making at various institutions.
There are 7 references cited in this article, which can be found at the bottom of the page.
This article has been viewed 33,801 times.
Learn more...
This wikiHow teaches you how to use Kindle Create to convert your book manuscript to the Kindle format.
Steps
Part 1
Part 1 of 2:
Creating a Project
-
1Save your completed book as a Word or PDF document. If your book is mostly text, save it as a .doc or .docx file. If it’s a book of images (such as a comic) or contains charts, complex graphics, links, and other content, save it as a PDF.
- If you wrote your book in Google Docs, download it as a .docx or .pdf file to your computer.
- If you wrote a text-based book in Pages for macOS, see How to Convert Pages to Word.
-
2Install Kindle Create. Kindle Create is a free tool by Kindle Direct Publishing that helps you turn your manuscript into a Kindle-ready book format.
- Go to the Kindle Create download page.
- Scroll down and click Download Now next to your operating system (Windows or macOS).
- Save the installer to your computer.
- Double-click the installer and follow the on-screen instructions to install the app.
Advertisement -
3Open Kindle Create. If you’re using Windows, open the Start menu, click Amazon, and select Kindle Create. If you have a Mac, open the Launchpad and click Kindle Create.[1]
-
4Click New Project by File. If you don’t see this option, click the File menu and select New Project.[2]
-
5Select the type of book you’re creating. If you select a text-based book, you’ll also have to choose a language.
-
6Click Choose File.
-
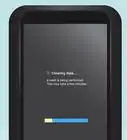
7Select your book file and click Open. The app will now convert the document to the Kindle format. When the conversion is complete, a confirmation window will appear.[3]
-
8Click Import Successful. Fonts, spacing, and other layout features (if applicable) are now optimized to look best on different types of screens.
- If you’re creating a book from a .doc or .docx file, click Get Started to open the Automatic Chapter Titles window. Follow the on-screen instructions to select/deselect suggested chapter names, then click Accept Selected.
-
9Save your project. Now that you’ve converted the file, save it as a Kindle Create project so you can edit and publish it. Click the File menu and select Save Your Project. Give the file a name and save it to your computer.
- To work on the project later, re-open Kindle Create, and click Resume Existing Project.
-
10Add a table of contents. If you created a more complex book from a PDF, you’ll have to build your table of contents (TOC) manually. Here’s how:[4]
- In the ″Contents″ panel, click a page you want to add to the TOC.
- Check the box next to ″Include Page in Table of Contents.″
- Enter a title.
- Repeat these steps for all pages you want to add to the TOC.
-
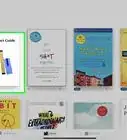
11Add, remove, or rearrange pages. If you created a book from PDF, you can manage your pages on the ″Contents″ panel.
- Rearrange: Drag a page’s thumbnail to the desired place in the book.
- Adding pages: Right-click a page’s thumbnail, select Insert Pages, and then follow the on-screen instructions to import the PDF that contains the page(s).
- Deleting pages: Right-click a page’s thumbnail and select Delete Selected Pages.


Advertisement
Part 2
Part 2 of 2:
Saving and Publishing
-
1Open the project in Kindle Create. If you haven’t already done so, open Kindle Create, click File, and then click Resume Existing Project.[5]
-
2Preview your book. Once you’re finished making final layout changes, click the Preview button near the top-right corner of the screen. Follow the on-screen instructions to preview different aspects of your book. Make sure to carefully inspect every page before continuing.[6]
-
3Click the File menu. It’s at the top of the screen.
-
4Click Save Project.
-
5Click Publish. This opens the ″Save for Publication″ window.
-
6Name the file and click Save. This saves your book in the .kpf format, which is the format you’ll be uploading to Kindle.[7]
- If you make any changes to your book later, you’ll need to publish the file to a new .kpf file.
-
7Sign in to Kindle Direct Publishing. If you have an Amazon.com account, click Sign in to log in now. If not, click Sign up to create an account now.[8]
-
8Enter your author information.
- Click your name at the top-right corner of the screen.
- Select your country.
- Fill out the form completely.
- Complete the tax interview.
- Click Save.
-
9Click Bookshelf. It’s at the top of the screen.
-
10Click + Kindle eBook. It’s under the ″Create a New Title″ header.[9]
-
11Enter your book’s details. Type your book’s title, a subtitle (if applicable), author information, and all other requested details. When you’re finished, you’ll move to the next page.
-
12Upload the Kindle Create file. Click Upload eBook manuscript to open your computer’s file browser, select the .kpf file you created in Kindle Create, and then click Open. This uploads the file to the server.
-
13Create a book cover. Click Launch Cover Creator, and then follow the on-screen instructions to customize the virtual ″cover″ of the book.
-
14Fill out all remaining details and click Save and Continue. This builds a Kindle book from your file(s) and all entered information. When the book is ready, you’ll come to a pricing screen.
-
15Enter your desired price and royalty plan. The options by location. The options you select here determine how you’ll be paid by Amazon when people buy your book.
-
16Click Publish Your eBook. All of the information you entered will now be compiled into a single downloadable book. The process is usually complete in a few hours, but you may have to wait up to a day to find it on Amazon.com.


Advertisement


References
- ↑ https://kdp.amazon.com/en_US/help/topic/G7R2L7V5X6SJH948
- ↑ https://kdp.amazon.com/en_US/help/topic/GJMRD9F78MS9F43R
- ↑ https://kdp.amazon.com/en_US/help/topic/G7R2L7V5X6SJH948
- ↑ https://kdp.amazon.com/en_US/help/topic/GMUKXSTBCN6F2TGM
- ↑ https://kdp.amazon.com/en_US/help/topic/GMUKXSTBCN6F2TGM
- ↑ https://kdp.amazon.com/en_US/help/topic/GJMRD9F78MS9F43R
- ↑ https://kdp.amazon.com/en_US/help/topic/GMUKXSTBCN6F2TGM
- ↑ https://kdp.amazon.com/en_US/help/topic/G202187760
- ↑ https://www.thebookdesigner.com/2018/06/posting-on-kdp/
About This Article

Nicole Levine, MFA
wikiHow Technology Writer
This article was co-authored by wikiHow staff writer, Nicole Levine, MFA. Nicole Levine is a Technology Writer and Editor for wikiHow. She has more than 20 years of experience creating technical documentation and leading support teams at major web hosting and software companies. Nicole also holds an MFA in Creative Writing from Portland State University and teaches composition, fiction-writing, and zine-making at various institutions. This article has been viewed 33,801 times.
Co-authors: 2
Updated: August 19, 2019
Views: 33,801
Categories: EBook Readers
Advertisement