This article was co-authored by wikiHow Staff. Our trained team of editors and researchers validate articles for accuracy and comprehensiveness. wikiHow's Content Management Team carefully monitors the work from our editorial staff to ensure that each article is backed by trusted research and meets our high quality standards.
The wikiHow Video Team also followed the article's instructions and verified that they work.
This article has been viewed 292,227 times.
Learn more...
Mini volcanoes are a popular science experiment for children to learn about chemical reactions. When baking soda and vinegar combine in the volcano, they make a water and carbon dioxide “eruption” that looks like lava from a volcano! You can easily do this fun experiment at home using a cup, baking soda, salt, and vinegar.
Ingredients
- 2 tablespoons (28.8 g) of baking soda
- 1/2 teaspoon (3 g) of salt
- 1-2 drops of washable paint
- 1-2 drops of dish soap
- 1 cup (240 mL) of vinegar
Steps
Mixing the Lava Ingredients
-
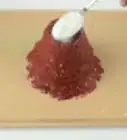
1Add 2 tbsp (28.8 g) of baking soda and 1/2 tsp (3 g) of salt to a cup. Use a larger plastic cup or a glass jar so you can build the volcano around the cup. Make sure the baking soda and salt are at the bottom of the cup in an even layer.
- The baking soda will react with the vinegar to cause the reaction, so make sure there's more baking soda than salt in the cup.
-
2Pour in a few drops of washable paint if you want a colorful eruption. To make the eruption more realistic, you can use red-orange paint. For a more creative eruption, use pink, purple, green, or blue![1]
- Washable paint is less likely to stain your hands or the ground than food coloring, but you can use food coloring if you don't have paint available.
Advertisement -
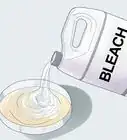
3Add 1-2 drops of liquid dish soap to the cup for a more bubbly reaction. If you want an extra impressive reaction, pour a few drops of regular dish soap into the cup. The dish soap will react with the water as it erupts, forming larger bubbles.
- The color and type of dish soap doesn't matter, as long as it produces bubbles when added to water.
-
4Stir the ingredients together in the cup with a toothpick or stick. Make sure all of the ingredients are combined thoroughly in the cup. This will make the reaction happen faster after you pour the vinegar into the cup.[2]
- If you don't have a small toothpick or stick, you can use a spoon. However, since the spoon is bigger, some of the baking soda “fuel” can stick to the spoon, causing the reaction to be less intense.
Building the Volcano
-
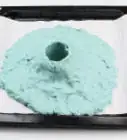
1Use aluminum foil and clay to make a more realistic volcano. Place your cup with the ingredients on a flat surface, and wrap tin foil around the rim of the cup, forming a wide cone shape to create the base of the volcano. Then, use a rolling pin to flatten 3-4 medium-sized balls of clay or playdough into 1⁄4 inch (0.64 cm) thick sheets, and carefully lay them over the tin foil.
- Remember that the outside of the volcano will quickly be covered with the “lava,” so the clay doesn't need to be dry.
-
2Roll a piece of paper into a cone and cut off the top for a simpler volcano. Take a large piece of construction paper or old wrapping paper, and roll it into a cone with a base that is wide enough to fit over the mouth of the cup. Tape the paper in place and put the cone over top of the cup with the base touching the flat surface. Then, use a pair of scissors to cut the top of the cone off just above the rim of the cup.[3]
- You might also have to trim around the base of the volcano to make sure it isn't crooked. Don't worry about making it perfect, as long as the general shape is right.
- Thinner paper, like regular printer paper, will start to collapse once it gets wet when the lava starts. Try to use a thicker paper, like construction paper, or a coated paper, like wrapping paper.
-
3Decorate the outside of the volcano with paint, markers, and mini figures. Use brown washable paint on the outside of the volcano to make it look real, or add a few lines of red paint around the top to look like mini lava flows. If you're using paper, use markers to draw trees and other figures on the sides of the volcano.
- For clay figures, you can press plastic dinosaur figures into the clay to create a fun Jurassic scene!
-
4Place the mini volcano in a plastic tray or outside to avoid a mess. Carefully pick up the volcano by holding the base and the top. A plastic tray will catch the “lava” for easy clean up, or you can move your volcano outside to have more room.[4]
- If you're doing the project outside, consider using rocks or sand to surround the base of your volcano, making it even more realistic!
Making an Eruption
-
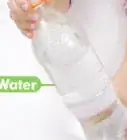
1Pour 1 cup (240 mL) of vinegar into the volcano to start the eruption. Carefully add the vinegar into the cup to start the reaction. Then, take a step back from the volcano to enjoy the eruption.[5]
- If you're doing this experiment with kids, you can talk to them about what's going to happen as you start pouring the vinegar into the cup.
-
2Watch as the eruption bubbles up from the volcano. Be patient while the reaction happens inside of the cup. Within 5-10 seconds, you should start to see the bubbles rising over the top of the cup and spilling down the sides of the volcano!
- If it doesn't start within 10 seconds, add an extra tablespoon (14.4 g) of baking soda to the reaction.
-
3Add more vinegar to restart the eruption when the bubbles slow down. For every 2 tablespoons (28.8 g) of baking soda, you can add 2–3 cups (470–710 mL) of vinegar to the cup before you run out of “fuel” for the reaction. If the bubbles don't pick up when you add vinegar, add more baking soda to balance out the reaction.[6]
- If the lava starts to lose its color, add another drop of paint before adding more vinegar!
Community Q&A
-
QuestionHow high will it fly?
 Community AnswerIt depends on the amount of liquid you use. It should not go more than few feet high though. Ideally, the 'lava' just flows over the edges.
 -
QuestionIs there an alternative to baking it?
 Community AnswerYou can just let it air dry naturally.
 -
QuestionHow do I make the lava and smoke?Community AnswerYou could try using dry ice for a smoky effect and paint 'lava' onto your model before using the volcano.
Things You'll Need
- Plastic cup or jar
- Aluminum foil and modeling clay
- Rolling pin
- Construction paper and tape
- Scissors
- Washable paint (optional for adding color to lava and decorating)
- Markers (optional for decorating)
- Plastic tray
- Toothpick or stick for stirring


References
About This Article