A step-by-step guide to inserting a photo slideshow into a WordPress blog post
X
This article was co-authored by wikiHow staff writer, Jack Lloyd. Jack Lloyd is a Technology Writer and Editor for wikiHow. He has over two years of experience writing and editing technology-related articles. He is technology enthusiast and an English teacher.
This article has been viewed 116,863 times.
Learn more...
This wikiHow teaches you how to create a photo slideshow on your WordPress site. Photo slideshows can be inserted into a blog post on any page of your site. You cannot create a photo slideshow using the WordPress mobile app.
Steps
-
1Open WordPress. Go to https://wordpress.com/ in your browser. This will open your WordPress site's dashboard if you're logged into WordPress.
- If you aren't logged in, click Log In in the top-right side of the page, then enter your email address and password to log in.
-
2Click My Site. It's in the upper-left corner of the page.Advertisement
-
3Go to your preferred page. Click the tab for the page to which you want to add the slideshow. The tabs for different blog pages are usually at the top of the page.
-
4Find the "Blog Posts" tab. You'll see this option on the left side of the page, just below the "Manage" heading.
-
5Click Add. It's to the right of the "Blog Posts" tab. Doing so opens a post window.
-
6Click + Add. This option is in the upper-left side of the post window. A drop-down menu will appear.
-
7Click Media. It's the top option in the drop-down menu. Doing so opens a window with all of your WordPress blog's photos on it.
-
8Add photos if necessary. If the photos that you want to use aren't in your WordPress media library, click Add New in the upper-left corner, select photos to add, and click Open in the bottom-right corner of the window.
- Skip this step if all of the photos that you want to use are in your WordPress media library.
-
9Select photos. Click each photo that you want to add to the slideshow. Selected photos will have numbers listed in their bottom-right corners.
- If you uploaded photos in the last step, they will be selected by default.
-
10Click Continue. It's a blue button in the bottom-right side of the window.
-
11Click the "Layout" drop-down box. This box is in the upper-right side of the window. A drop-down menu will appear.
-
12Click Slideshow. It's at the bottom of the drop-down menu.
-
13Select other options if you like. You can randomize the slideshow order by checking the "Random Order" box. You can also change the photos' redirect links by clicking the "Link To" drop-down box and selecting an option.
-
14Click Insert. It's a blue button in the bottom-right side of the page.
-
15Enter a title and text. You can enter a title in the "Title" text box in the upper-left side of the page, and you can add text to your slideshow post below the slideshow box itself.
-
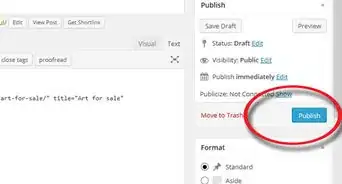
16Click Publish…. It's a blue button in the top-right side of the page.
-
17Click Publish when prompted. This will publish your slideshow on your WordPress site.


Advertisement
Warnings
- Posting copyrighted content without permission may result in your blog being suspended or taken down.⧼thumbs_response⧽
- Hosting a large number of photos on your WordPress site will eventually slow down your site's load time.⧼thumbs_response⧽
Advertisement


About This Article
Jack Lloyd
wikiHow Technology Writer
This article was co-authored by wikiHow staff writer, Jack Lloyd. Jack Lloyd is a Technology Writer and Editor for wikiHow. He has over two years of experience writing and editing technology-related articles. He is technology enthusiast and an English teacher. This article has been viewed 116,863 times.
How helpful is this?
Co-authors: 9
Updated: May 30, 2022
Views: 116,863
Categories: Wordpress
Advertisement