wikiHow is a “wiki,” similar to Wikipedia, which means that many of our articles are co-written by multiple authors. To create this article, 15 people, some anonymous, worked to edit and improve it over time.
This article has been viewed 194,956 times.
Learn more...
This tutorial will show you how to make a PowerPoint-like presentation using Google Slides. Presentations can be used for school, business, and so much more.
Steps
-
1Go to Google's home page and click on the grid in the upper right hand corner. From there, click on the Drive icon. You will be redirected to a log in page if you are signed out, if not you will be taken to your Drive.
- You can also just type in https://slides.google.com, log in if you haven't already, and will be taken to the Slides page.
- If you don't have a Google account, learn to create one now!
-
2From your Drive, click the blue New button on the left side of the page. Select "Google Slides" from the drop-down menu.
- For more options, hover over the arrow on the right edge of the Google Slides option, where a smaller drop-down menu will appear. From here you can select to create a presentation from a template or a blank slide.
Advertisement -
3If you are on the slides page, select an option from the top of the page to create a new slide. You can press the white square with a plus sign for a blank slide, or click one of the templates. Click on the Template Gallery option, where more templates will show up.
-
4Name your slide and select a theme. You will also be prompted to select a theme for your presentation. This demonstration will use the "Luxe" theme. To name it, click the "Untitled" text on the top to rename it. This will appear in the browser bar when you or someone is viewing the presentation.
- Be sure to add a title and subtitle by clicking where you are prompted to add text.
-
5Add new slides. At the upper left hand corner, there is a small + button. Click on this to create the default title and body slide. If you want a different structure, click the small down arrow right next to it. This will lead to a large drop-down menu of many different layouts for various purposes.
- You can also change a pre-existing slide's layout by clicking the layout option on the upper editing bar.
-
6Insert images. Go to the upper editing bar and click insert. From there, find Images in the drop-down menu. A window will pop up with various image options: you can upload your own image from your computer, take a picture with your webcam, paste an image URL, find an image from your Google photo albums, find a picture from your drive, or search for one online with Google, LIFE, or stock images.
-
7Add text. If you want to add a text box, click the box with a T in the upper editing bar (this is if you don't already have an open space with a "click to add text" prompt). You can edit the text's font and size, make it bold, underlined, or italic, all of which are right next to each other in the editing bar. There are also options with alignment and line spacing in the editing bar. Click on more, located at the right edge of the bar, to adjust indent and add a numbered and/or bulleted list.
-
8Animate. Right click text or a picture, preferably the one you want to animate first, and navigate to the bottom of the drop-down menu where it says Animate. Your selected element should be highlighted in blue. From there, click on the rectangle that says Fade in, which is the default animation. Select an animation from the drop down menu. Beneath it is another rectangle that says On click, click on this to choose if you want the animation to occur manually or automatically. You can check if you want it to animate by paragraph, which is recommended for bulleted lists. Underneath that you can adjust the speed of each animation by dragging the bar.
- As you add animations to each element by clicking the blue "+ Select an object to animate", they will begin to pile up. Click on each one to edit it.
- Change the transition from slide to slide by clicking the default "Slide: No transition" at the top of the sidebar. You can choose whether to apply to all slides or just one.
- Preview your animations by clicking Play at the bottom of the sidebar.
- Remove an animation by clicking the small x on its rectangle, and drag each animation up or down to change the order.
-
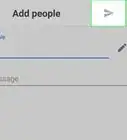
9When you are done editing, press the share button to edit permissions for your presentation. Search for people you want to share with by their names or email, and edit permissions by clicking the pencil icon next to it- they can either view it, edit it, or comment on it. Clicking the button also gives you your unique presentation link which can be accessed by clicking "Get shareable link". When you are done, click Done.
-
10View the finished product by clicking "Present" on the upper right hand corner. Navigate from slide to slide by using arrow keys or the arrows at the bottom of the screen. Click the squiggle at the bottom to turn on the laser pointer, the four outreaching arrows for fullscreen, name of the current slide to navigate to another one, and the gear for settings. You can also turn on presenter view, which allows you to accept audience Q&A and view speaker notes.


Community Q&A
-
QuestionHow do I make a template to share with my class so they can add their own information on the slide?
 Community AnswerYou will have to make a template, and share it with your class. For easiness on your end, you should only allow them to view it. Then, have them open it and do the following: Go to the FILE menu. Click on "Make a copy." Name it something like "My Name - Project name." Click "Ok."You can now edit the slides and all information.
 -
QuestionHow do I upload a Google Sheets spreadsheet to my google drive presentation?Community AnswerInsert --> chart --> from Google Sheets. If you are not importing a chart, try copying and pasting.
-
QuestionHow do I create a presentation with Google Docs?Community Answer1) Go to drive.google.com and log in. 2) Click the blue "New" button toward the top left corner of the page. 3) Select "Google Slides" next to the orange icon on the drop-down menu. 4) Drive will open your new presentation. Just start editing!
wikiHow Video: How to Create a Presentation Using Google Slides

About This Article
To create a new Google Slides presentation, open a web browser and go to Slides.Google.com. If you want to start from a template, you can choose one from the template gallery. Otherwise, click "Blank" to create a new blank presentation. Your blank presentation starts with a single simple slide with space to enter a title and subtitle. You can personalize this slide, as well as other slides you add, by editing the placeholder text, as well as choosing a slide theme from the panel to the right. To insert another slide, click the "Insert" menu and select "New Slide," or press "Control M" for a quick keyboard shortcut. You'll also find other things you can add to your slide on the Insert menu, including the option to add an image, a text box for typing, videos, shapes, charts, and other features. After adding a new slide, click the "Layout" menu to choose a slide layout—you can give each slide its own layout or reuse the same layout as much as necessary. Edit the placeholder text, and then insert objects from the Insert menu. To move an object, click the arrow in the toolbar, hover the mouse cursor around the object's border line until it turns to a 4-point arrow, and then click and drag it. Each slide you add will have a thumbnail in the left panel—click a slide's thumbnail to open that slide for editing. To see your presentation as a viewer would, click your first slide in the left panel, and then click "Present" at the top corner. Click the Escape key to go back to editing. Google Slides also has some built-in effects you can access from the "Transition" menu—here you can animate a slide's transition into the next slide, as well as animate individual objects. To apply an effect, background, theme, layout, or any other setting to more than one slide at once, select the slides in the left panel by holding down the Control key as you click each thumbnail. Your presentation will automatically save to your Google Drive as you work—type a name for the presentation in the top-left corner so you can easily find the file when you need it.