wikiHow is a “wiki,” similar to Wikipedia, which means that many of our articles are co-written by multiple authors. To create this article, volunteer authors worked to edit and improve it over time.
The wikiHow Tech Team also followed the article's instructions and verified that they work.
This article has been viewed 31,560 times.
Learn more...
The iCloud service provides added storage for your iPhone by letting you save and access all your important files over the Internet from your smartphone. The iCloud service uses the storage space of the Apple servers, or cloud, letting you save your iPhone’s device memory for other far more important stuff. If you haven’t used this cloud storage yet, you can create an iCloud account right on your iPhone device for instant access to the service.
Steps
Creating an iCloud Account on iPhone
-
1Open your iPhone’s device settings. Tap “Settings”—the app with a gear icon—from the home screen of your iPhone to open your iOS smartphone’s device settings. Here you can view all the customizable options for your iPhone.
-
2Open the iCloud settings. Scroll down the Settings screen and tap “iCloud” from the list of entries. This will take you to your iPhone’s iCloud service settings where you customize various options for the service.Advertisement
-
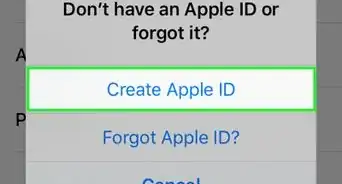
3Tap the “Get a Free Apple ID” found on the lower portion of the iCloud settings screen. This will begin the process of creating an iCloud account, and a pop-up menu will show prompting you to enter your date of birth.
- Note that if you already have an Apple ID, you don’t need to create an iCloud account. The iCloud service will readily be available for you. All you have to do is enable it.
-
4Enter your birth date. Just use the scroll buttons you see on the pop-up menu to select your birth date, and tap the “Next” button on the upper right-hand corner of the menu to continue.
-
5Enter your full name. On the next step, you’ll be asked to enter your full name. Type in your first name and last name on the text fields provided using the on-screen keyboard, and press the “Next” button again on the top right-hand corner of the pop-up menu to proceed to the next step.
-
6Create an Apple ID using an existing email address. The next step will tell you that an email address is needed to sign up for an Apple ID. There are two options here; the first one is to use an existing email, and the second one is to create a new iCloud email address (described in the next step). If you prefer to use an existing email address, tap the “Use your current email address” on the pop-up menu, and you’ll be prompted to enter the email address and its password. After entering these credentials, tap the “Next” button on the top right hand corner to proceed to the Security Question.
-
7Create an Apple ID using a new iCloud email. If you prefer to create a new iCloud email address instead of an existing one, tap “Get a free iCloud email address” and you’ll be prompted to enter the email address you’d like to use for the iCloud account (for example: johndoe@icloud.com).
- Once you’ve written the email address you like, tap the “Next” button on the top right-hand corner of the page, and you’ll be asked to enter a password for the iCloud email you’re about to create. Type in the password you want to use on the “Password” field (your iCloud password must contain a number, a lower, and an upper case letter), and re-type it again on the “Verify” field to confirm. Once you’re done, tap the “Next” button on the top right-hand corner of the pop-up menu once more to proceed to the next step.
-
8Choose a security question. The next step will require you to choose three security questions, which will be asked in the event that you forget your password and try to recover it. Tap the “Question” field and select a security question you’d like to use from a random list of questions that you can use. Tap the “Answer” text field and enter your answer for the security question you’ve picked using the on-screen keyboard.
- Do this for the remaining two “Question” and “Answer” security question text fields. Once you’re done, press the “Next” button again on the upper right corner of the pop-up menu to proceed.
-
9Enter a rescue email. The next step will ask you to enter an alternate email address where your iCloud account password can be sent to in case you forget it. Enter the email address you’d like to use on the text field and press the “Next” button to continue to the next step.
- Make sure that the email address you’ll be using here is a live and active one because it will be used for security purposes. If you don’t have any extra email address, this step is optional, and you can just tap the “Next” button on the upper right corner of the pop-up menu to proceed to the next step without entering any email address.
-
10Subscribe for an email update (optional). If you want to receive the latest email newsletter on the email address you used to set up your iCloud account, tap the toggle switch and set it to green. Otherwise, tap the switch and set it to color gray. Tap the “Next” button once more to continue.
-
11Review the terms and conditions. The next step will show you the terms and agreements related to creating an iCloud account. Read the statements you see on the pop-up menu, and tap the “Agree” button on the lower-right corner of the pop-up menu to complete the setup and create your Apple ID.
- Tapping the “Disagree” button instead will close the pop-up menu and cancel all the information you’ve entered from the previous step.
-
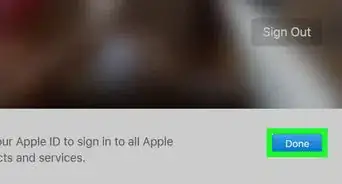
12Sign in your newly created iCloud account. After tapping the “Agree” button, the pop-up menu will close and redirect you back to the iCloud settings screen. You’ll notice that your newly created iCloud ID is already written on the “Apple ID” text field with your password filled in (but encrypted) on the “Password” field. All you need to do now is to tap the “Sign In” button to start using your newly created iCloud account.


Enabling iCloud
-
1Open your iPhone’s device settings. Tap “Settings”—the app with a gear icon—from the home screen of your iPhone to open your iOS smartphone’s settings. Here you can view all the customizable options for your iPhone.
- It is advisable that before you enable iCloud, you update your iPhone to iOS 8. Go to Settings >> General >> Software update. If an update is available, tap “Download and install.”
-
2Open the iCloud settings. Scroll down the Settings screen and tap “iCloud” from the list of entries. This will take you to your iPhone’s iCloud service settings where you customize various options for the said service.
-
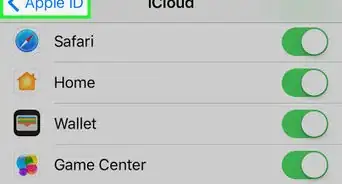
3Log in with your Apple ID. Most likely you’re already logged in, if not, enter your existing Apple ID and registered password in the text fields, and tap “Sign in” to proceed.
-
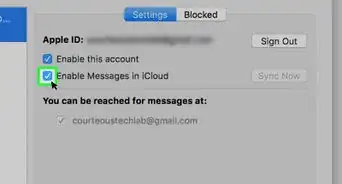
4Enable the iCloud services you want to use. There will be several iCloud services listed; each will have a toggle switch beside it. Slide the switch to green on the services you want to enable on your device. You can enable the following:
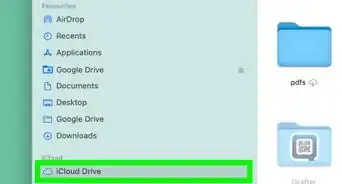
- iCloud Drive (allows you to save files to iCloud Drive, which you can access with other devices connected to the same iCloud account)
- Photos (allows you to upload and backup photos to iCloud)
- Mail, Contacts, Calendar, Reminders (will sync information of all these options across all devices connected to the same iCloud account)
- Safari (will save your bookmarks in iCloud, which can be accessed by other connected devices)
- Backup (allows you to use iCloud to backup your iPhone)
- Keychain (this will save your passwords, which can be accessed across all devices connected to the same iCloud account)
- Find My iDevice (allows “Find my iPhone” service and helps track down the missing iPhone)


Community Q&A
-
QuestionI am worried my mom won't let me create an Apple ID. What should I do?
 Community AnswerCreating an Apple ID is easy, but probably check with your parents or guardians first, as you can purchase things with their money with it.