This article was co-authored by Art Fricke. Art Fricke is a home renovation and repair specialist and the owner of Art Tile & Renovation based in Austin, Texas. With over 10 years of experience, he specializes in bathroom and kitchen renovations. Art focuses on a single contractor approach to customized renovation work, and performs projects such as installing custom tile showers, fixing tiled shower leaks, replacing cracked tiles, and installing floor and wall tile.
There are 15 references cited in this article, which can be found at the bottom of the page.
This article has been viewed 9,196 times.
Spruce up that boring old wall or floor with some beveled tile! Also known as subway tile, beveled tile has a timeless, rectangular style that’s super easy to install on your own. If you want to create your own beveled edge on tile, you might be surprised at just how simple it is to do it. However, installing beveled tile can be tricky if you have fit tiles into uneven gaps or over wall outlets. The best way to do the job is to cut the tiles as needed while you actually install them. That way, each tile that you trim fits neatly into whatever space you need it for. But don’t worry—with a tile saw, it’s an easy job.
Steps
Trimming Beveled Tile to Size
-
1Measure any space you need to fill as well as electrical outlets. When you reach the edge of a wall or the gap of a wall outlet, use a ruler or tape measure to measure the space you need to fill. Take careful measurements so you can cut your tiles accurately.[1]
- It’s easier to measure and cut tile as needed so you can fit them perfectly into each individual space or gap.
-
2Mark the cut lines on the edge of the tile. Use a washable marker or pencil to mark the edge of the tile where you need to make your cuts. Mark all of the tiles you plan to cut.[2]
- The tile saw will cut a straight line, so all you need to do is mark where you need to align the blade.
Advertisement -
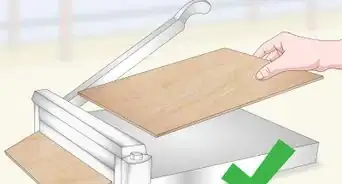
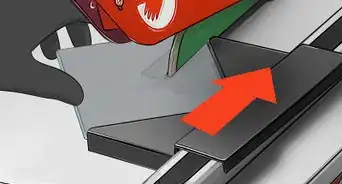
3Set the cutting guide of a tile saw to match the cut line. A tile saw is a specially designed tool used to cut tiles. Place your tile flat in the cutting area the tile saw and adjust the guide so it lines up with the cut line you marked on the tile.[3]
- You can find tile saws at your local home improvement store. You may be able to rent one for the day.
- Take your time and line up the guide perfectly so you have a clean cut.
- Keep in mind that ceramic tile tends to be more brittle than porcelain or natural stone.[4]
-
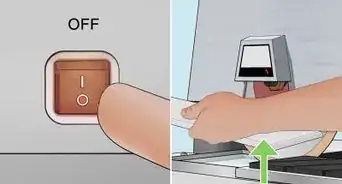
4Cut the tile to size with the tile saw. Make sure the tile is held securely in place. Run the saw over the tile to cut it along the line you marked. Remove the tile once you’ve finished cutting it.[5]
- If you don’t have a tile saw, you can use a tile cutter, which uses a blade to score and cut the tile.[6]


Creating a Beveled Edge
-
1Use a tile rubbing stone or a diamond rubbing pad. Tile rubbing stones and diamond rubbing pads are both designed to smooth tile edges, but they can also be used to create a beveled edge. The traditional rubbing stone will do the job just fine, but a diamond rubbing pad is lightweight, lasts longer, and may grip the edge of the tile more effectively.[7]
- You can find tile rubbing stones and diamond rubbing pads in the tile section of your local hardware or home improvement store. You can also order them online.
-
2Place the tile on a flat surface and apply pressure. Make the job a little easier and ensure a more consistent edge by laying the tile on a flat surface like a table. Place your hand on the tile and put some weight on it to hold it still.[8]
- Beveling tile can create a lot of dust, so you may want to lay a sheet or a tarp down over the surface to keep the dust contained.
-
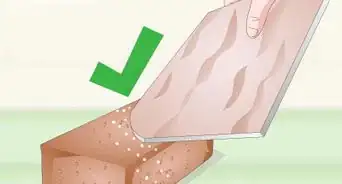
3Hold the rubbing stone or pad at a 45-degree angle to the edge. Take your rubbing stone or rubbing pad in one hand and place it against the edge of the tile. Angle the stone or pad at about 45 degrees so you can create a sloped, beveled edge on the tile.[9]
-
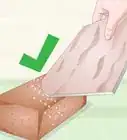
4Rub the edge of the tile until it forms a beveled edge. Apply pressure against the tile with the stone or pad. Run it back and forth over the edge of the tile, keeping it held at a 45-degree angle. Continue rubbing until you form an evenly sloped beveled edge.[10]
- The amount of rubbing it takes to form a beveled edge can vary depending on the material. For instance, ceramic tile is extra hard and will take more rubbing than granite tile.
-
5Wipe away dust and shavings with a damp cloth. Take a clean cloth and soak it in water. Squeeze out the excess and wipe off the tiles to pick up any of the dust or shavings created from the rubbing process.[11]
- You want your tiles nice and clean before you lay them. Dust and dirt can stick to them when you apply a tile adhesive to install them.


Installing Beveled Tile
-
1Choose your tiles and get their measurements. Visit the manufacturer’s website or head down to your local home improvement store to search for the tile you like. Order samples of a few different styles or ask the store to let you borrow the samples overnight so you can see how they look in your home before you make your buying decision. Once you’ve made your choice, get the measurements of the tile.[12]
- There are a ton of different beveled tile styles to choose from, so it’s a good call to hold a few samples against your wall or floor to help you make a decision.
- For instance, your tile may be 3 by 6 inches (7.6 by 15.2 cm), which will help you figure out how many you need.
-
2Measure the number of tiles you need to cover the area. Use a ruler or tape measure to measure the area where you plan to install the beveled tile. Measure the space length of the space to find out how many tiles you need to cover across it. Then, measure the space vertically to find out how many tiles you need to cover it up and down. Add the 2 numbers together to get the total number of tiles you need.[13]
- For example, let’s say you’ve got a beveled tile that measures 3 by 6 inches (7.6 by 15.2 cm). If the area you want to install it is 120 inches (300 cm) long, you’d need 20 tiles to reach across it. If it’s 45 inches (110 cm) tall, you’d need 15 tiles to fill the space up and down. Add these values together and you’ll need 35 total tiles to cover the entire area.
-
3Clean the area and remove any outlets or switch covers. Use an all-purpose cleaner and a clean cloth to wipe down the area you plan to install the tile and remove any dust or dirt from the surface. Take a screwdriver and unscrew the screws holding any outlet or switch covers so you can remove them.[14]
- If you have any holes in a wall, patch them with a filler like putty and sand the surface smooth with sandpaper.
-
4Tape off the area with painter’s tape. Mark off the outer boundaries of the area you’re installing the tile so you don’t get any adhesive on it. Use painter’s tape to do it, which won’t leave behind any yucky sticky residue when you remove it.[15]
- Avoid using something like clear tape or duct tape to section off the area.
-
5Use a notched trowel to apply thin-set tile adhesive to the wall. Choose an adhesive designed specifically for tile, which won’t be too thick or gummy. Apply the adhesive to a hand trowel and spread a thin layer over the entire area you plan to install the tile.[16]
- You can find thin-set tile adhesive at your local hardware or home improvement store. You can also order it online.
-
6Start with border tiles and press the sheets of tile into place. Position a tile on the floor or wall and press it into the adhesive to install it. If you have border tiles, place them first.[17] Start laying the tile on 1 side of the floor or wall and work your way across it, laying each tile so they’re flush against the previous one.[18]
- Starting at 1 end and working your way across the area makes the job quicker, easier, and more consistent than starting in the middle because you don’t have to constantly move around to add more tiles.
-
7Replace the wall outlets or switch covers. If you removed outlet covers from a wall, replace them once you finish installing the tile. Place the covers back against the wall and use your screwdriver to install the screws that hold them securely in place.[19]
-
8Allow the adhesive to dry overnight. Wait at least 8-10 hours for the tile adhesive to fully dry. Check to make sure it’s hardened and fully dry before you do anything else to the tile.[20]
- If the adhesive is still sticky or isn't fully dry, wait another hour or so and check it again.
-
9Use a rubber float to apply grout to the tile. A rubber float is a lightweight, handheld tool perfect for adding grout. Apply your grout to the float and spread it evenly in the space between the beveled tiles. Continue adding grout to the float and applying it until all of the tiles have grout lines between them.[21]
- Grout helps your tile last longer, keep out water, and prevent mold.[22]
-
10Clean the tiles with a sponge an hour after you apply the grout. Wait for the grout to dry, which usually takes about an hour (but check the packaging for specific drying times just to be safe). Then, fill a bucket with warm water and use a clean sponge to clean the grout and the tiles.[23]
-
11Apply caulk to where the tile meets the wall or countertop. If you want to seal the space between the edge of the tile and a countertop, wall, or under any cabinets, use caulk. Tape off the areas you don’t want caulk with painter’s tape and apply the caulk into the space you want to fill. Use your fingers to smooth it out and help fill it in. Then, remove the painter’s tape and let the caulk dry.[24]
- Check the packaging for specific drying times.


Expert Q&A
Did you know you can get expert answers for this article?
Unlock expert answers by supporting wikiHow
-
QuestionHow do you drill through ceramic tile?
 Art FrickeArt Fricke is a home renovation and repair specialist and the owner of Art Tile & Renovation based in Austin, Texas. With over 10 years of experience, he specializes in bathroom and kitchen renovations. Art focuses on a single contractor approach to customized renovation work, and performs projects such as installing custom tile showers, fixing tiled shower leaks, replacing cracked tiles, and installing floor and wall tile.
Home Renovation & Repair SpecialistYou'll need to use an abrasive bit and word very slowly. Keep the drill bit wet, because it's going to get hot very quickly. Once you get through the top layer of porcelain, it's easy to drill through the clay.
Support wikiHow by unlocking this expert answer.
Warnings
- Use caution whenever you’re using a tile saw. Avoid placing your fingers or hands near the blade whenever you cut the tile.⧼thumbs_response⧽
Things You’ll Need
Trimming Beveled Tile to Size
- Ruler or tape measure
- Pencil or washable marker
- Tile saw
Creating a Beveled Edge
- Tile rubbing stone or diamond rubbing pad
- Clean cloth
Installing Beveled Tile
- Ruler or tape measure
- Painter’s tape
- Screwdriver
- Notched trowel
- Rubber float
- Grout
- Sponge
- Caulk


References
- ↑ https://www.diytileguy.com/ceramic-subway-tile/
- ↑ https://youtu.be/HIyIGJcJejU?t=393
- ↑ https://youtu.be/HIyIGJcJejU?t=402
- ↑ Art Fricke. Home Renovation & Repair Specialist. Expert Interview. 1 July 2020.
- ↑ https://todayshomeowner.com/video/how-to-install-a-subway-tile-backsplash/
- ↑ https://youtu.be/slRU35Kan7E?t=24
- ↑ https://youtu.be/0A2179VkDTs?t=105
- ↑ https://youtu.be/705SM4fmxN4?t=91
- ↑ https://youtu.be/705SM4fmxN4?t=112
- ↑ https://youtu.be/705SM4fmxN4?t=150
- ↑ https://www.bobvila.com/articles/how-to-cut-glass-tile/
- ↑ https://www.thisoldhouse.com/kitchens/21097162/all-about-ceramic-subway-tile
- ↑ https://www.thisoldhouse.com/kitchens/21097162/all-about-ceramic-subway-tile
- ↑ https://www.bhg.com/bathroom/remodeling/projects/how-to-install-subway-tile/
- ↑ https://www.bhg.com/bathroom/remodeling/projects/how-to-install-subway-tile/
- ↑ https://todayshomeowner.com/video/how-to-install-a-subway-tile-backsplash/
- ↑ https://todayshomeowner.com/video/how-to-install-a-subway-tile-backsplash/
- ↑ https://youtu.be/HIyIGJcJejU?t=381
- ↑ https://www.bhg.com/bathroom/remodeling/projects/how-to-install-subway-tile/
- ↑ https://www.bhg.com/bathroom/remodeling/projects/how-to-install-subway-tile/
- ↑ https://todayshomeowner.com/video/how-to-install-a-subway-tile-backsplash/
- ↑ https://www.thisoldhouse.com/bathrooms/21014993/all-about-grout
- ↑ https://www.bhg.com/bathroom/remodeling/projects/how-to-install-subway-tile/
- ↑ https://www.bhg.com/bathroom/remodeling/projects/how-to-install-subway-tile/
About This Article