This article was co-authored by Art Fricke. Art Fricke is a home renovation and repair specialist and the owner of Art Tile & Renovation based in Austin, Texas. With over 10 years of experience, he specializes in bathroom and kitchen renovations. Art focuses on a single contractor approach to customized renovation work, and performs projects such as installing custom tile showers, fixing tiled shower leaks, replacing cracked tiles, and installing floor and wall tile.
This article has been viewed 119,696 times.
Mineral fiber or fiberglass ceiling tiles can get stained, dirty, or just start to look old after a few years. If you're tired of looking at your old ceiling tiles, or you just want to replace the stained ones, you can do so in just a few hours. Measure the size of tile you need to fill the gap in the ceiling grid and cut the tile using a utility knife. The last thing you need to do is make a shadow line in the side of your tile before you install it in the ceiling grid. In a matter of hours, you've replaced your old, grey tiles with new, shiny white ones.
Steps
Getting Ready to Cut the Tile
-
1Purchase ceiling tiles if necessary. If you're replacing tiles on an existing ceiling, you will want to match the ceiling tile style to the existing tiles. Measure the width and length of your tiles and take a picture of them. Ask at the local tile shop if they have the same type. If not, try to find them online.[1]
- To find out what material your tiles are, remove 1 from the grid. Knock on it and if there's a hollow sound it's wooden. You should be able to tell which tiles are metal and plastic from touching them.
- Mineral fiber or fiberglass tiles feel rougher on the surface but are light to hold.
-
2Remove the tiles from their package and let them rest overnight. New ceiling tiles need time to adjust to temperature and humidity conditions. In these conditions, the tiles can expand or contract by a small margin. Place the tiles in a pile indoors and let them adjust to the conditions overnight.[2]Advertisement
-
3Wear thin work gloves when working with the tiles. Thin work gloves will stop you leaving fingerprint marks on your tiles. On top of that, they will protect your hands from the rough, abrasive texture of the tiles. Buy some good quality thin work gloves at your local hardware store.[3]
- Do not wear surgical gloves as the material is too weak.
-
4Measure the length and width of the area you need to fix. If you have a gap you need to fill in or you need to make some small adjustments to a tile, use a ruler or tape measure to find out the cut you need to make. Place your ruler along the grid and take note of the width and length you measure. Measure from the center of the bar on the ceiling grid. [4]
- Don't measure from the edges of the bars as your tile will be too small to fit when you cut it.
-
5Use a pencil to mark where you need to cut the tile. Look at the dimensions you wrote down and make an outline on your tile. If you need to cut out a thin rectangle, try and mark it out along the side of the tile. The fewer cuts to the tile you need to make, the easier it will be to cut and the smaller the chance you have of damaging the tile.[5]
- Get a light pencil such as a 2H and mark the dimensions on your tile.
-
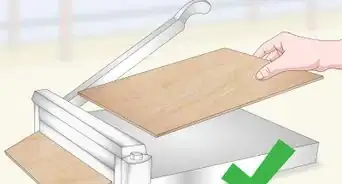
6Lay your tile out on a flat, smooth, clean surface. The best place to do this is in a desk or work area in your garage. If you have to, you can use the kitchen table. Lay down some sheets on the table to reduce your chances of damaging the table when you cut.[6]


Cutting the Tile
-
1Score the width of the tile with the hook of a tape measure. Once you've got your measurement, roll out your tape measure to the right length. Place the body of the measure at the side of the tile and the hook at the start of the pencil line you marked. With 1 hand on the body of the measure and the other holding the hook, drag the hook in a quick, fluid motion along the length of the tile.[7]
- If you're using a wood tile or a tile of another material, use a pencil to mark the score on the tile with a ruler.
- You may want to cut your tiles about 0.125 inches (0.32 cm) shorter than the measurements taken from your ceiling grid. This will ensure that the tile does not fit so tightly in the grid that it is hard to install.
-
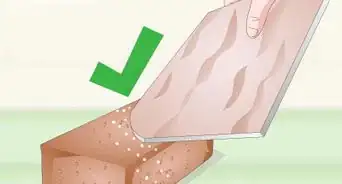
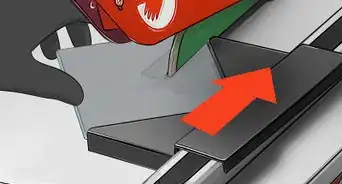
2Make your first pass along the line with a sharp utility knife. Place your knife's edge at the start of the tile. Hold the tile in place by grabbing the side firmly with your free hand. Use your hip to hold the corner of the tile in place, well away from the path of the blade. Push the blade into the tile and drag it along the line in a rapid motion.[8]
- Use a saw to cut your wood tile, a buzz saw for tin tiles, and either a jigsaw or non-melt blade to cut through plastic.
-
3Cut the tile again with the utility knife making a deeper incision. This time, push your knife further into the tile and use plenty of pressure as you drag it back across the material. Make sure you keep plenty of downward pressure on the knife to cut through the deeper layers of the ceiling tile.[9]
- Don't use a sawing motion. You may rip the tile and damage it beyond repair in that spot.
-
4Keep cutting the tile, making deeper and deeper passes each time. Continue with the cutting process, each time forcing your knife deeper into the tile and pulling back in a smooth motion. Keep cutting until you reach the work surface or the tiles come apart without you pulling.[10]
- Don't try to pull the 2 parts of tile apart with your hands. Wait until they are completely separated by the cutting action.


Making the Shadow Line
-
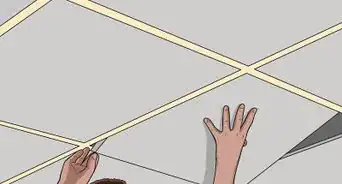
1Place the tile in its spot in the ceiling and cut the edge. Use a step ladder to climb up and place the cut section of tile in its spot on the ceiling grid. With the tile in its position, take your knife and make a light incision along the border of the grid.[11]
- If you have plastic, tin, or wooden tiles, place the tile in the grid and mark the shadow line with a pencil.
-
2Cut along the incision to create a shadow line on the tile. To ensure your tiles fit snugly into the ceiling grid, you need to cut the shadow line. The shadow line is the groove around the edge of your tile that fits into the grid. Push your knife halfway into the tile at the point where you made the light incision when you placed it in the grid. Anchoring the tile the same way you did before, pull the knife back towards you, maintaining enough pressure to cut halfway into the tile.[12]
- Use a saw to cut the shadow line into your wooden tiles, cutting along the marked line. If you have a plastic tile, use a jigsaw or non-melt blade to make the shadow line. For tin tiles, use a buzz saw.
- Only cut halfway through the tile at the edge to create the shadow line.
- A non-melt blade is a saw designed to cut lightweight materials without chipping or melting them.
-
3Cut the side of the tile to finish making the shadow line. Place your knife at the side of the tile, at the bottom of the cut you just made halfway through the tile. Place your free hand flat on the tile's surface for support. Pull the knife down along the side to remove the edge of the tile and create a shadow line.[13]
- Remove the section of the tile at the edge when you're finished.
-
4Repeat the process for the other tiles. If you have other tiles in the ceiling grid that need to be replaced, repeat the process. Remember to measure the ceiling grid each time. Measure from the center of each bar to the center of the next bar to find the required width of your tile.[14]
- Don't try to take shortcuts to speed up the process. Cut the tile repeatedly until it separates by itself. Never try to pull the tiles apart.
- Replace or sharpen the blade of your knife if it becomes dull.
-
5Put the tile in the ceiling grid. Use a step ladder to climb up and pop the tile into its place on the grid. If the tile doesn't fit snugly in the grid, take it back out and make any adjustments you need to.


Expert Q&A
-
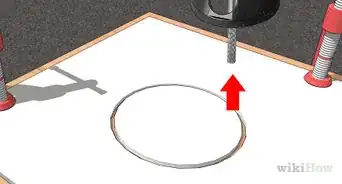
QuestionHow do you drill ceramic tile without breaking it?
 Art FrickeArt Fricke is a home renovation and repair specialist and the owner of Art Tile & Renovation based in Austin, Texas. With over 10 years of experience, he specializes in bathroom and kitchen renovations. Art focuses on a single contractor approach to customized renovation work, and performs projects such as installing custom tile showers, fixing tiled shower leaks, replacing cracked tiles, and installing floor and wall tile.
Home Renovation & Repair SpecialistCeramic tile tends to be very sensitive. If you're drilling into the tile, make sure that you use an abrasive drill bit designed specifically for ceramic. An abrasive diamond drill bit is a really good option. Second, you want to make sure that you get the drill bit wet and work really slowly as you're drilling, since the ceramic is going to get really hot, which can cause it to shatter. Just take your time and go slow.
Things You'll Need
- Ceiling tiles
- Tape measure
- Ruler
- 2H pencil
- Buzz saw
- Jigsaw
- Hand saw
- Non-melt blade
- Smooth work surface
- Utility knife or a carpet knife
- Step ladder
- Thin work gloves


References
- ↑ https://www.nytimes.com/1990/07/29/nyregion/home-clinic-how-to-replace-ceiling-tiles.html
- ↑ https://www.nytimes.com/1990/07/29/nyregion/home-clinic-how-to-replace-ceiling-tiles.html
- ↑ https://www.familyhandyman.com/ceiling/how-to-cut-ceiling-tiles/
- ↑ https://www.nytimes.com/1990/07/29/nyregion/home-clinic-how-to-replace-ceiling-tiles.html
- ↑ https://www.nytimes.com/1990/07/29/nyregion/home-clinic-how-to-replace-ceiling-tiles.html
- ↑ https://www.familyhandyman.com/ceiling/how-to-cut-ceiling-tiles/
- ↑ https://www.popularmechanics.com/home/interior-projects/how-to/a168/suspended-ceiling-tiles-install/
- ↑ https://www.familyhandyman.com/ceiling/how-to-cut-ceiling-tiles/
- ↑ https://www.familyhandyman.com/ceiling/how-to-cut-ceiling-tiles/
- ↑ https://www.familyhandyman.com/ceiling/how-to-cut-ceiling-tiles/
- ↑ https://www.familyhandyman.com/ceiling/how-to-cut-ceiling-tiles/
- ↑ https://www.nytimes.com/1990/07/29/nyregion/home-clinic-how-to-replace-ceiling-tiles.html
- ↑ https://www.popularmechanics.com/home/interior-projects/how-to/a168/suspended-ceiling-tiles-install/
- ↑ https://www.popularmechanics.com/home/interior-projects/how-to/a168/suspended-ceiling-tiles-install/
About This Article