This article was co-authored by Ryaan Tuttle. Ryaan Tuttle is a Home Improvement Specialist and the CEO of Best Handyman, Inc. in Boston, Massachusetts. With over 17 years of experience, he specializes in building home service businesses, focusing on creating scalable and efficient brands. With the help of his global team, the companies have achieved over 10+ million in sales and received recognition through magazine features, and enjoy partnerships with wikiHow and Jobber field service software. Boston Magazine and LocalBest.com have named Best Handyman Boston the Best Handyman in Boston. Ryaan holds Construction Supervisor and Home Improvement Contractor Licenses.
There are 13 references cited in this article, which can be found at the bottom of the page.
This article has been viewed 186,642 times.
If you’re planning a DIY tiling job, you may run into situations where you need to cut the tile to fit along walls, corners, and household fixtures. To accomplish this, you can use a manual tile cutter to score and break standard ceramic and porcelain tiles, or rent a wet saw to make clean cuts through natural stone materials. Remember take accurate measurements and cut one tile at a time in order to ensure that your finished project looks polished and professional.
Steps
Using a Tile Cutter to Cut Ceramic and Porcelain Tiles
-
1Purchase a tile cutter that’s wider than the tiles you’re working with. Measure the tile from end to end and pick out a tile cutter at least 1 inch (2.5 cm) larger than the dimension of the tile. If you’re planning on laying your tile in a diagonal pattern (which may require diagonal cuts), measure from corner to corner instead to make sure it will fit the tile cutter.[1]
- You can typically buy a tile cutter for as little as $15-20 USD. Once you have one of your own, you’ll be able to use it for all future tile cutting tasks, which means it will eventually pay for itself.
- For maximum versatility, look for a tile cutter with a rotating guide that will allow you to make cuts at different angles.
- Manual tile cutters work best for ripping standard ceramic and porcelain tiles. For tiles made from natural stone, you’ll need to use a wet saw instead.[2]
-
2Practice using the tile cutter with scrap tiles or inexpensive pieces. Tile cutters are simple to operate. Still, it’s a good idea to get a little experience using the tool before you get started on your actual project. There are a few different types of tile cutters, but all use the same basic components and cutting action.[3]
- Any mistakes you make once you begin cutting your main tiles could end up costing you quite a bit of money in wasted materials.
Advertisement -
3Mark the tile where you want to make a cut. Trace a faint line from one end of the glazed side of the tile to the other with a pencil. Use a straight edge or ruler to ensure that the line is straight and precise. This is the path that the cut will follow.[4]
- In most cases, the place where you make your cut will correspond to measurements you’ve taken from the area where the tile will be laid. If the tile is 2 inches (5.1 cm) too long to fit along a wall, for example, you’d cut 2 inches (5.1 cm) off the end of the tile.[5]
- Double-check your measurements to confirm that the line you draw is as accurate as possible. Otherwise, you could end up with gaps or tiles that are still too large.
-
4Slide the lever on the tile cutter toward you until it stops. This will move the cutter wheel into the correct start position. When operating a tile cutter, you always want to stand with the tool oriented vertically in front of you.
- Have all of the tiles you need to cut marked and close at hand in order to work more efficiently.
-
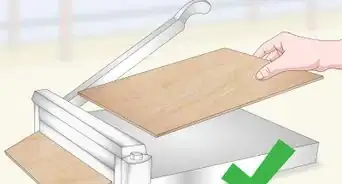
5Place a tile in the cutter with the glazed side up. Center the tile beneath the blade rails and push it forward until it sits snugly against the end stop. Make sure the measurement line you drew is positioned directly over the central guide line, which is the thin metallic rail that runs the length of the cutting surface.[6]
- If you need cut multiple tiles to the same specifications, adjust the locking protractor gauge (usually located on the right-hand side of the device) to the desired angle and tighten it down.
-
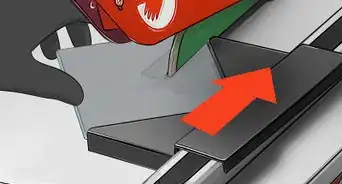
6Guide the hand lever forward along your measurement line. As you inch the cutter wheel across the face of the tile, the carbide or tungsten-steel blade will slice through the glazed surface. It may take a little bit of effort to keep the wheel moving smoothly. Keep pushing the lever along until it comes to a halt against the end stop.[7]
- Only score each tile once. Making multiple passes increases your chances of breaking the tile or producing uneven cuts.
-
7Push down on the lever to break the tile in two. The forked foot on the underside of the lever will press into both sides of the scoring line, which the blade will have weakened considerably. With enough pressure, the tile will snap and you’ll be left with 2 tile sections with clean, straight edges.[8]
- Apply pressure to the tile gradually to prevent it from breaking along any axis but the scoring line.
- On some models, you may have to lift the handle to put the lever foot into position to break the tile after you’re finished scoring it.
-
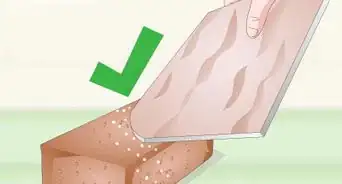
8Run a rubbing stone against the cut edge of the tile to smooth it. Sweep the textured surface of the stone back and forth smoothly over the jagged edge the way you would a piece of sandpaper. Blunting the freshly-cut edge will keep it from becoming a hazard later on while you’re laying the tile. Be sure to smooth the top and bottom edges of both pieces of tile.[9]
- You should be able to find a rubbing stone or tile file in the tile section at any hardware store or home improvement center.
- Some rubbing stones have two sides with different grits to give you more control over the texture of the finished tile.[10]
- If the cut edge of the tile will be hidden under molding or a nearby appliance or fixture, you can skip this step.


Cutting Natural Stone Tiles with a Wet Saw
-
1Rent a wet saw from your local home improvement center. Since these machines tend to be quite a bit more expensive than manual tile cutters, renting is a more economical option than buying. You can often rent a $500 saw for around $50 a day.[11]
- Another benefit of renting as opposed to buying is that you’ll have your pick of a wider range of models, making it easy to find just the right tool for your project.
-
2Make sure the saw’s water reservoir is full before you get started. On most models, you can access the water reservoir by opening a hatch near the center of the saw table. Fill the reservoir to the indicator line, then close and lock the hatch.[12]
- Some simpler models make use of an open reservoir tray directly underneath the saw table. These tend to be easier to fill and drain.[13]
- It's alright to fill your wet saw's water reservoir with standard tap water.
-
3Mark the tile where you want to cut it with a washable marker. Cut lines drawn in marker will show up better on the face of the tile than those drawn in pencil. Check your measurements carefully before marking the tile, and use a straight edge to ensure that your lines are straight and precise.[14]
- When you’re done cutting, you can simply wipe off any remaining ink with a damp cloth.
-
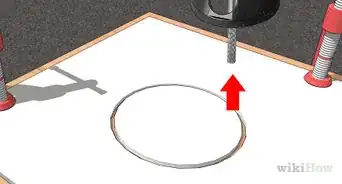
4Set the guide plate on the saw table to ensure a precise cut. Most wet saws feature adjustable numbered guide plates that are situated perpendicularly to the blade. These plates are designed to hold the tile steady while you operate the saw. To change the position of the guide plate, pull the small end lever out, move the plate into the desired position along the built-in measuring guide, then push the lever in until it clicks to lock it in place.[15]
- Always make sure the tile you’re cutting is resting snugly against the guide plate. If there is any space between the tile and the edge of the plate, your cut may turn out crooked.[16]
- If the model you’re using doesn’t have an adjustable guide plate, you’ll need to line up the cut line you drew with the saw blade manually.
-
5Place the tile flat against the saw table with the glazed side up. Make sure it’s oriented according to how you want to make your cut. If you’re removing part of the vertical edge, you’ll position the tile horizontally. If you’re trimming the horizontal edge, you’ll set it up vertically.[17]
- In other words, your cut line should be positioned parallel to the saw blade.
-
6Turn on the saw and allow it to run for 15-20 seconds. Flip the power switch on the front of the saw base and give the blade a moment to get up to speed. For best results, it should reach top velocity before you attempt to cut the tile.[18]
- It’s a good idea to put on a pair of safety glasses before you begin sawing to protect your eyes from any tile particles or water droplets that happen to go flying during the cutting process.
- As the blade spins, the water from the reservoir will be pulled upward, wetting the blade and making it possible to achieve clean, smooth cuts without damaging the delicate tile.
-
7Feed the tile slowly into the saw blade. Use gentle, steady pressure to push the sliding table toward the blade. The idea is to let the saw do the cutting at its own natural pace—you’re just there to position the tile. Take your time and hold the tile steady with both hands as you work.[19]
- To keep the tile from shifting, press it down into the surface of the saw table while pulling it back against the guide plate.
- Try not to apply too much pressure. Forcing the tile into the saw blade could cause it to crack, chip, or break completely.[20]
- Be extremely careful to keep your hands clear of the saw blade at all times while it's in motion. It's far better to lose a piece of tile than a finger!
-
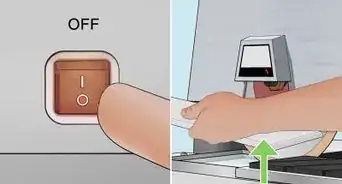
8Turn off the saw and allow the blade to power down before removing the tile. Once you’ve made the necessary cuts to your tile, flip the power switch to the “Off” position. Wait 5-10 full seconds for the saw to stop spinning before removing your cut tile pieces or handling any other part of the machine.[21]
- Failure to wait for the saw blade to come to a complete stop before reaching for the tile could result in serious injury.
- Don’t forget to wipe off any last traces of your cut lines before installing the tile.
-
9Unplug the saw when you’re finished using it. As a final safety measure, pull the electrical cord out of the wall outlet. This will help prevent accidents while the saw is not in use.[22]


Expert Q&A
-
QuestionHow do you cut tile without a cutter?
 Ryaan TuttleRyaan Tuttle is a Home Improvement Specialist and the CEO of Best Handyman, Inc. in Boston, Massachusetts. With over 17 years of experience, he specializes in building home service businesses, focusing on creating scalable and efficient brands. With the help of his global team, the companies have achieved over 10+ million in sales and received recognition through magazine features, and enjoy partnerships with wikiHow and Jobber field service software. Boston Magazine and LocalBest.com have named Best Handyman Boston the Best Handyman in Boston. Ryaan holds Construction Supervisor and Home Improvement Contractor Licenses.
Home Improvement SpecialistTry using a wedge saw or a 4 in (10.2 cm) angle grinder with a masonry blade in it. -
QuestionHow do I make a cutout for an electrical outlet on a wall from a piece of tile that would encapsulate the box?
 Community AnswerYou'll have to cut the tile into four pieces to fit against each side of the outlet. Then work your way outwards from there.
 -
QuestionHow do I do a bullnose edge on tile?
 DonaganTop AnswererBuy bullnose pieces, and treat them the way you'd treat any other pieces.
Warnings
- Manual tile cutters may not be effective for cutting strips of tile narrower than about 1⁄2 in (1.3 cm).⧼thumbs_response⧽
Things You'll Need
- Tile cutter or wet saw
- Rubbing stone
- Pencil
- Washable marker
- Clean cloth
- Safety goggles


References
- ↑ https://www.laserlevelhub.net/tile-cutting-tools/
- ↑ https://www.thisoldhouse.com/how-to/how-to-cut-tile
- ↑ https://www.askthebuilder.com/ceramic-tile-cutter/
- ↑ https://www.bobvila.com/articles/how-to-cut-glass-tile/
- ↑ https://www.sothatshowyoudothat.com/how-to-measure-for-tile-cuts-an-easy-method/
- ↑ https://www.bobvila.com/articles/how-to-cut-glass-tile/
- ↑ https://www.youtube.com/watch?v=gsJCx19tnBc&feature=youtu.be&t=113
- ↑ https://www.youtube.com/watch?v=H_OAovANaO4&feature=youtu.be&t=85
- ↑ https://www.thisoldhouse.com/how-to/how-to-cut-tile
- ↑ https://www.youtube.com/watch?v=8C983ulf1t4&feature=youtu.be&t=79
- ↑ https://www.bobvila.com/articles/how-to-cut-glass-tile/
- ↑ https://www.bhg.com/home-improvement/remodeling/carpentry/how-to-use-a-wet-saw/
- ↑ https://www.youtube.com/watch?v=owpJJwRYpes&feature=youtu.be&t=25
- ↑ https://www.bobvila.com/articles/how-to-cut-glass-tile/
- ↑ https://www.bobvila.com/articles/how-to-cut-glass-tile/
- ↑ https://www.homedit.com/how-to-use-a-wet-tile-saw/
- ↑ https://www.homedit.com/how-to-use-a-wet-tile-saw/
- ↑ https://www.bobvila.com/articles/how-to-cut-glass-tile/
- ↑ https://www.youtube.com/watch?v=4qXMzf35YE8&feature=youtu.be&t=324
- ↑ https://www.bhg.com/home-improvement/remodeling/carpentry/how-to-use-a-wet-saw/
- ↑ https://www.bhg.com/home-improvement/remodeling/carpentry/how-to-use-a-wet-saw/
- ↑ https://www.bobvila.com/articles/how-to-cut-glass-tile/
- ↑ Ryaan Tuttle. Home Improvement Specialist. Expert Interview. 18 June 2021.
About This Article

Before you cut tile, make sure to purchase a tile cutter that is wider than the tile you have bought. Measure and mark with a pencil where you would like to cut your tile. Then, slide the lever on the tile cutter so that the blade is closest to you. Place the tile glaze-side up in the slot and score the tile firmly across your marked line by dragging the wheel across the tile. Once the tile is scored, pull the lever so that the tile will snap in two. For more on cutting tile with a wet saw, keep reading!


