This article was co-authored by Ryaan Tuttle and by wikiHow staff writer, Amber Crain. Ryaan Tuttle is a Home Improvement Specialist and the CEO of Best Handyman, Inc. in Boston, Massachusetts. With over 17 years of experience, he specializes in building home service businesses, focusing on creating scalable and efficient brands. With the help of his global team, the companies have achieved over 10+ million in sales and received recognition through magazine features, and enjoy partnerships with wikiHow and Jobber field service software. Boston Magazine and LocalBest.com have named Best Handyman Boston the Best Handyman in Boston. Ryaan holds Construction Supervisor and Home Improvement Contractor Licenses.
This article has been viewed 42,000 times.
Glass tile is a popular material used in homes for aesthetic purposes. It comes in a wide variety of styles, colors and sizes. When installing glass tile, you will inevitably need to make a variety of cuts. Some cuts are small and can be done with simple tools like nippers and scoring knives. Larger cuts will require the use of a wet saw. Cutting glass tile may sound intimidating, but the process is fairly straightforward. By using the appropriate tools and a few specific techniques, you can make clean cuts into your glass tile.
Steps
Setting up the Job
-
1Measure the space carefully and then purchase the tile. The number of tiles you buy depends on the size of the space and the size of the tiles you choose. Glass tiles are frequently used as backsplash in kitchens, as well as in bathrooms. However, glass tile is very versatile and can be used in many other ways. Measure the space carefully beforehand and purchase the tiles accordingly.
- You can purchase glass tiles at most home improvement stores.
- Try to buy about 5% more tile than you need for the job to account for any errors that occur during installation, though if you're putting in a backsplash with many outlets or otherwise has many difficult cuts, allow yourself an additional 10%.
-
2Read the manufacturer’s instructions. Your glass tile will come with instructions from the manufacturer and there may be specific installation guidelines. Read and follow the directions provided. The thickness of your glass tile may require a particular cutting tool, for instance, or the manufacturer may recommend a particular technique. Some manufacturers won’t provide a warranty for the materials you purchased unless you follow their specific guidelines for installation.
- If you don’t feel comfortable with the installation after reading the instructions, consider contacting the manufacturer directly for more information.
- You may want to consider using a qualified contractor, carpenter or professional installer for this job.
Advertisement -
3Inspect the tiles for consistency before you begin. The manufacturer’s instructions will elaborate on what you should expect from the materials. Depending on the type of tile, some variations in shape, color, shade and tone may be normal and should be expected. Sheet mosaic tiles will often have a mix of glass, metal and ceramic tiles. Confirm that the purchased materials meet your expectations before you begin the installation process.
- Check for any defective or broken glass, as well. Glass tiles with paper or foil backing should be checked carefully for manufacturing defects that will hard to spot until after it is installed.
-
4Wear protective gear. Small slivers of glass will be discharged as you make cuts, creating a potential safety hazard. Be very careful. It’s imperative that you wear some kind of eye protection or safety goggles when cutting glass tile. It’s also recommended that you wear heavy cloth or leather gloves to protect your hands from flying glass shards.
- Gloves will also protect your hands from the extremely sharp edges of freshly cut glass tile.


Using Nippers or Scoring Tools for Small Tiles
-
1Cut small pieces of glass with nippers. Nippers, also known as “tile nibblers,” are essential for cutting small format tiles. Nippers look a lot like regular pliers, except they have extremely sharp tips. The most effective nippers for cutting glass tiles have tiny carbide wheels attached to the ends. These wheels make it possible for you to apply the necessary force required to make a cut without damaging the glass. Nippers aren't accurate to use in highly visible areas, so only use them to help the tile fit around pipes and edges along walls and corners that will eventually be grouted.
- You can also use nippers to perform other detail work like trimming flares, cutting around pipes and breaking off pieces of scored tile.[1]
- An example of small format tiles are 4mm mosaic tiles.
-
2Choose a glass scoring tool to make straight cuts on thin tiles.[2] If you need to make larger, straight edge-to-edge cuts on smooth standard thickness (4mm) tile, use a glass scoring tool and a straight edge. Scoring means to minutely cut the glass to encourage a clean break. Most scoring tools feature a carbide or diamond cutting wheel to scratch the glass.
- The scoring tool itself does not cut the glass into pieces. It creates a break line, and then the cutter applies pressure by hand to snap the tile along the line.
-
3Plan and mark your desired cut line with a straight edge. To make a successful cut, measurements and cut lines must be very accurate. Use the straight edge to mark an accurate cut line with a non-permanent marker. Marking a cut line will also help you make one continuous, straight cut with the scoring tool, which is ideal.[3]
- The score needs to run from one side of the tile to the other, so make sure your cut lines are drawn all the way to the edges of the tile.
-
4Score the tile. After you mark your cut line, use the scoring tool to scratch that line into the surface of the glass. Place the straight edge next to the line and score along it to ensure accuracy. Tilt the scoring tool at an angle and press down firmly – this will “score” the tile. Be sure to press down hard enough to scratch a visible line into the glass. Avoid pushing down too hard, however, because this can damage the glass.[4]
- If you hear a gritty sound as you score, that means you are pushing too hard. The right amount of pressure will result in a smooth, tearing sound.
- These scored lines are sometimes called break lines.
-
5Break the tile along the score line. Place your thumbs close to the score, one on each side of the line. Put pressure along the line by pressing down with your thumbs. Make sure you press down with equal force on both sides of the score. Then use a quick, snapping motion with your wrists. The tile will snap apart crisply along the scored line. Pull the tile apart after it snaps.[5]
- You may need to use an additional tool to break the tile. Place a piece of wire or some other thin object directly beneath the score line, making sure the score line is facing up. Apply pressure to both sides of the line to snap the tile.
- You can try using pliers as long as you wrap the ends with electrical tape.


Using a Wet Saw for Large Tiles
-
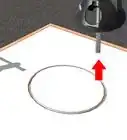
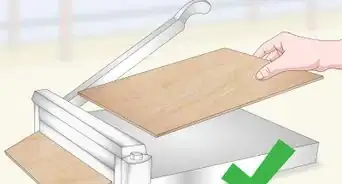
1Choose a wet saw to cut large or thick tiles. It’s very hard to score larger tiles deep enough to snap them cleanly. A wet saw is the best choice. If you don’t own one, most home improvement stores will rent them out. Wet saws usually come equipped with standard (ceramic tile) blades. Do not use these blades to cut glass tile because it will damage the glass.
- Switch that blade out with a glass compatible diamond-encrusted blade, which the home improvement store will carry.[6]
-
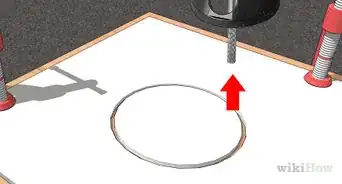
2Fill the saw’s tray with water. The water used in a wet saw helps to cool and lubricate the diamond blade as you make your cuts. Without the water, the glass will eventually heat up and explode. Adequate water flow in the saw’s reservoir tray is imperative to prevent this. Make sure you fill the tray up completely with water before you start using the wet saw.
- Replace the water frequently when cutting glass tiles, since as the water fills with debris it will increase the chances of chipping a tile.
-
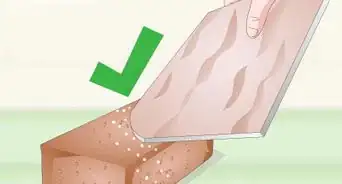
3Place the tile face down on the wet saw tray. Cutting the tile face down will help to prevent chipping. Take your measurements and then draw the cut line onto the tile with a non-permanent marker. Place a piece of electrical tape, masking tape or duct tape along the line, which will prevent the glass from chipping at the edges. Line the saw up with the cut line.
-
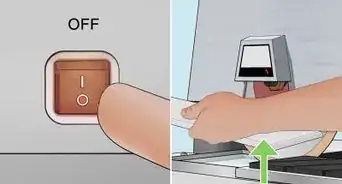
4Use the wet saw to make the cut. Turn the saw on and guide the diamond blade across the glass tile. Cut along the line slowly. Take your time making the cut and don’t push the blade into the glass. To get a clean cut, push the glass tile against the saw’s blade lightly and steadily.[7]


Expert Interview
Thanks for reading our article! If you'd like to learn more about working on your home, check out our in-depth interview with Ryaan Tuttle.
References
- ↑ http://aboutglasstile.com/cutting-glass-tiles/
- ↑ http://aboutglasstile.com/how-to-use-a-glass-scoring-tool/
- ↑ http://www.ebay.com/gds/How-to-Properly-Cut-Glass-Tiles-/10000000178722189/g.html
- ↑ http://aboutglasstile.com/how-to-use-a-glass-scoring-tool/
- ↑ http://aboutglasstile.com/how-to-use-a-glass-scoring-tool/
- ↑ http://aboutglasstile.com/how-to-cut-with-a-wetsaw/
- ↑ http://www.ebay.com/gds/How-to-Properly-Cut-Glass-Tiles-/10000000178722189/g.html
About This Article

To cut glass tile, start by using a marker and ruler to draw a line over the area you want to cut. Then, scratch the line into the glass with a scoring tool and break the tile by snapping it in half with your fingers. Alternatively, place a thin piece of wire beneath the score line and pull up on both ends of the wire to snap the tile. If you're trying to make detailed cuts, like cutting tiles to fit around pipes, try using nippers for more control. For tips on how to cut tiles using a wet saw, read on!