This article was co-authored by Art Fricke. Art Fricke is a home renovation and repair specialist and the owner of Art Tile & Renovation based in Austin, Texas. With over 10 years of experience, he specializes in bathroom and kitchen renovations. Art focuses on a single contractor approach to customized renovation work, and performs projects such as installing custom tile showers, fixing tiled shower leaks, replacing cracked tiles, and installing floor and wall tile.
wikiHow marks an article as reader-approved once it receives enough positive feedback. In this case, 91% of readers who voted found the article helpful, earning it our reader-approved status.
This article has been viewed 141,859 times.
Cutting ceramic tiles may sound scary, but it is actually surprisingly easy. The tool you use will depend on what sort of cut you are doing and how many tiles you plan on cutting. If you just have to cut a few tiles, a glass cutter will suffice. If you need to cut more tiles, however, a tiling tool or a wet saw might be more convenient. Knowing how to cut tiles yourself can save you a lot of money, and ensures that your tiles come out precisely the way you want them to.
Steps
Using a Glass Cutter for Straight Cuts
-
1Use a pencil and a square to measure and mark your tiles. A square is a special ruler shaped like a right angle. Align the horizontal edge of the square with the bottom edge of the tile. Use the vertical edge of the square and a pencil to draw your guideline.
- This method is better suited to small jobs where you just need to cut a few tiles. It is not suitable for cutting corners or curves.
-
2Set the tile down onto a sturdy surface and reposition the square. A workbench or plywood would work the best for this. Move the square off to the side so that it is right next to your marked line. This will allow you to cut right along the line without cutting into the square.[1]Advertisement
-
3Score the tile with the glass cutter. Press down on the tile with the glass cutter, then drag it across the line that you drew, using the square as a guide. You may have to score the tile a few times in order to make a shallow cut.[2]
- If you can't find a glass cutter, try a carbide tipped pencil instead.[3]
-
4Snap the tile over a wire hanger. Place the tile on top of a wire hanger. Make sure that the hanger is aligned with the line that you scored. Next, press down on the un-scored edges of the tile until it snaps.[4]
- if you scored from left-to-right, press down on the top and bottom edges, and vice versa.
- If you scored the tile close to the edge, snap off the thinner side with tile nippers.[5]
-
5Smooth the edges of the tile with a brick, if needed. You can do this by rubbing the cut edge of the tile back and forth across a brick or some concrete. This will buff away any roughness, much like sandpaper would on a block of wood.[6]


Using a Tiling Tool for Straight Cuts
-
1Measure and mark your tile with a square and a pencil. A square is a ruler shaped like a right angle. Align one edge of the square with one edge of your tile. Use a pencil and the other edge to draw your guideline.
- This method is great if you have a lot of tiles to cut. It's also suitable if you need to cut a lot of surface area, such as corner-to-corner cuts (as opposed edge-to-edge).
-
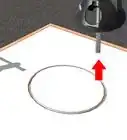
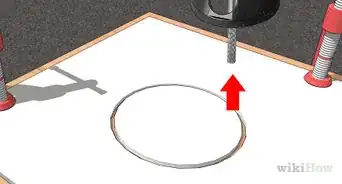
2Set the tile into a tile cutter. Set the square aside and set the tile into the tile cutter. Push the tile right up against the fence, and make sure there is no debris preventing the tile from touching the fence. Make sure that the line that you drew is right under the scoring wheel.[7]
-
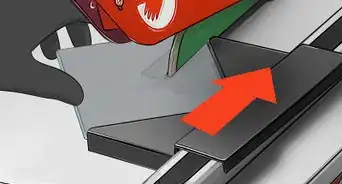
3Use the tile cutter to score the tile. Use smooth, even pressure. Gently press down on the handle of the cutter, then slide the wheel part across the tile. Hearing a scratching noise is nothing to worry about, it just means everything is going as planned and the tile is being cut.[8]
-
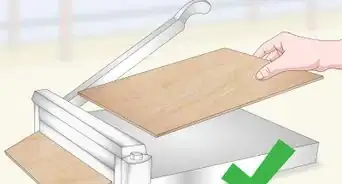
4Use the tile cutter to snap the tile in half. Move the handle away from the edge of the tile so that the breaking feet land on top of the tile. Gently press down on the handle again to lower the breaking feet and snap the tile.[9]
-
5Use a jig and a strip of wood if you need to snap off a thin strip. Set up a jig that’s composed of 2 1-by-4s. Separate the 1-by-4s with a strip of wood that's the same thickness as your tile. Make sure that the scored line is level with the edge of your jig set-up. Press down on the tile to create a clean break.[10]
-
6Smooth the cut edges with a brick if needed. Rub the cut edge of the tile back and forth across a brick until the roughness is gone. If you don’t have a brick handy, concrete will also work.


Using a Wet Saw for Straight and Corner Cuts
-
1Measure and mark your tiles where you want to cut them. Use a measuring square to determine how much you need to cut off and make a strong mark with a pencil or where you would like to cut so the water doesn’t erase the mark. Then make the marks in any direction you'd like, such as horizontal, vertical, or even diagonal.
- This method is suitable for bigger jobs that involve a great amount of tile.
- You can also use wet saws to cut tile trimmings with a bullnose or quarter-round shape.[11]
-
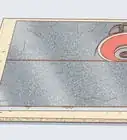
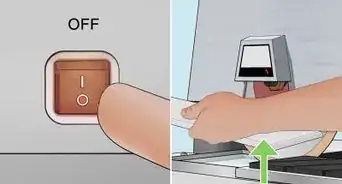
2Set up the wet saw according to the saw's instructions. Each wet saw will be a little different, so be sure to follow the instructions closely. In most cases, you will need to fill the tub with water and turn the saw on.[12]
- Make sure the water level doesn’t get too low, and be sure to replace it when it gets dirty so the saw operates properly.
-
3Cut the tile according to the saw’s instructions. Each saw will be a little different, so read the instructions carefully. For the cleanest cut, avoid pushing or forcing the tile into the saw. Instead, gently guide the tile towards the saw, and let the saw do the cutting for you.[13]
- Make sure that the water is covering the blade when cutting.
-
4Smooth down any roughness with a brick. Even if you took extra steps to ensure the cleanest of cuts, there may be some roughness on the cut edges. If this happened to you, simply rub the cut edge of the tile across a brick or a piece of concrete a few times.
- Avoid using a brick or piece of concrete with jagged edges, as this could break the tile.


Using Tile Nippers for Curves
-
1Draw a curved line with a pencil where you want to cut the tile. Don’t be afraid to use French curves, cans, lids, and other round objects as a template. If the area you will be cutting is far from the edge of the tile, consider cutting the tile down using one of the above methods first.
- This method will require you to cut the tile away, bit by bit, until you reach the line that you drew.
-
2Pinch the tile between the tile nippers. Place them close to the edge of the tile—even if your curved line is further in. Break off small pieces of tile at a time. If you break off too much at one time, you will risk breaking the tile.
-
3Break a piece of the tile off with the tile nippers. Squeeze down on the handle of the tile nippers to get a good grip on the tile. Snap the piece off of the tile.
-
4Continue breaking off pieces of tile until you reach the curved line. Work your way back and forth across the tile in narrow rows. Break off smaller pieces the closer you get to the line for more precision.[14]
-
5Smooth and refine the line with a brick. Rub the cut edge of the tile back and forth across a smooth brick or piece of concrete. Rock the tile while doing so to ensure that the edge gets smoothed evenly.


Expert Q&A
Did you know you can get expert answers for this article?
Unlock expert answers by supporting wikiHow
-
QuestionWhy does the ceramic keep breaking when I drill into it?
 Art FrickeArt Fricke is a home renovation and repair specialist and the owner of Art Tile & Renovation based in Austin, Texas. With over 10 years of experience, he specializes in bathroom and kitchen renovations. Art focuses on a single contractor approach to customized renovation work, and performs projects such as installing custom tile showers, fixing tiled shower leaks, replacing cracked tiles, and installing floor and wall tile.
Home Renovation & Repair SpecialistCeramic can be kind of tricky to drill into since it tends to be very sensitive. If you're drilling into it, make sure that you're using an abrasive drill bit that's designed specifically for ceramic. Also, keep the drill bit wet a little while you're drilling to keep the ceramic from getting too hot. Finally, make sure that you're working really slowly. If you go too fast, you're more likely to break the ceramic tile.
Support wikiHow by unlocking this expert answer.
Things You'll Need
Using a Glass Cutter for Straight Cuts
- Ceramic tile
- Square
- Pencil
- Glass cutter
- Wire hanger or tile nippers
- Concrete block or brick
Using a Tiling Tool for Straight Cuts
- Ceramic tile
- Pencil
- Tiling tool
- Concrete block or brick
- Jig and strip of wood (optional)
Using a Wet Saw for Straight and Corner Cuts
- Ceramic tile
- Square
- Pencil
- Wet saw
- Water
- Concrete block or brick
Using Tile Nippers for Curves
- Ceramic tile
- Square
- Pencil
- Tile nippers
- Concrete block or brick


References
- ↑ https://www.bobvila.com/articles/how-to-cut-ceramic-tile/
- ↑ https://www.hunker.com/13402331/how-to-cut-ceramic-tile-without-a-tile-cutter
- ↑ https://www.hunker.com/13402331/how-to-cut-ceramic-tile-without-a-tile-cutter
- ↑ https://www.todayshomeowner.com/video/how-to-cut-ceramic-tile-with-a-glass-cutter/
- ↑ https://www.bobvila.com/articles/how-to-cut-ceramic-tile/
- ↑ https://www.todayshomeowner.com/video/how-to-cut-ceramic-tile-with-a-glass-cutter/
- ↑ https://www.bobvila.com/articles/how-to-cut-ceramic-tile/
- ↑ https://www.bobvila.com/articles/how-to-cut-ceramic-tile/
- ↑ https://www.bobvila.com/articles/how-to-cut-ceramic-tile/
- ↑ https://www.todayshomeowner.com/video/jig-for-snapping-tile-with-a-manual-tile-cutter/
- ↑ https://www.zillow.com/blog/easy-ways-to-cut-tiles-203558/
- ↑ https://www.bobvila.com/articles/how-to-cut-ceramic-tile/
- ↑ https://www.hunker.com/13402331/how-to-cut-ceramic-tile-without-a-tile-cutter
- ↑ https://www.bobvila.com/articles/how-to-cut-ceramic-tile/
- ↑ https://www.bobvila.com/articles/how-to-cut-ceramic-tile/
- ↑ https://www.zillow.com/blog/easy-ways-to-cut-tiles-203558/
About This Article

To cut a ceramic tile using a glass cutter, start by using a pencil and a square, or a ruler shaped like a right angle, to measure and mark your tile. Next, place the square right next to the marked line so you can use it as a guide, then press down on the tile with the glass cutter and drag it along the line. After that, place the tile on top of a wire hanger that’s aligned with the line you just cut, then press down on the uncut edges of the tile until it snaps. For more tips, like how to cut ceramic tile using a wet saw, read on!