This article was co-authored by Art Fricke. Art Fricke is a home renovation and repair specialist and the owner of Art Tile & Renovation based in Austin, Texas. With over 10 years of experience, he specializes in bathroom and kitchen renovations. Art focuses on a single contractor approach to customized renovation work, and performs projects such as installing custom tile showers, fixing tiled shower leaks, replacing cracked tiles, and installing floor and wall tile.
There are 8 references cited in this article, which can be found at the bottom of the page.
This article has been viewed 33,446 times.
Installing a tile backsplash yourself is a great way to save money while getting the exact look you want. There is more to installing backsplashes than just arranging tiles, however; you have to measure and cut the tiles so that they fit properly. If the backsplash is already installed, you may still be able to cut holes into it for new fixtures, as long as you use the proper tools.
Steps
Preparing the Surface
-
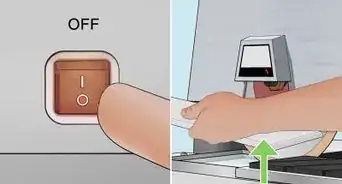
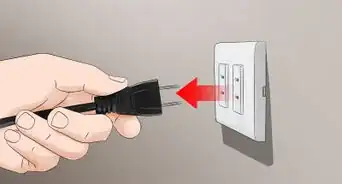
1Turn off the power to your kitchen. Find the electrical panel in your home. It is typically a small, metal panel painted to match your wall. Open the panel, then find the switch for the bathroom or kitchen electrical outlets (wherever you are doing the backsplash). Flick the switch(es) to the off position.
- Remember to flick the switches back on after you have finished installing the tiles.
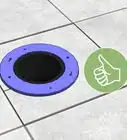
- If your tiles are already on the wall and you wish to cut a hole in them, complete this step, then click here to learn how.[1]
-
2Remove any light switch and outlet covers. Use a screwdriver to remove the screws from each cover. Place the covers into separate zippered bags along with their matching screws. Work 1 cover at a time so that you don't mix or lose the pieces.[2]
- You will need to reinstall the light switch and outlet covers after you have finished installing the tiles.
Advertisement -
3Clear and cover the counters. Move anything on the counter that might get in the way, such as coffee makers and toasters. Cover the counter with a plastic sheet to protect it. If you are installing the tiles later, it would be a good idea to mask off counters and cabinets. This will save you a step.
- To mask off the counters and cabinets: lay strips of painter's tape along any counter or cabinet edges that touch the backsplash wall.
-
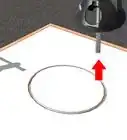
4Mark the center of the wall, then draw a plumb line through it. Find the center of the backsplash wall, and make a like mark with a pencil. Place a 2-ft (61-cm) level against the mark and orient it vertically. Use the edge of the level as a ruler to draw a vertical line spanning the height of your backsplash.[3]
- The plumb line will help you lay out your tiles evenly once you go to mount them on the wall.[4]
- Make sure that the level is straight. The bubble inside the glass tube should be centered between the lines.


Cutting Standard Tiles
-
1Lay out your tiles on the counter, table, or floor. Make sure that your tile lay out matches the dimensions of your wall. For example, if your backsplash is 6 to 2 feet (1.83 to 0.61 m), then your tile lay out should also be 6 to 2 feet (1.83 to 0.61 m). Include the tiles that will get in the way of cabinets, corners, and edges. You will cut these down to size later. Also, remember to include the grouting gaps between the tiles; use a spacer if you have to.[5]
- This step is known as "dry-fitting." It will help you figure out whether or not you need to cut any tiles.
- Leave a 1⁄8-in (0.32-cm) gap around the backsplash, where it connects to the cabinets, counter, and adjacent wall.[6]
- If you are working with a large sheet of tiles, click here to continue.
-
2Mark the tiles that will get in the way of cabinets and corners. Check the dimensions of your wall against your laid-out tiles. Use a marker to make a mark across the tiles where they will bump against a cabinet or corner.[7]
- Mark the tiles that will be along the top edge of your backsplash, next to a wall, or under a cabinet. They will be more disguised that way.[8]
-
3Put on some eye and respiratory protection. A pair of safety goggles will protect your eyes against any flying pieces of tile. A good respiratory mask will prevent you from breathing in any sanding dust. Most masks are graded based on the type of particle they can filter. Choose one that can filter dust particles.
-
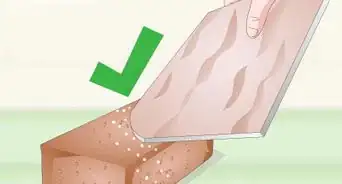
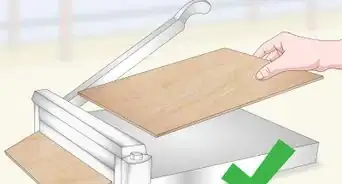
4Use a score-and-snap tile cutter on large tiles. Use the cutting wheel to make a single, deep score in the tile. Snap the tile along the scored line.[9]
-
5Use tile nippers for small tiles. Tiles that are smaller than 1 or 2 inches (2.5 or 5.1 cm) may be difficult to cut on a score-and-snap tile cutter. Not only could you hurt yourself, but you could break the tile. Instead, use a pair of tile nippers to pinch the tile where you need to break it.[12]
- You can use tile nippers on larger tiles to "cut" curves.
- Do not use tile nippers made from slate. You can use them on ceramic tiles, however.[13]
-
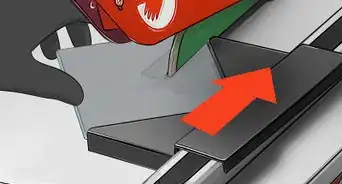
6Use a wet saw to notch tiles, if needed. Sometimes, the corner of a cabinet or outlet cover will extend into your backsplash tiles. Measure the corner, then trace it onto the tile with a pencil or marker. Place the tile onto the sliding table of the wet saw. Gently guide the tile into the saw to make the first cut. Pull the tile back, then create the second cut. Use a tile nipper to break off the piece between the 2 cuts.[14]
- You can also use a wet saw to make basic cuts on most tiles.[15]


Cutting Tile Sheets
-
1Measure the area of your backsplash. Use a measuring tape to measure the dimensions of your backsplash area. Write these measurements down. Don't worry about cabinet corners that cut into the backsplash area just yet.
-
2Transfer the measurements to your tile sheet. The easiest way to do this is with long strips of painter's tape of masking tape. You can also draw on the back of the tile sheet with a marker.
- Be sure to mark any outlet and light switch holes. Place the sheet against the wall and mark them, if needed.[16]
-
3Put on some eye and respiratory protection, if needed. A pair of safety goggles is highly recommended because it will protect your eyes against flying pieces of tile. A good respiratory mask is only needed if you will be cutting the tiles with a wet saw or grinder. If you will be using tile nippers, you won't need a mask.
- Masks are graded based on the size of particle they filter. Purchase one that will filter dust particles.
-
4Cut the tile sheet down to size with a box cutter. Flip the tile sheet over so that you can see the back, then cut through the mesh with a box cutter or utility knife. If the tape runs across a row of tiles, cut through the mesh along the inside edge of the tape. This will make your tile sheet a little smaller than necessary, but that's okay.[17]
- If your tiles are staggered like bricks or a honeycomb, you will need to cut around the tiles. Don't cut straight through them.
- Be sure to cut through the outlet and light switch holes.[18]
-
5Install the tile sheet using your preferred tile cement. Spread the tile cement across the backsplash area, then press the tile sheet into place. If you cut your tile sheet smaller, arrange it so that the gaps caused by the size difference are along the top edge, where the cabinets are. If there is a gap along 1 of the side edges, position the sheet so that the gap is in a corner.[19]
-
6Measure the excess tiles against the gaps. You should still have some tile sheeting left over from when you cut the tile sheet down. Take these excess tiles, and measure them against the gaps. If you need to, mark the back of each time with a pencil or marker to figure out how much you need to trim.[20]
- If your tiles are staggered like bricks, the gaps won't be consistent. You will need to cut some tiles larger, and other tiles smaller.
-
7Cut the tiles while they are still on the mesh. Using your sketched line as a guide, cut the tiles down to the right size. A wet saw should do the trick for most tiles.[21] If the tiles are smaller than 1 or 2 inches (2.5 or 5.1 cm), a pair of tile nippers may work better.[22]
- The tiles should fall away from their mesh backing as you cut them. If they don't. cut them away with your box cutter.
- If the tiles are more than 1 or 2 inches (2.5 or 5.1 cm) across, you may be able to cut them with a score-and-snap tile cutter.
-
8Press the cut tiles into place. Make sure that you keep the grouting gaps between the tiles consistent so that they match up with the grouting gaps on the tiles that are already on the wall.[23]


Cutting Installed Tiles
-
1Cover your counter and put on a mask and safety goggles. Cover your counter with plastic sheeting to protect it and make cleaning up easier. Put on a pair of safety goggles to protect your eyes against dust. Finally, put on a mask suitable for working with fine particles.[24]
- Most dust masks and respirator masks come with a description of what they are used for, such as sanding dust, aerosol, etc. Choose the one for dust.
-
2Make the tile where you wish to cut it. A pencil may work just fine on a slate or ceramic tile, but if the tile is glazed, you should switch to a marker. Try to be as precise as possible for this step.[25]
-
3Cut along the top, bottom, and side edges. If you need to get inside the wall, then you should cut through the dry wall as well. A dremel rotary cutter with a diamond tile blade will work for most tiles.[26]
- If you're cutting a brittle tile like ceramic, use your drill on the lowest speed, and frequently dip the drill bit in a little bit of water to keep it from getting too hot.[27]
- If your blade can't go around the corners, skip them for now.
- Installing a new electrical fixture will require you to get inside the wall. Mounting a towel rack does not.
-
4Use an oscillating cutter to cut through tight corners. While a dremel rotary tool will work for most lines, it won't work on tight corners. For that, you should switch to an oscillating cutter instead.[28]
- You may have to experiment before you find the right one for your type of tile. A multi-surface blade seems to work better than a tile blade, however.
-
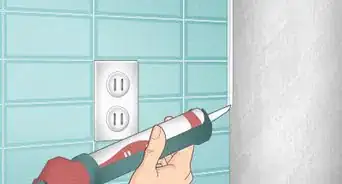
5Pull the tile away. Wedge a thin knife or spatula behind the tile and pop it out. If you had to cut through the wall, try not to lose anything inside the wall. Your hole is now complete and ready to finish.


Things You'll Need
Preparing the Surface
- Screwdriver
- Plastic bags
- Plastic cloth
- Level
- Marker or pencil
Cutting Standard Tiles
- Safety goggles
- Mask
- Measuring tape
- Marker or pencil
- Tile cutters, tile nippers, or wet saw
Cutting Tile Sheets
- Safety goggles
- Mask
- Measuring tape
- Marker or pencil
- Box cutter or utility knife
- Masking tape or painter's tape
- Tile cutters, tile nippers, or wet saw
Cutting Installed Tiles
- Safety goggles
- Mask
- Marker or pencil
- Dremel rotary cutter
- Diamond tile blade for dremel
- Oscillating cutter


References
- ↑ https://www.lowes.com/projects/kitchen-and-dining/how-to-install-a-tile-backsplash/project
- ↑ https://www.thisoldhouse.com/how-to/how-to-install-tile-backsplash
- ↑ https://www.wallcoverings.org/?page=PlumbLine
- ↑ https://www.thisoldhouse.com/how-to/how-to-install-tile-backsplash
- ↑ https://www.lowes.com/projects/kitchen-and-dining/how-to-install-a-tile-backsplash/project
- ↑ https://www.lowes.com/projects/kitchen-and-dining/how-to-install-a-tile-backsplash/project
- ↑ https://www.thisoldhouse.com/how-to/how-to-install-tile-backsplash
- ↑ https://www.lowes.com/projects/kitchen-and-dining/how-to-install-a-tile-backsplash/project
- ↑ https://www.thisoldhouse.com/how-to/how-to-install-tile-backsplash
- ↑ https://www.lowes.com/projects/kitchen-and-dining/how-to-install-a-tile-backsplash/project
- ↑ https://www.familyhandyman.com/tiling/new-backsplash-with-kitchen-mosaic-tile/view-all/
- ↑ https://www.lowes.com/projects/kitchen-and-dining/how-to-install-a-tile-backsplash/project
- ↑ https://www.familyhandyman.com/tiling/new-backsplash-with-kitchen-mosaic-tile/view-all/
- ↑ https://www.thisoldhouse.com/how-to/how-to-install-tile-backsplash
- ↑ https://www.familyhandyman.com/tiling/new-backsplash-with-kitchen-mosaic-tile/view-all/
- ↑ https://www.todayshomeowner.com/video/how-to-install-a-mosaic-tile-backsplash/
- ↑ https://www.familyhandyman.com/tiling/new-backsplash-with-kitchen-mosaic-tile/view-all/
- ↑ https://www.todayshomeowner.com/video/how-to-install-a-mosaic-tile-backsplash/
- ↑ https://vintagerevivals.com/2014/08/the-nugget-installing-a-tile-backsplash-and-how-to-perfectly-cut-penny-tile
- ↑ https://vintagerevivals.com/2014/08/the-nugget-installing-a-tile-backsplash-and-how-to-perfectly-cut-penny-tile
- ↑ https://www.familyhandyman.com/tiling/new-backsplash-with-kitchen-mosaic-tile/view-all/
- ↑ https://vintagerevivals.com/2014/08/the-nugget-installing-a-tile-backsplash-and-how-to-perfectly-cut-penny-tile
- ↑ https://vintagerevivals.com/2014/08/the-nugget-installing-a-tile-backsplash-and-how-to-perfectly-cut-penny-tile
- ↑ https://sawdustgirl.com/how-to-cut-a-hole-in-a-tile-backsplash/
- ↑ https://sawdustgirl.com/how-to-cut-a-hole-in-a-tile-backsplash/
- ↑ https://sawdustgirl.com/how-to-cut-a-hole-in-a-tile-backsplash/
- ↑ Art Fricke. Home Renovation & Repair Specialist. Expert Interview. 1 July 2020.
- ↑ https://sawdustgirl.com/how-to-cut-a-hole-in-a-tile-backsplash/
About This Article