wikiHow is a “wiki,” similar to Wikipedia, which means that many of our articles are co-written by multiple authors. To create this article, 13 people, some anonymous, worked to edit and improve it over time.
This article has been viewed 220,433 times.
Learn more...
Making wax hands requires only a few items, cheaply available at hobby stores and hardware stores. You can make a quick and easy hollow wax hand, or put in a little work and make it into a candle instead. An adult should supervise this project for all stages where hot wax is involved.
Steps
Melting the Wax
-
1Follow safety procedures. This process is not too dangerous if an adult follows these instructions precisely. Skipping any of the steps below greatly increases the risk of fire, especially if you heat the wax directly instead of using the double boiler setup described here.
- If the wax does ignite, extinguish the fire with baking soda or a chemical fire extinguisher. Never add water or a water-based fire extinguisher to a wax fire, as this causes an explosion.
-
2Add a little water to a large pan. You only need about 2 inches (5 centimeters) of water. This will be the lower half of a makeshift double boiler.
- If you already have a double boiler, fill the lower pan with water and skip ahead to "Add the wax."
Advertisement -
3Place a metal stand in the pan. Find a metal cookie cutter or metal jar lid, and place it on the base of the pan, underneath the water.
-
4Add a smaller pan. Choose an aluminum or steel pan, and place it on top of the metal stand. Avoid other metals, which can discolor or react with the wax, and non-stick pans, which are very difficult to clean wax from.
- Don't use this pan for food again, unless you're using food-grade paraffin wax or beeswax. Even a food-safe wax may leave residue that affects the taste of your food, but it won't harm you.
-
5Crumble small pieces of wax into the small pan. You can use beeswax or paraffin wax from a hobby retailer, or remove the wick from used candles and use them. Crumble or cut the wax into small pieces so they melt faster, then throw them into the smaller pan.
- Make sure there's enough wax to cover your hands.
-
6Add color (optional). You can shave crayon wax into the mix to add color, or purchase wax dye or candle dye from a hobby store. If you're using a dye product, follow the instructions on the label.
- It's best to assume that any color addition is not safe for food, even if it is labeled non-toxic. In other words, if you add color here, don't use this pan for cooking.
-
7Set up your other materials. Before you begin heating the wax, read over one of the two methods below and gather any materials you need. There are two types of wax hands you can make:
- Hollow wax hands are easy to make, and the only additional material you need is a container of water.
- To make a solid wax hand you can use as a candle, you'll need a bucket of damp sand, a dowel, and a candle wick. Read the instructions below for preparation before you start heating the wax.
-
8Heat and stir the mixture until the wax melts completely. Place the double boiler set up on the stovetop and heat over medium heat. Stir slowly and constantly using a steel or aluminum utensil. If the wax is not food-grade, this utensil will also not be suitable for cooking.
- This can take quite a while, especially if the wax is in large chunks.
- Never leave wax unattended while it's being heated.
-
9Remove from heat. Take the pan off the heat and continue on to one of the methods below.


Making Hollow Wax Hands
-
1Fill a container with cool water. A bucket works well, since you'll need to dip your whole hand into it. Fill it up most of the way, but leave room at the top to avoid spilling.
- You can add food coloring to the water to color your wax hands. This only has a minor effect, but may be a better coloring option if you don't want to use non-food-safe dyes or crayons in your wax-heating pan.
-
2Wait for the wax to cool. Follow the instructions above to melt the wax, then wait for it to cool. Touching hot wax can cause serious burns, so it's best to use a candy thermometer or candle-making thermometer to be sure the wax is safe. The wax is ready once it has cooled to 110 degrees Fahrenheit (43ºC) or slightly lower.[1]
- If a solid film has formed over the wax, return the pan to heat again to melt it, then let it cool again.
-
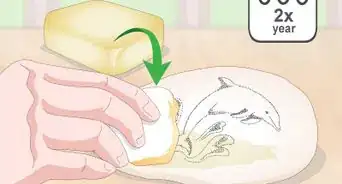
3Wipe hand lotion onto your hand and wrist. Cover your hand and wrist with the lotion, but do not rub it into your skin. You should still be covered with white smears of lotion. This will make it easy to slip the wax hands off without breaking them.
-
4Lightly wet your hand. Dip one hand in the bucket of water up to your wrist. Shake the excess water off your hand.
-
5Dip your hand in wax. Briefly dip the same hand in the warm wax and pull it out again. To make removal easy, only dip up to the base of your hand, before it starts narrowing to your wrist.[2]
- Choose a hand shape before dipping and keep your hand in that position for the rest of this method.
-
6Keep dipping in water and wax. Dip your hand back and forth between the water and wax. Each time, you'll add another layer of wax to your hand. An average-sized wax hand is ready after eight dips, but a small child's hand may be ready after three to four.[3]
- End with a water dip. This will help adhere the final layer of wax to the layers beneath it.[4]
-
7Pull off your new wax hand. Gently loosen the wax hand by sliding your un-waxed pinky finger under the wrist. Once it starts to loosen, dip it under the water level to help it glide off.[5]
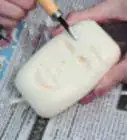
- If the hand is stuck, poke a hole in the wax fingertips with a pencil tip to release the suction.
-
8Make the finishing touches. Dip it in water one last time to help the wax harden. While the wax is still soft, use your fingers to smooth out any bumps or tears. Once the wax is air-dried, the job is done.
- Optionally, you can dip the wrist end of the hand into the warm wax, then fold the edges inward to make a sturdy base for the hand to stand on.[6] This may not work if the wax wrist is torn or short.


Making a Wax Hand Candle
-
1Fill a bucket with damp sand. Mix water into sand bit by bit, until it is damp but firm. It should stick together enough to hold shapes.
- You can purchase sand at a hardware store or home improvement store.
-
2Stick your hand in the sand. Press your fingers and hand into the sand in the hand shape of your choice. Carefully pull your hand out again, without making any extra holes. You should be left with a hollow in the sand that holds the shape of your hand.
-
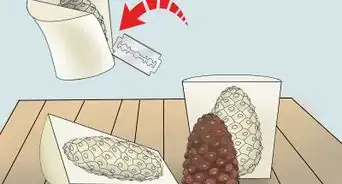
3Dangle a candle wick into the hole. Tie a candle wick or braided cotton string onto a dowel, and lay the dowel over the bucket. Adjust the wick so it hangs down into the hollow left by your hand.
- If you want the candle to burn with the fingers pointing upward, the candle wick needs to touch the bottom of the hole.
-
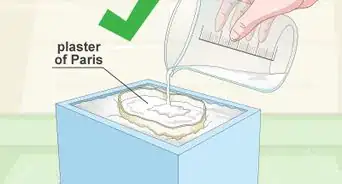
4Pour hot wax into the mold. Follow the instructions above to melt the wax. As soon as it has melted completely, carefully pour the wax into the hollow left by the sand.
- Wear gloves when pouring hot wax.
-
5Let the wax set. Depending on the type of wax and the size of your hand, this can take anywhere from 2 to 8 hours, but leaving it overnight is a good idea just in case.
-
6Remove the candle. Once the wax is set, you can dig out the sand around it, or place a plastic bag over the mouth of the bucket and slowly tip the whole thing over. You may need to trim the wax hand if it's seeped out of the original hollow, or scrape it slightly to uncover the wick. Once that's done, your hand candle is complete.


Community Q&A
-
QuestionFor the melting process, can I use a Scentsy pot to warm the wax, then transfer it to the mold, or would that not work?
 Joseph MadderCommunity AnswerIf it melts the wax so it is entirely liquid, then it should work just fine.
 -
QuestionHow do I make the temperature 40-50 Celsius?
 Community AnswerJust increase the flame under the pot and let it sit longer. Be sure to keep stirring it.
 -
QuestionHow do I make the color in wax hands?Joseph MadderCommunity AnswerBuy some food coloring from a grocery store and add it in slowly. Remember, it will usually look lighter when it is dry.
Things You'll Need
- Aluminum or steel pot
- Larger pot (any metal)
- Water
- Bucket
- Baking soda or chemical fire extinguisher (just in case)
- Paraffin wax or used candles
- Candy thermometer or candle-making thermometer
- Stove
- Aluminum or steel stirring utensil
- Hand lotion (for hollow wax hands)
- Sand (for candle hand)
- Dowel (for candle hand)
- Candle wick (for candle hand)


References
- ↑ http://letitshineusa.com/instructions/handinwax.pdf
- ↑ http://www.galileo-camps.com/blog/entry/diy-make-a-wax-hand
- ↑ http://letitshineusa.com/instructions/handinwax.pdf
- ↑ http://letitshineusa.com/instructions/handinwax.pdf
- ↑ http://www.galileo-camps.com/blog/entry/diy-make-a-wax-hand
- ↑ http://letitshineusa.com/instructions/handinwax.pdf
- ↑ http://chickensintheroad.com/house/crafts/so-you-want-to-make-candles-basic-supplies-to-get-started/
- ↑ http://letitshineusa.com/instructions/handinwax.pdf
About This Article
To make a hollow wax hand, add 2 inches of water to the lower part of a double broiler and place on the stove at medium heat. Crumble small pieces of wax into the top pan and stir until the mixture is totally melted. Then, remove from the heat and wait until the wax has cooled to 110 °F. Dip your hand in a bucket of cool water to protect it, then dip it in the pan of wax so that it's completely covered. Immediately remove your hand from the pan and place it back in the bucket of cold water. Repeat this process about 8 times, or until your wax hand is thick enough. To learn how to make a solid wax hand candle, read on!