This article was co-authored by wikiHow Staff. Our trained team of editors and researchers validate articles for accuracy and comprehensiveness. wikiHow's Content Management Team carefully monitors the work from our editorial staff to ensure that each article is backed by trusted research and meets our high quality standards.
There are 9 references cited in this article, which can be found at the bottom of the page.
This article has been viewed 45,761 times.
Learn more...
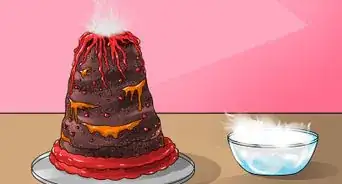
A cookie monster cake is a unique and tasty way to celebrate a birthday. The basic cake is simple to make, and while the decorations are easy as well, it takes a bit of patience to create the frosting fur. The great thing about this cake is that cookies and other goodies are part of the decorations, so there's even a tasty dessert for people who don’t like cake. This recipe can also be adapted into other characters by changing the frosting color and the decorations.
Ingredients
- 2 cups (450 g) sugar
- 1¾ cups (219 g) all-purpose flour
- ¾ cup (89 g) cocoa powder
- 1½ teaspoons (6 g) baking powder
- 1½ teaspoons (8 g) baking soda
- 1 teaspoon (6 g) salt
- 2 eggs
- 1 cup (237 ml) milk
- ½ cup (119 ml) vegetable oil
- 2 teaspoons (10 ml) vanilla extract
- 1 cup (237 ml) boiling water
- 1 cup (227 g) unsalted butter, softened
- 3 to 4 cups (375 to 500 g) powdered sugar
- ¼ teaspoon (1.25 g) table salt
- 1 tablespoon (15 ml) vanilla extract
- 4 tablespoons (60 ml) milk
- Blue food coloring
- Black food coloring
- 2 chocolate chip cookies
- 2 large white candy melts
- 2 chocolate chip cookies
Steps
Baking the Chocolate Cake
-
1Gather your ingredients and supplies. With this recipe, you'll use frosting and a few simple decorations to turn a regular cake into an amazing cookie monster cake. Before baking your cake, preheat the oven to 350 F (177 C). Along with your ingredients, you'll also need your materials.
-
2Combine the dry ingredients. Sift together the sugar, flour, cocoa, baking powder, baking soda, and salt into the large mixing bowl. Sifting the dry ingredients will remove lumps, and help the batter come together more easily.
- The less stirring and beating you do with the batter, the lighter and fluffier the cake will be. Over mixing flour develops the gluten, and this can make a cake dense and heavy.
Advertisement -
3Pour in the wet ingredients. To the dry ingredients, add the eggs, milk, oil, and vanilla. Beat on medium speed with the electric beaters for about two minutes. Then carefully add the boiling water and whisk everything for an additional minute.[1]
- You can use a whisk instead of electric beaters to combine all the ingredients, but be sure to whisk vigorously to combine everything properly. If you're using a stand mixer instead, use the paddle attachment to make the batter.
-
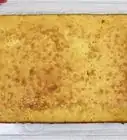
4Fill the cake pans. Divide the batter evenly between the two prepared cake pans. The batter will be quite thin and runny, so be careful not to pour too quickly.[2]
-
5Bake the cakes. Place the cakes in the oven and bake them for 30 to 35 minutes. They are ready when you insert a toothpick into the center of the cake and it comes out clean.
- Set the cakes aside to cool for 10 minutes after they come out of the oven.[3]
-
6Cool the cakes. After 10 minutes, transfer the cakes to the wire cooling racks and remove the cake pans. Let the cakes cool completely before adding frosting or decorations.


Making the Frosting
-
1Cream the butter. Add the butter to your medium mixing bowl or the bowl of a stand mixer. Use electric beaters or the paddle attachment to cream the butter on medium speed for about two minutes.[4]
- When the butter is ready, it will be smooth, creamy, and free of lumps.
-
2Add the sugar and the remaining ingredients. Turn the mixer to low speed. Gradually add 3 cups (375 g) of the powdered sugar to the butter, adding it 1 cup (125 g) at a time.[5] When the sugar has been incorporated, increase the speed to medium and add the salt, vanilla, and 2 tablespoons (30 ml) of the milk.
- Beat the frosting on medium speed for about three minutes. This will ensure all the ingredients are fully incorporated, and make the frosting light and fluffy.
-
3Add more milk or sugar if necessary. At this point, the frosting may be too stiff to spread or too runny to stick to cake. You can correct this by adding more milk or sugar:[6]
- For frosting that’s too thick, beat in more milk. Add it 1 tablespoon (15 ml) at a time, until the frosting is light, airy, and easily spreadable.
- For frosting that’s too runny, beat in the remaining cup of sugar in ¼-cup (31-g) increments, until you’ve achieved the right consistency.
-
4Divide the frosting. To make this cake, you'll need a small quantity of white frosting, a small quantity of black frosting, and a large portion of blue frosting. Leave 2¼ cups of frosting in the original mixing bowl for the blue frosting.
- Measure out 1 cup of frosting for the white filling, and ¾ cup of frosting for the black mouth.
-
5Add the food coloring. To make the blue fur frosting, start by adding 10 drops of blue food coloring to the large portion of frosting. Whisk in the color to fully combine. Add another 10 drops of color if necessary. Continue whisking in 10 drops of color at a time, until you achieve the desired intensity of blue.
- To the ¾ cup of frosting, add five drops of black food coloring and whisk to combine. Add five more drops if necessary, repeating until you have black frosting.
- The white frosting doesn’t have to be colored, but you can add chocolate chip cookies to the mix. Place the three cookies in a sealable bag and break them into pea-sized chunks. Fold the cookie chunks into the white frosting until they are evenly distributed.


Assembling and Decorating the Cake
-
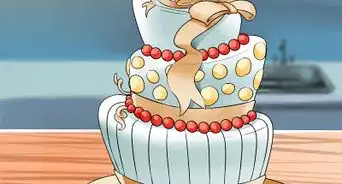
1Layer the cakes. Place one of the cakes onto a cake plate or serving platter so that you don’t have to move it after assembly. Spread a generous layer of white cookie crumble frosting on the top of the cake. Carefully lay the second cake on top to create a double layered cake.
- Use a large spatula to move the top cake onto the bottom layer.
-
2Ice the cake with blue frosting. To help make the cookie monster fur fuller and more vibrant, coat the entire outside of the cake with a generous layer of blue frosting. Use an frosting knife or a butter knife to spread the frosting on in an even layer.[7]
- Turn the cake in a circle to make sure that there isn't any chocolate cake showing through from underneath the frosting.
- Leave about half of the blue frosting so that you can make the fur.
-
3Create the mouth. Fill a pastry bag with the black frosting. Fit the bag with the round frosting tip. Pipe the outline of a semicircle on the bottom half of the cake, leaving a one-inch (2.5-cm) border of blue frosting around the edges of the cake. Then use the rest of the black frosting to fill in the outline to make cookie monster’s mouth.
- With the frosting knife, smooth out the black frosting so there aren't any piping marks.
- Don’t clean the pastry bag with the black frosting until you’ve made the pupils for the eyes.
- If you don’t have a pastry bag, use a sealable plastic bag instead. Fill the bag with the frosting, and push all the frosting to the bottom right corner of the bag. With sharp scissors, snip off the corner of the bag so you can pipe out the frosting.
-
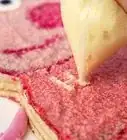
4Create fur with the blue frosting. Fill a clean pastry bag with the remaining blue frosting. Fit the bag with the grass tip. Starting at the center and working your way outward in a spiral motion, use the special tip to apply frosting fur to the top and sides of the cake. Squeeze the pastry bag to release some frosting. Pipe about a half-inch (1.3 cm) of frosting, and then pull the bag up and away to create the fur.[8]
- Apply frosting fur around the black frosting that you piped for cookie monster’s mouth. Do not cover the mouth with blue fur.
-
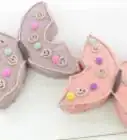
5Make the eyes. Position the two white candy melts side by side at the top center of the cake, so that the top half of each candy melt is overhanging the cake. Press the candy melts gently into the icing to secure them in place. To make the pupils, make one dot on each candy melt with the black icing.[9]
- Cookie monster’s pupils are always lopsided and slightly crossed. For the left eye, position the pupil in the bottom right half of the candy melt. On the right eye, place the pupil in the top left half of the candy melt.
-
6Decorate with cookies before serving. Break one of the chocolate chip cookies in half and position one of the halves on the cake so it’s sticking out of cookie monster’s mouth.[10]
- Before serving the cake, break up the remaining chocolate chip cookies and sprinkle the crumbs and chunks around the cake on the serving plate.
-
7Finished.


Community Q&A
-
QuestionHow do I make the filling in a Cookie Monster cake?
 Community AnswerYou can use the frosting you've already made to fill the middle of the Cookie Monster cake.
Things You'll Need
- Sifter
- Large mixing bowl
- Medium mixing bowl (for the frosting), plus two small bowls
- Two round nine-inch cake pans, greased
- Electric beaters and whisk
- Two wire cooling racks
- Pastry bag (for decorating)
- Round frosting tip and grass frosting tip (for decorating)
- Frosting knife
References
- ↑ https://www.hersheys.com/recipes/en_US/recipes/184/hersheys-perfectly-chocolate-chocolate-cake.html
- ↑ http://addapinch.com/the-best-chocolate-cake-recipe-ever/
- ↑ http://allrecipes.com/recipe/17981/one-bowl-chocolate-cake-iii/
- ↑ http://savorysweetlife.com/2010/03/buttercream-frosting/
- ↑ http://www.wilton.com/buttercream-frosting/WLRECIP-41.html
- ↑ http://savorysweetlife.com/2010/03/buttercream-frosting/
- ↑ http://www.twosisterscrafting.com/cookie-monster-cake/
- ↑ http://www.wilton.com/grass-fur/WLTECH-39.html
- ↑ http://www.twosisterscrafting.com/elmo-cupcakes/
About This Article