This article was co-authored by wikiHow staff writer, Nicole Levine, MFA. Nicole Levine is a Technology Writer and Editor for wikiHow. She has more than 20 years of experience creating technical documentation and leading support teams at major web hosting and software companies. Nicole also holds an MFA in Creative Writing from Portland State University and teaches composition, fiction-writing, and zine-making at various institutions.
There are 9 references cited in this article, which can be found at the bottom of the page.
The wikiHow Tech Team also followed the article's instructions and verified that they work.
This article has been viewed 931,820 times.
Learn more...
Is your keyboard not behaving as it should? This wikiHow teaches you how to resolve all types of keyboard problems by resetting your PC or Mac's keyboard. There are many ways to reset your keyboard, and the processes vary on Windows and macOS. But don't worry—they're all super easy and you'll be back to your normal typing experience in no time!
Steps
Resetting a Bluetooth Keyboard (Windows) in Settings
-
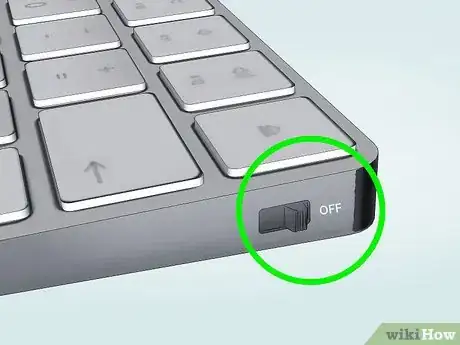
1Turn off your Bluetooth keyboard. The location of the power button varies by keyboard, but you'll usually find it on the bottom or side of the keyboard.
- Use this method if you're having trouble keeping your Bluetooth keyboard paired to your PC.
-
2Open your Windows Settings. You'll find this gear icon in your Start menu, toward the bottom-left side.Advertisement
-
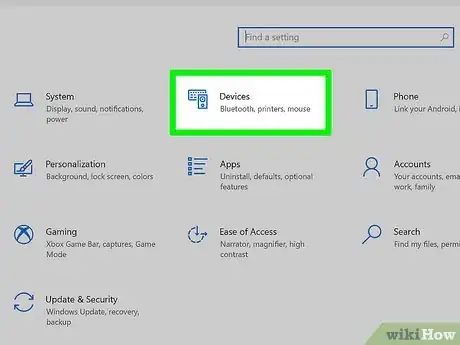
3Click Devices. It's the icon of a keyboard and smartphone.
-
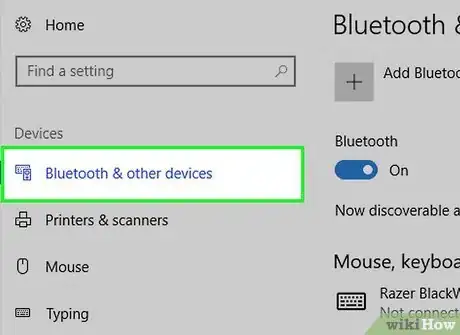
4Click the Bluetooth and other devices tab. It's on the left side of the window.
- If Bluetooth is disabled, click the "Bluetooth" switch at the top to turn it on.
-
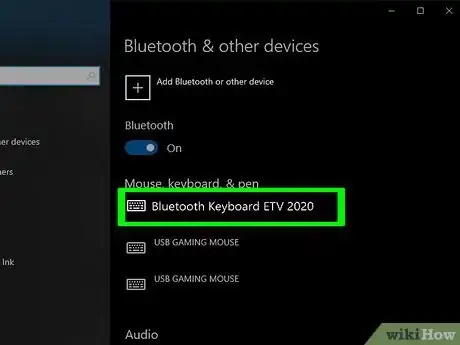
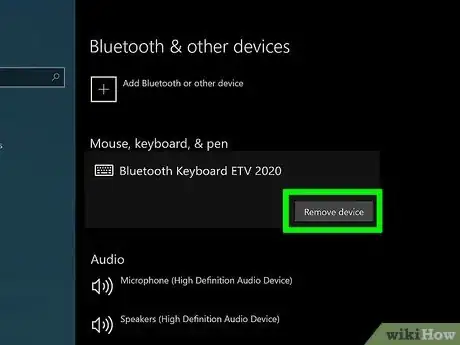
5Click your keyboard in the device list. It'll be under "Mouse, keyboard, & pen." A "Remove device" button will expand.
-
6Click the Remove device button. A confirmation window will appear.
-
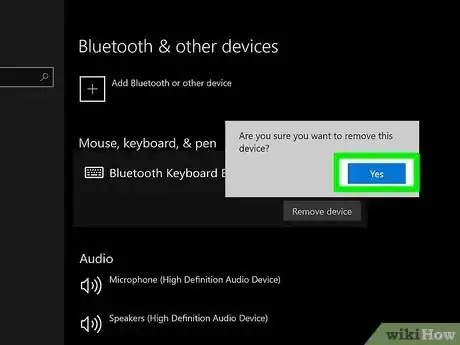
7Click Yes to confirm. This unpairs the keyboard from your computer.
- If Bluetooth is disabled, you'll need to reenable it now.
-
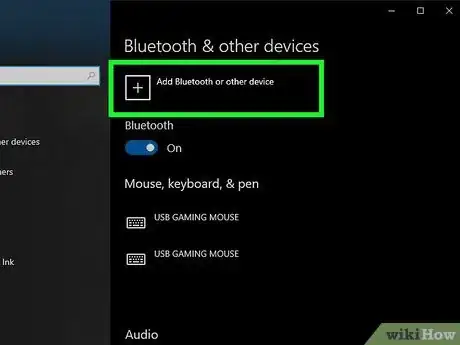
8Turn your keyboard on and click + Add Bluetooth or other device. It's at the top of the right panel.
-
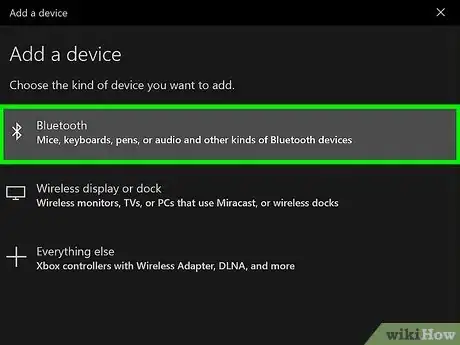
9Click Bluetooth. It's the first option. Your PC will now scan for Bluetooth devices.
-
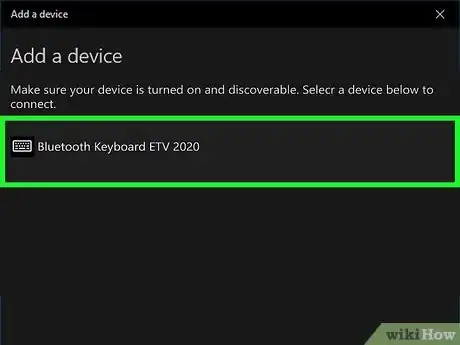
10Click your keyboard when it appears in the list. Depending on your keyboard, additional instructions may appear on the screen. Follow them, if so.
-
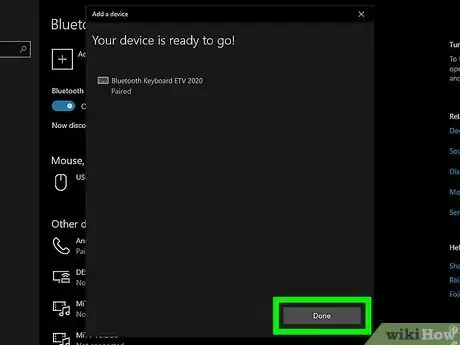
11Click Done. You've now re-paired your Bluetooth keyboard to your PC.
Resetting a Bluetooth Keyboard (Mac) in Settings
-
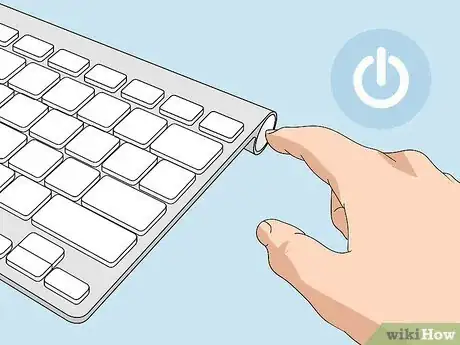
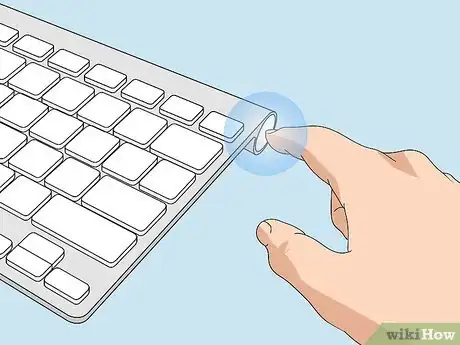
1Turn off your keyboard. Press and hold the Power button on the back of the keyboard (for newer models) or on the right side (for older models) for at least three seconds to turn it off.[1]
- Use this method if you're having trouble keeping your Bluetooth keyboard paired to your Mac.
- You may need a Lightning cable to pair your keyboard back to your Mac. Make sure you have one available.
-
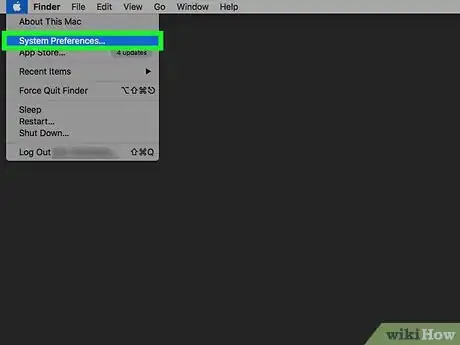
2
-
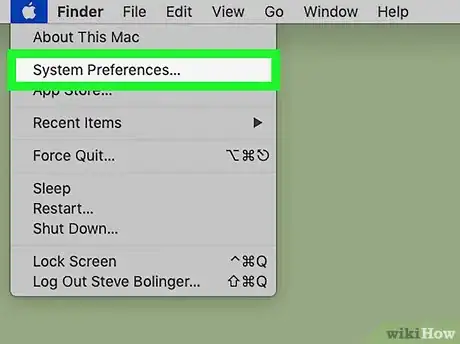
3Click System Preferences. It's near the top of the drop-down menu.
-
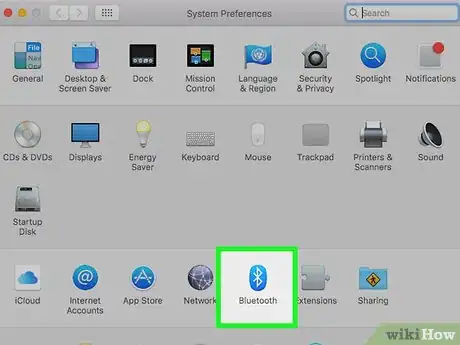
4Click Bluetooth. It's the icon that looks like a sideways bowtie or ribbon.
- If Bluetooth isn't on, click Turn Bluetooth On on the left side of the window before continuing.
-
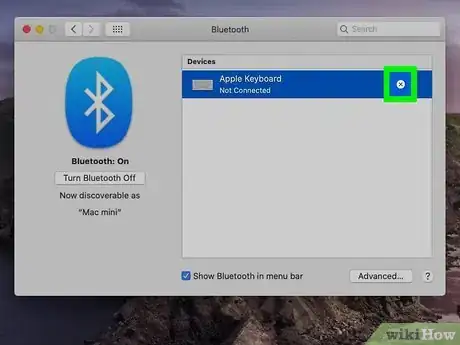
5Click the X next to your keyboard in the list. You'll be asked if you want to remove the keyboard.[2]
-
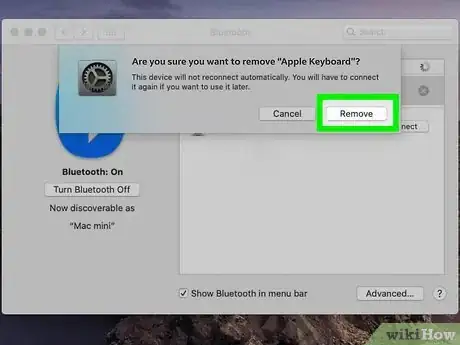
6Click Remove to confirm. This removes the keyboard from your Mac.
-
7Press and hold your keyboard's Power button to turn it back on. When the keyboard comes back on, it will pair with your Mac immediately.
- If your keyboard doesn't reappear in the list of Bluetooth devices, connect it to your Mac using a Lightning cable. Once connected, it should activate Bluetooth and automatically pair your keyboard.[3]
Resetting the Keyboard Language (Windows)
-
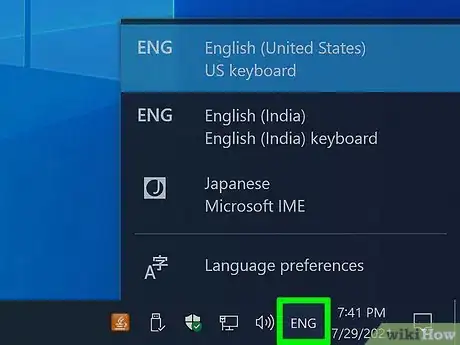
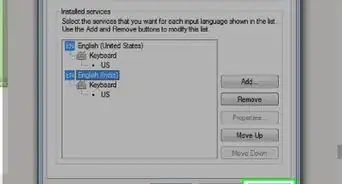
1Switch the keyboard language using the Input menu icon. If you're seeing characters from the wrong language as you type, it's usually because the wrong language is selected as the input language. To switch to a different language quickly, click the current language in the taskbar, just left of the system clock. It's usually at the bottom-right corner of the screen. Then, select the language you want to type in.
- If you don't see the Input menu icon, don't see the language you need, or want to change your default keyboard input language, continue to the next step.
-
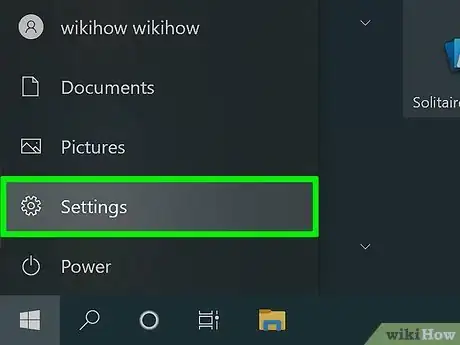
2
-
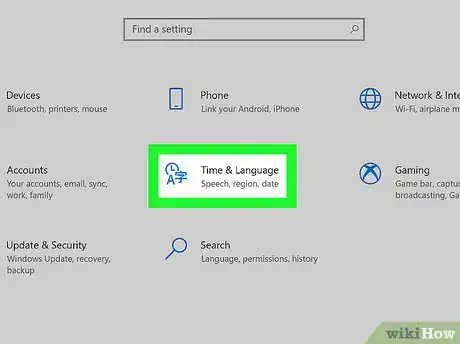
3Click Time & language. It's a clock-shaped icon in the middle of the window.
-
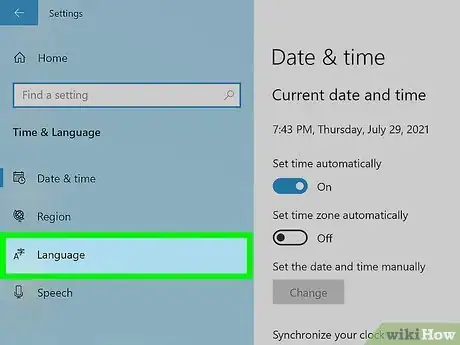
4Click the Language tab. It's in the left panel.
- If you only have one language installed under "Preferred languages," you won't see the Input menu in the system tray. This icon only shows up if multiple languages or inputs are installed.
-
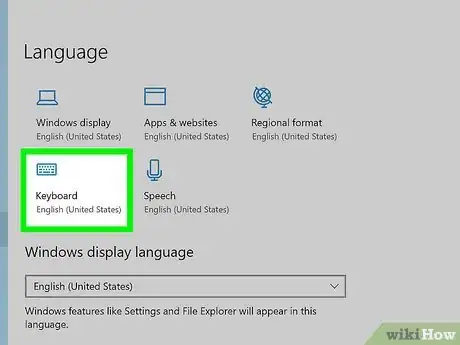
5Click the Keyboard icon. It's in the upper portion of the right panel.
-
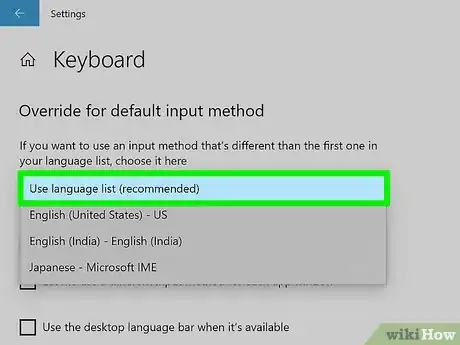
6Select Use language list (recommended) from the menu. It's at the top of the window. This tells Windows to use the first language in your list as the default language.
- Click the back button to return to your Language settings.
-
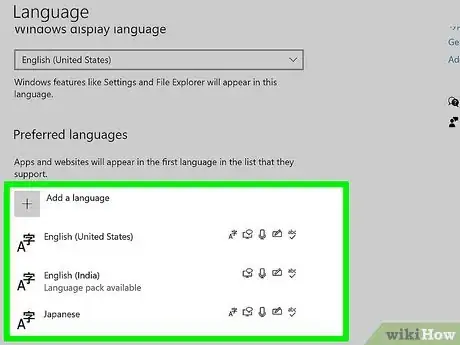
7Move your preferred language to the top of the list. To do this, select the language and click the up-arrow until it's at the top of the list. Windows will now default to using the language at the top of the list if you have multiple languages installed.
- If you don't see the language you want to use, click the + next to "Add a language," select the language, click Next, and then click Install language pack to install it.
- You can remove a language you no longer want to use by clicking it once and selecting Remove.
- If the language is correct but the layout isn't (for example, if you're using the US English keyboard in the DVORAK layout rather the QWERTY), select the language, click Options, choose Add a keyboard, and then choose the desired layout to add it.
Resetting the Keyboard Language (Mac)
-
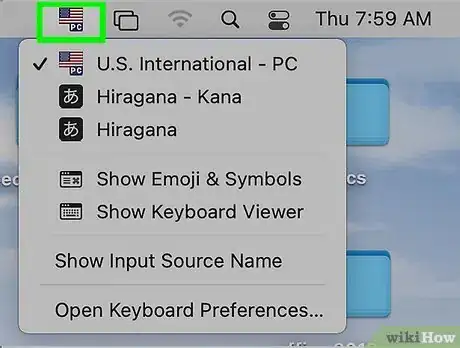
1Switch the keyboard language using the Input menu icon. If your keyboard is typing characters from the wrong language when you type, it's usually because the wrong language is selected as the input language. To switch to a different language quickly, click the current language's flag icon (for example, an American flag if you're using US English) in the menu bar at the top of the screen and select the language you want to type in.
- If you don't see this icon, you'll have to activate it, which you'll learn to do in a moment.
-
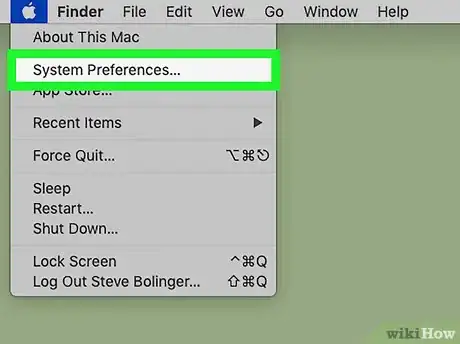
2Open your Mac's System Preferences System Preferences. You can get there by clicking the Apple icon at the top-left corner and selecting System Preferences from the menu.
-
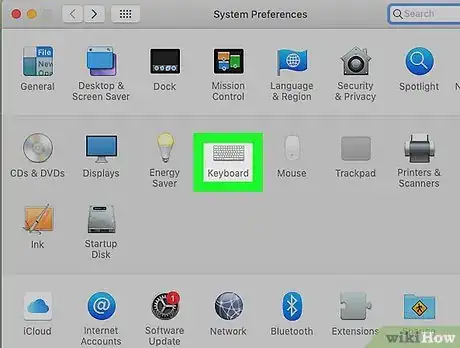
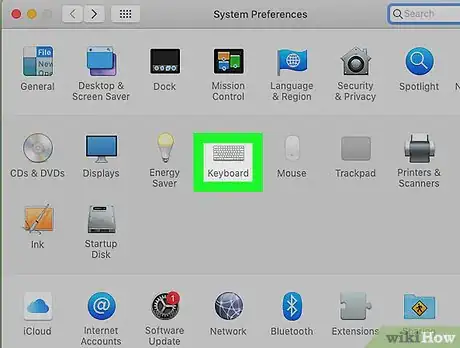
3Click the Keyboard icon. This opens your keyboard settings.
-
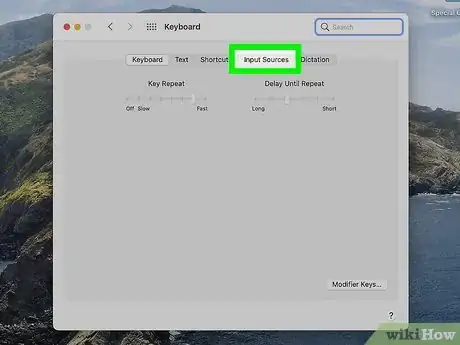
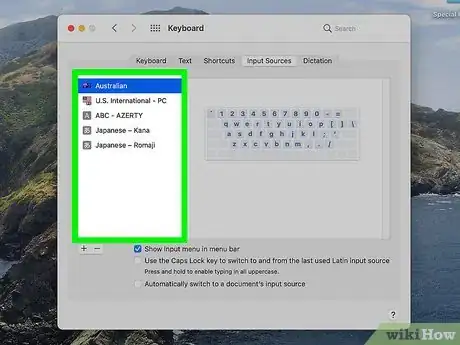
4Click the Input Sources tab. It's the fourth tab at the top of the window.[4]
-
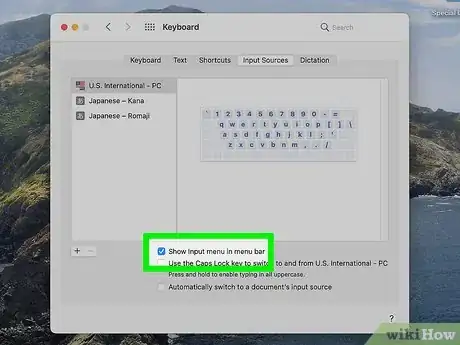
5Check the box next to "Show Input menu in menu bar." This box is at the bottom of the window. When checked, the Input menu will display in the menu bar. You can now click the icon to toggle keyboard languages at any time.
-
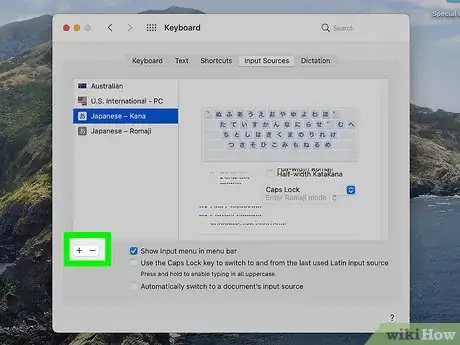
6Rearrange the languages in your desired order. If you have multiple languages installed, you can reposition them so your default language appears at the top of the list. Just click and drag your favorite language to the top to set it as the default.
-
7Remove any languages you don't want to use (optional). If you want to completely remove a keyboard language from your Mac, you can do so by clicking that language and then clicking the minus sign below the language list.
-
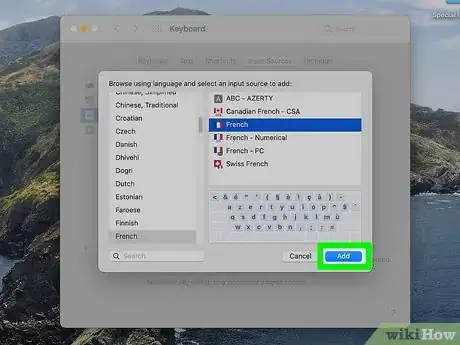
8Add another language (optional). If your preferred keyboard language does not appear on the list, you can add it by clicking the + below the list, selecting the language, choosing a keyboard layout, and then clicking Add.
-
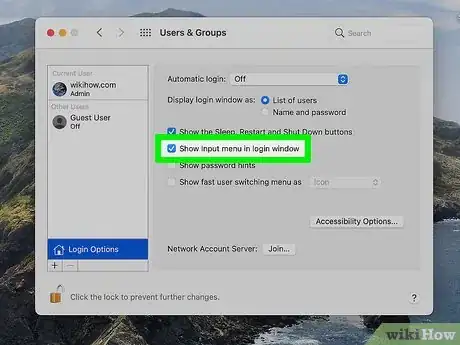
9Allow users to select a keyboard layout at login (optional). Do you share this Mac with other users who need different keyboard languages? You can add an input menu to the login screen that allows all users to choose a language before logging in.[5] Here's how:
- Click the back button at the top-left corner of the window to return to System Preferences.
- Click the Users & Groups icon.
- Click the padlock at the bottom-left to allow changes.
- Click Login Options at the bottom-left.
- Check the box next to "Show Input menu in the login window."
- Click the padlock to lock your settings in and close the window.
Reinstalling the Keyboard Drivers (Windows)
-
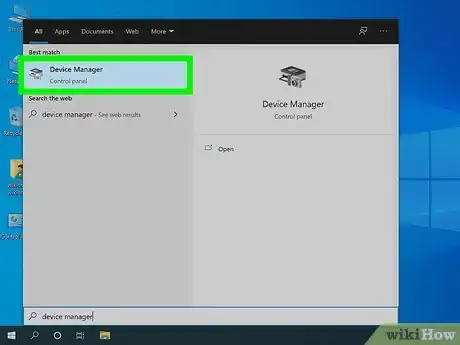
1Open the Device Manager. This program allows you to reset hardware on your computer. A faulty driver can be responsible for all sorts of keyboard problems on Windows PCs, including erratic behavior and unresponsiveness. This method will help you delete the current driver and replace it with a clean version. To open Device Manager:
- If your keyboard is working, click the Start menu, type device manager into the search bar, and then click Device Manager in the search results.
- If you can't type, click the Start menu, scroll down the programs list, expand the Windows System folder, select Control Panel, and then click Device Manager.
-
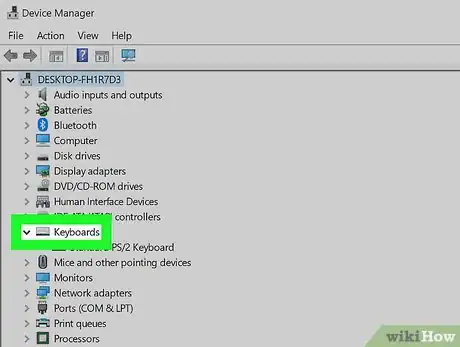
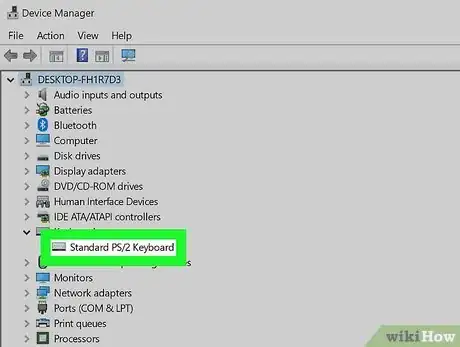
2Scroll down and expand Keyboard. Click the arrow icon to the left of the Keyboard heading. A drop-down list of your currently connected keyboards will appear.
-
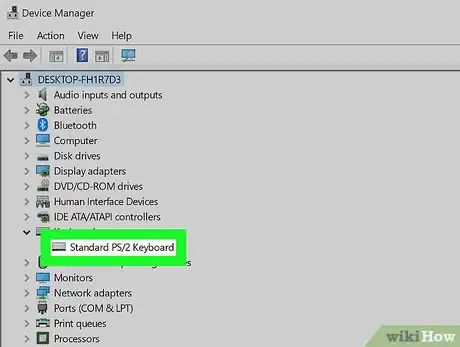
3Select the keyboard that you want to reset. Click on a keyboard's name to select it.
- The names of the keyboard might be generic, such as "Standard PS/2 Keyboard" or "HID Keyboard Device." If you have a laptop and have connected a secondary keyboard (connected via USB or through a USB-based wireless receiver), the "Standard" keyboard is the one built-in to the laptop, and the HID keyboard is the secondary one.[6]
-
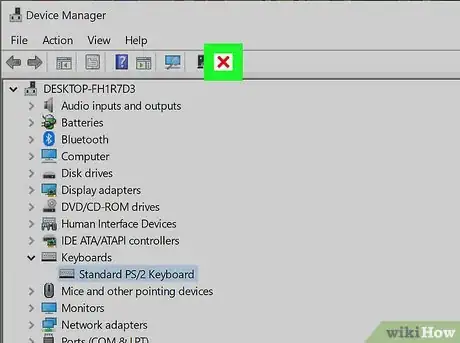
4Click the "Uninstall" icon. It's the red X at the top of the window.
-
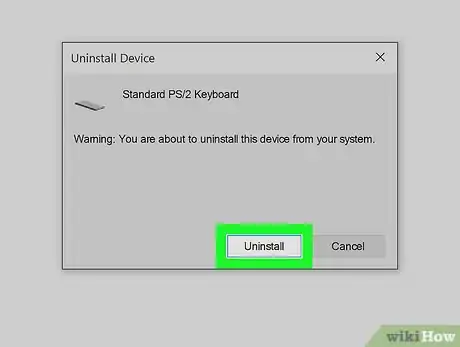
5Click Uninstall to confirm. Doing so removes the keyboard from the Device Manager.
-
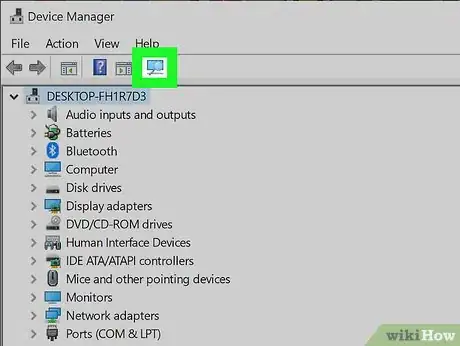
6Click the "Scan for hardware changes" icon. It's the computer monitor icon in the upper-right side of the Device Manager window. Clicking this will scan your PC for connected hardware that doesn't have an driver (such as your keyboard) and reinstall the driver automatically.
- At this point, try using your keyboard again. If it works, great! If not, you may need to install a specific driver. You can also continue with this method to try updating the driver.
- If your external keyboard is not detected, unplug it (or power it off completely if it's connected via Bluetooth). When you plug it back in or turn it back on, Windows should install the drivers automatically.
-
7Select the keyboard again. The keyboard's name will appear in the Keyboards section. Depending on the driver used to reinstall it, it may have a different name than it did before.
-
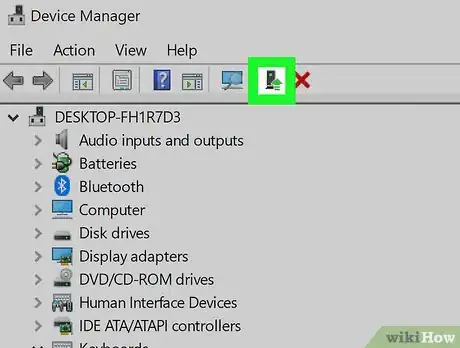
8Click the "Update drivers" button. This option is at the top of the window, and looks like a black box with a green arrow facing upward.
-
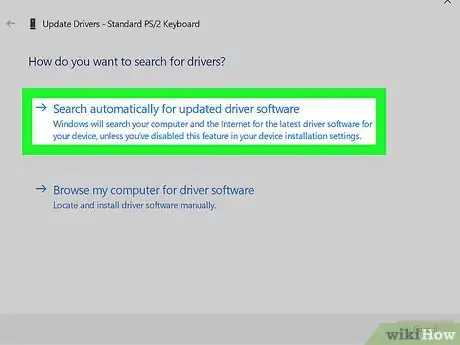
9Click Search automatically for updated driver software. It's the top option in the pop-up window. This will prompt Windows to begin searching for the most recent software updates for your keyboard.
-
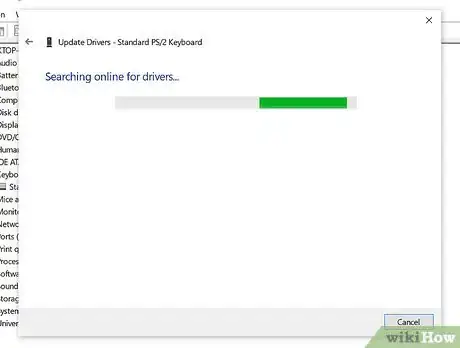
10Allow the newest drivers to install. If there are any drivers available for your keyboard they will install automatically.
- If there aren't any new drivers, click Search for updated drivers on Windows Update. If an update is available, click Install now to download it—Windows Update is the best way to get the latest drivers for your PC.
- You may be prompted to restart your PC after updating the drivers.
Restoring Default Keyboard Settings (Mac)
-
1Open your Mac's System Preferences. You can find it by clicking the Apple menu at the upper-left corner of the screen and selecting System Preferences on the menu.
- Use this method if you've tweaked some keyboard settings, such as shortcuts and automatic corrects, but want to return to the defaults.
-
2Click Keyboard. This keyboard-shaped icon is in the System Preferences window. This opens your Keyboard settings to a tab called Keyboard by default.
- If you're not on the Keyboard tab, click Keyboard near the top of the window to go there now.
-
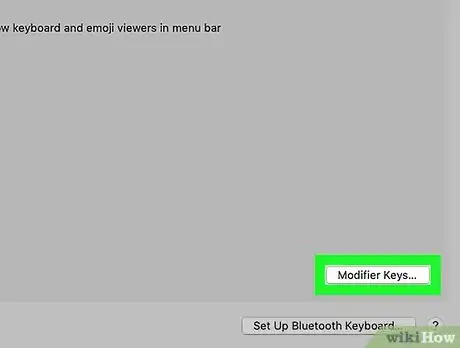
3Click the Modifier Keys… button. This option is in the lower-right side of the window.
-
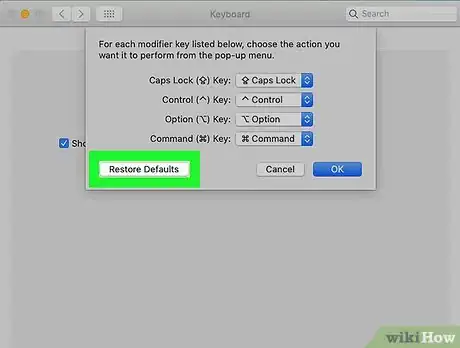
4Click the Restore Defaults button and then click OK. Doing so will wipe any preferences for your Mac's modifier keys (e.g., Command).
-
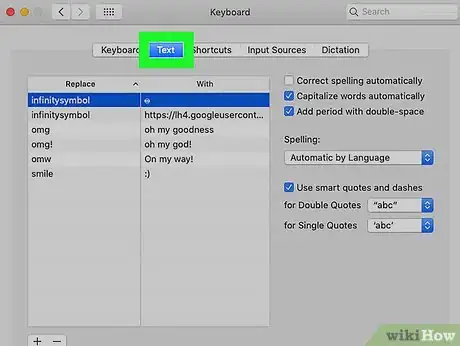
5Click the Text tab. This tab is at the top of the window to the right of the Keyboard tab.
-
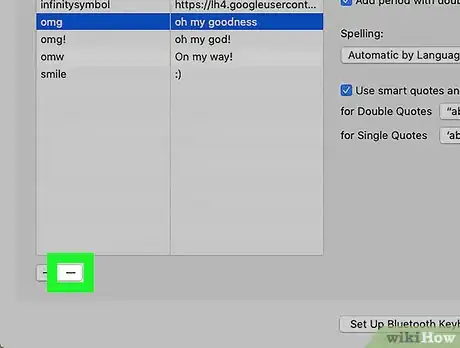
6Remove any text replacements you don't want to keep. Text replacements are the automatic corrections your Mac makes when you type certain letter combinations (for example, typing "omg" might autocorrect to "Oh my goodness!"). To remove a text replacement, click it once to select it, and then click the minus sign below the list.
Note: You'll do this for each text replacement that you want to delete.
-
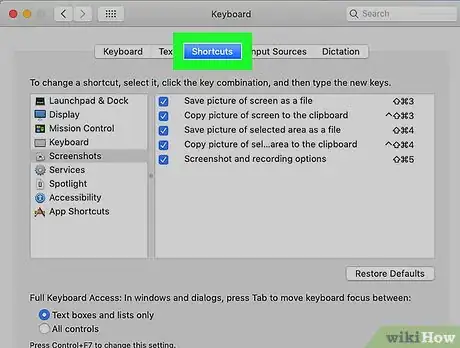
7Click the Shortcuts tab. This tab is at the top of the window. This is where you'll find keyboard shortcuts that launch certain features, such as Shift + Command + 5 for taking a screenshot.[7]
-
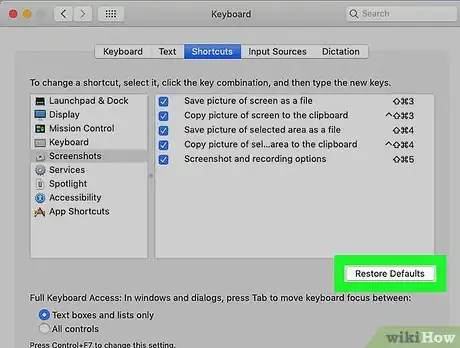
8Click Restore Defaults. It's in the bottom-right corner of the window. Doing so resets your text shortcuts to the default settings. Now you'll just have the shortcuts that were preconfigured on your Mac (including that screenshot shortcut).
-
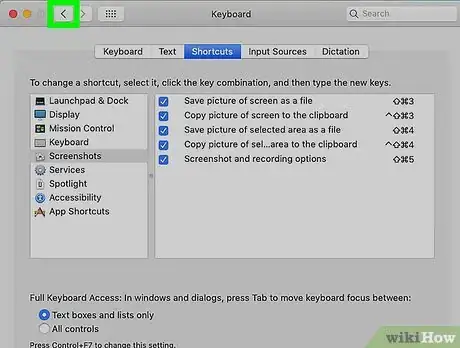
9Click the back button to return to System Preferences. It's the back arrow in the upper-left area of the window.
-
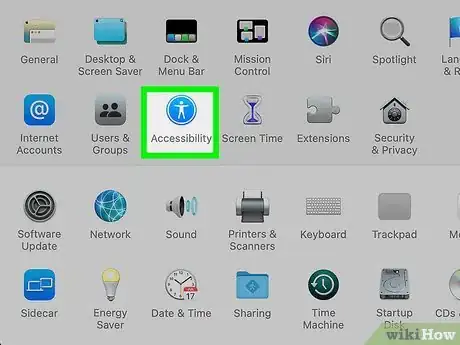
10Click the Accessibility icon. It's the blue circle with a white outline of a person inside.
-
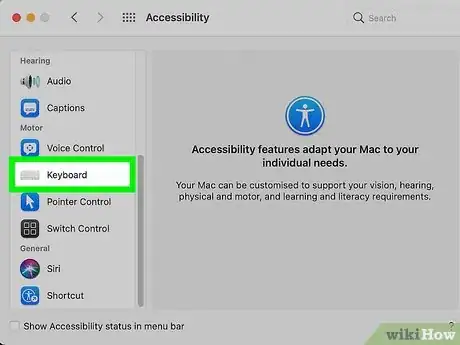
11Click Keyboard in the left panel. It's under the "Interaction" heading.[8]
-
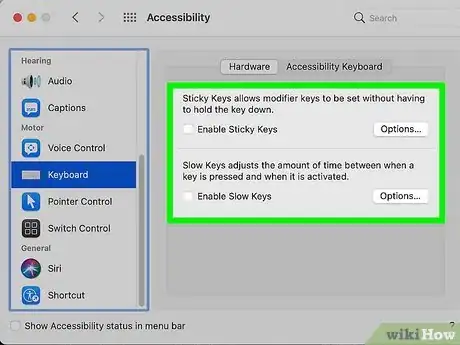
12Remove the checkmarks from "Enable Sticky Keys" and "Enable Slow Keys." If either of these options are enabled, disabling them will restore your Mac's original method of keyboard input.
- These options are accessibility features designed to make typing easier for people with limited mobility.[9]
-
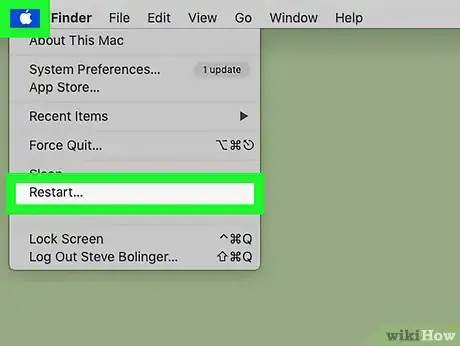
13Restart your Mac. Open the Apple menu, click Restart..., and click Restart when prompted. Your Mac's keyboard should be back to normal once your Mac finishes restarting.
Community Q&A
-
QuestionCannot get the @ key to work. I get inverted commas instead. What have I done?
 Community AnswerI'm guessing you are using a British keyboard with an American PC system or vice versa. To change back in Windows 10, go to Settings > Time and Language > Region and Language.
 -
QuestionWhat should I do if both my keyboard and mouse are not working?
 Community AnswerYou will likely need to replace your keyboard and mouse. You could also try searching for tutorials on YouTube that might help with the issue.
 -
QuestionWhat should I do if the keys do not respond to typing?
 Community AnswerPress CRTL ALT and Delete. When it goes there, hit Cancel. If that does not work, shut down the computer and turn it back on again. That usually fixes it. And check the batteries inside the keyboard, or its power connection. A lack of power will stop it from working!
References
- ↑ https://support.apple.com/en-us/HT204621
- ↑ https://www.ifixit.com/Guide/How+to+Apple+Wireless+Keyboard+Reset/138509
- ↑ https://support.apple.com/en-us/HT201178
- ↑ https://support.apple.com/guide/mac-help/type-language-mac-input-sources-mchlp1406/mac
- ↑ https://www.macworld.com/article/343300/how-to-customize-keyboard-layout-macos-11-big-sur.html
- ↑ https://nerdschalk.com/what-is-hid-keyboard-device-how-to-install-hid-keyboard-drivers/
- ↑ https://support.apple.com/en-us/HT201236
- ↑ https://mcmw.abilitynet.org.uk/macos-mojave-accessibility-keyboard
- ↑ https://support.apple.com/guide/mac-help/change-keyboard-hardware-preferences-mh40580/11.0/mac/11.0
About This Article
1. Press Windows Key + S.
2. Type "device manager."
3. Click Device Manager.
4. Expand the "Keyboard" menu.
5. Select the keyboard and click Uninstall.
6. Click Yes.
7. Click Search for updates.
8. Select the keyboard and click Update drivers.
9. Click Search automatically for updated driver software.
10. Restart the computer.
