This article was written by Ken Colburn and by wikiHow staff writer, Megaera Lorenz, PhD. Ken Colburn is a Consumer Electronics Expert and the Founder & CEO of Data Doctors Computer Services. With more than 34 years of experience, he specializes in computer checkups and repairs, data recovery, and teaching others about technology. Ken also provides one-minute tech tips through his broadcast, Data Doctors Tech Tips.
The wikiHow Tech Team also followed the article's instructions and verified that they work.
This article has been viewed 2,174,624 times.
Most Dell computers have a Print Screen button on the keyboard that allows you to capture whatever is on your screen and save it to your clipboard. However, the method for capturing a screenshot varies a lot from one model of Dell to another. The Windows operating system you’re using can also make a difference in how you make a screen capture. In this article, we’ll talk you through the keyboard shortcuts that work on most Dell desktop and laptop computers, as well as how to use the Windows Snipping Tool to take a screenshot.
Things You Should Know
- On most Dells, the Print Screen key is located at the top of the keyboard on the right side. Sometimes it’s one of the Function keys.
- The keyboard shortcut to take a screenshot varies depending on your model, Windows version, and type of screenshot.
- You can also take screen captures using the built-in Windows Snipping Tool on any Dell.
Steps
Print Screen Key
-
1Find the ⎙ PrtScr key at the top of your keyboard. The Print Screen key allows you to quickly and easily take a screenshot on a Dell. On most Dell keyboards, this key is located in the top row of keys at the right, close to the Del key.[1]
- On some Dell keyboards, the Print Screen key may also be one of the Function keys (e.g., F10).
- The Print Screen key may be labeled with a variety of different abbreviations, such as PrtScn, PrntScrn, or PrtSc.
- If your keyboard doesn’t have a Print Screen key, you can take a screen capture by pressing Fn and ⌤ Ins at the same time.
-
2Capture your entire screen with ⊞ Win+⎙ PrtScr. Different keyboard shortcuts take different types of screenshots on a Dell, and the combination you need to use may vary from one model of Dell to another. To capture everything that’s on your screen in one shot, use the combination ⊞ Win+⎙ PrtScr.[2]
- If you’re using a Dell tablet, press the Windows logo button and the volume down button at the same time to capture your whole screen.
- On some Dell laptops, you’ll need to press Fn+⇲ End to take a screenshot instead.[3]
- Keep in mind that the shortcut ⊞ Win+⎙ PrtScr may capture just a single window instead of the whole screen on some Dells.[4]
Advertisement -
3Use ⎙ PrtScr alone to capture your active windows. On some Dells, you can use the ⎙ PrtScr button by itself to capture just the windows that are currently open, without capturing the background, taskbar, or other extraneous elements.[5]
- On other models, doing this may take a picture of the entire screen.
-
4Screenshot a single window with Alt+⎙ PrtScr. If you just want to capture one window, click or tap on the window and then hold down Alt+⎙ PrtScr. This will capture the active window without including anything else that is on the screen.
- Some Dells use the combination ⊞ Win+⎙ PrtScr or Fn+⊞ Win+⎙ PrtScr to capture a single window.[6]
-
5Use Ctrl+V to paste your screenshots from the clipboard. Typically, when you take a screenshot on a Dell, the image will be stored in your clipboard instead of directly saved as an image file. To access the screenshot, open an image editing app, such as Microsoft Paint, and paste the screenshot into a new image window using Ctrl+V.[7]
- When you take a screenshot on a Dell tablet, it is automatically saved to your Pictures folder.
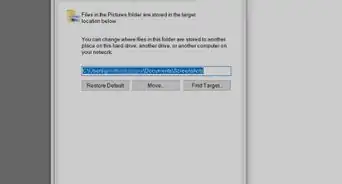
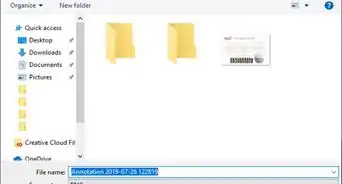
- In some versions of Windows, the ⊞ Win+⎙ PrtScr combination saves screenshots as image files instead of saving them to the clipboard. To find them, open File Explorer, navigate to Pictures, and open Screenshots.[8]


Snipping Tool
-
1Launch the Snipping Tool from the Start menu. The Snipping Tool allows you to select just a portion of your screen to capture. To open it, click on Start and type snipping tool into the search box, then click on Snipping Tool in the search results.[9]
- In Windows 10 and later, you can launch the snipping tool by holding down ⊞ Win+⇧ Shift+s.
- In Windows 8, swipe in from the right side of the screen and select Search from the menu, then type snipping tool into the search box to find the tool.
-
2Select the type of snip you want from the Mode menu. The Snipping Tool allows you to take a variety of types of screenshots. To choose which kind you want, click or tap the Mode menu on the Snipping Tool toolbar. You can also choose a mode by pressing Alt+m. Select one of the following modes:[10]
- Free-form Snip lets create a selection in any shape using a drawing tool, and will create a screenshot from your selection.
- Rectangular Snip lets you take a screenshot from a rectangular selection.
- Window Snip captures a selected window.
- Full-screen Snip captures the entire screen.
-
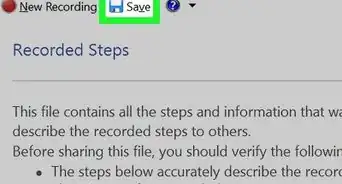
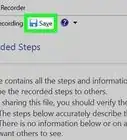
3Click Save Snip to save your screen capture. Once you’ve taken your screenshot, click the Save Snip button. Use the Save As box to name your snip, select your preferred file type, and choose a location for the saved screenshot.[11]
- You can also share a snip by clicking the arrow next to the Send Snip button, then selecting a sharing option.
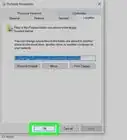
- If you save a capture of a browser window as an HTML file, the URL will be displayed at the bottom of the screenshot. To prevent this from happening, click the Options button and uncheck Include URL below snips (HTML only), then click OK.
-
4Annotate or edit your snip if you like. In addition to taking basic screenshots, you can also use the Pen and Highlighter buttons to draw on your snip or highlight parts of it. To do other types of edits (such as cropping, rotating, or resizing your screenshot), click Edit with your screenshot open and then select Edit with Paint 3D.[12]


Community Q&A
-
QuestionHow do I take a screenshot on a Dell tablet?
 Community AnswerYou press the Windows button and the Volume Down button at the same time.
 -
QuestionHow do I use the blue signs on my Dell laptop keypad?
 Community AnswerHold FN and then use them. This should activate the "function" keys. The FN button should be blue for this to work.
-Step-19.webp)


References
- ↑ https://www.dell.com/support/kbdoc/en-us/000147539/how-to-use-the-print-screen-key-in-microsoft-windows-operating-systems
- ↑ https://www.dell.com/support/kbdoc/en-us/000147539/how-to-use-the-print-screen-key-in-microsoft-windows-operating-systems
- ↑ https://youtu.be/xzH1JCY-ISk?t=23
- ↑ https://youtu.be/xzH1JCY-ISk?t=40
- ↑ https://www.dell.com/support/kbdoc/en-us/000147539/how-to-use-the-print-screen-key-in-microsoft-windows-operating-systems
- ↑ https://youtu.be/xzH1JCY-ISk?t=40
- ↑ https://www.dell.com/support/kbdoc/en-us/000147539/how-to-use-the-print-screen-key-in-microsoft-windows-operating-systems
- ↑ https://www.pcmag.com/how-to/how-to-take-screenshots-in-windows-10
- ↑ https://support.microsoft.com/en-us/windows/use-snipping-tool-to-capture-screenshots-00246869-1843-655f-f220-97299b865f6b
- ↑ https://support.microsoft.com/en-us/windows/use-snipping-tool-to-capture-screenshots-00246869-1843-655f-f220-97299b865f6b
- ↑ https://support.microsoft.com/en-us/windows/use-snipping-tool-to-capture-screenshots-00246869-1843-655f-f220-97299b865f6b
- ↑ https://support.microsoft.com/en-us/windows/use-snipping-tool-to-capture-screenshots-00246869-1843-655f-f220-97299b865f6b
About This Article

1. Press ⊞ Win+⎙ PrtScr at the same time to capture the screen.
2. Type screenshots into the Windows Search bar.
3. Click Screenshots.
4. Double-click the screenshot to open it.


-Step-19.webp)