X
wikiHow is a “wiki,” similar to Wikipedia, which means that many of our articles are co-written by multiple authors. To create this article, volunteer authors worked to edit and improve it over time.
This article has been viewed 32,427 times.
Learn more...
Taking screenshots are easy, useful, and fun. You can use them in presentations, how to articles, and word documents. Ever wondered how to do it on a Kindle Fire?
Steps
-
1Open your device tabs to the screen you want to screenshot. You can take a screenshot of an app you downloaded, home screen, or silk browser.
-
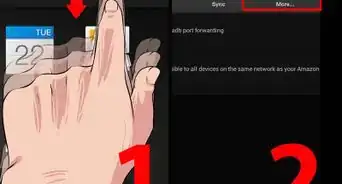
2Find the power off button on the side of your device. You will use this button to create a screenshot later.Advertisement
-
3Find the button that lowers the volume. That is on the side of your device too. You will also use this button to create a screenshot.
-
4Press both of the buttons at the same time, the power off and the lower volume button, together. Your device will show you your screenshot, and it should send you a notification about it.
- Your screenshot will automatically be saved to Amazon Photos and device.
-
5Your screenshot is now taken. You can now edit your photo on Amazon Photos, or other photo editing apps.
- Use screenshots in presentations, docs, and more!


Advertisement
Warnings
- If you have too much storage used, your device may not allow you take a screenshot.⧼thumbs_response⧽
Advertisement

About This Article
Advertisement