This article was co-authored by Kai Ng. Kai Ng is a USATF and RRCA Certified Running Coach at Run Coach Kai. Kai has competed in over 55 races and over 15 marathons, and has trained with 16x USA and World record holder Patti Catalano Dillonso. He specializes in coaching runners of all levels and showing people that everyone can be a runner. Kai is committed to helping his clients reach their goals by showing them how to run with proper form and holding them accountable to train consistently.
There are 11 references cited in this article, which can be found at the bottom of the page.
This article has been viewed 24,821 times.
From marathoners to casual walkers, everyone knows that a great walk or jog starts with a pair of perfectly fitting running shoes. To make a good fit even better, you can try special lacing and tying techniques to prevent pain and blisters, or to loosen or tighten the shoe.
Steps
Tying a Heel Lock for Stability
-
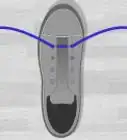
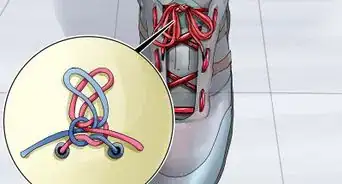
1Use the heel lock to prevent heel slippage and blisters. For this style, also called the runner’s loop, you’ll use the very top 2 eyelets of your running shoes, which are usually skipped over. This extra loop will provide more stability for your feet, holding them in place and preventing your heel from rubbing against the back of the shoe and causing blisters. It’s a great method to get the best fit for any foot type and any kind of running shoe.[1]
-
2Lace your shoes up with whatever technique you’d like. The heel lock works well with the classic criss-cross technique, but can also be used with any of the other methods listed below. See what type works best for you, then add in the heel lock for extra stability.[2]Advertisement
-
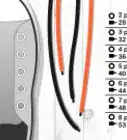
3Loop the lace through the top eyelet on the both sides of the shoe. From a seated position, turn your foot to the outside to see the uppermost eyelet on the shoe, near your anklebone. Take the lace on that side of the foot and pull the tip through that eyelet. The tip should be pointing towards your foot, creating a big loop. Repeat on the inside of your foot.[3]
-
4Pull the lace through until a 2 in (5.1 cm) long loop remains. On the outside side of your shoe, pull the tip of the lace farther through until it makes a smaller loop, about 2 in (5.1 cm) long. Repeat this on the inside of your foot. The loops should be small enough to stick out a bit without laying flat against your shoe.[4]
-
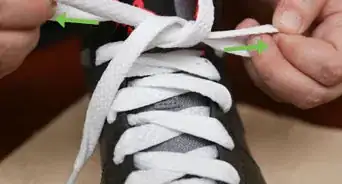
5Cross the laces and insert them in the opposite loop. Take the lace on the outside of your foot and cross it over the shoe. Place the tip of the lace into the loop, but don’t pull it through yet. Do the same with the lace on the inside of your foot. The middle of the laces should be crossed over the tongue of your shoe.[5]
-
6Pull the laces down hard and tie. Take the ends of both laces and pull hard to the side to cinch them. Pull down with the laces, not up, as that would cause the loop to hang down. Pulling down will pull the loop tight against your shoe so you can get the snuggest fit.[6]
-
7Tie and repeat with the other shoe. Now that your heel lock is in place, tie a normal double-knot. Repeat the process on the other shoe for a comfortable, supportive fit.


Loosening the Laces for a Wide Foot
-
1Choose this technique to give wide feet a bit more room. With this method, you’ll be skipping over some eyelets on the shoe. This loosens the overall fit and gives your feet more space to spread out.
-
2Draw the lace straight across the bottom 2 eyelets. Remove the lace from the shoe and insert both tips into the lowest eyelets so that they’re facing the tongue of the shoe. Pull both laces all the way through.[7]
-
3Cross the laces to the next eyelets. Cross one lace over the other and draw them across to the next eyelets. Pull them through from the inside out, so that the tips are facing away from the shoe.[8]
-
4Lace through every other eyelet until you get to the top of the shoe. Cross the laces again and skip over the next eyelet on either side. Pull the laces through the following eyelets. Cross them again and repeat until you get to the top of the shoe. Repeat the method on the other shoe.[9]

Tightening Up for a Narrow Foot
-
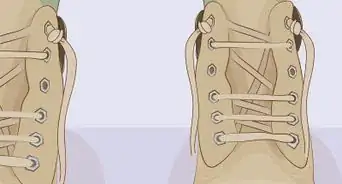
1Try this technique if you want your shoes to fit more snugly. If your feet are narrow or your shoes just a bit too wide, try this tightening method. It’s a slight modification on the typical criss-cross method, which will help your shoes fit more closely against your feet.
-
2Draw the laces straight across the bottom 2 eyelets. Remove the lace completely. Insert the laces into the bottom two eyelets so that the tips are pointing towards the shoe, then pull the laces taut.[10]
-
3Pull each lace straight up to the next eyelet. Instead of crossing the laces as you normally would, draw each lace up vertically to the next eyelet. Pull them through from the inside out, so that the tips are pointing outwards.[11]
-
4Cross the laces over each other to the opposite eyelets. Place one lace over the other like you would if you were lacing your shoes normally. Pull each one through the next eyelet on the other side.[12]
-
5Cross again, skipping over the next eyelet on each side. This time, cross the laces but leave the next eyelet empty on either side. Pull the laces up to the following eyelet on either side and pull them through.[13]
-
6Finish lacing the shoe normally. Continue crossing the laces and pulling them through each eyelet, then tie them normally at the top. When you’re finished, only one pair of eyelets should be empty. Repeat the process on the other shoe.[14]

Lacing to Loosen the Top of the Shoe
-
1Use this method if your shoe is too tight across the top. This technique will greatly loosen the top and sides of your shoes. It’s a great choice if your shoe is feeling a little tight, or if your feet are swollen and need more room.
-
2Lace the bottom two eyelets above your big toe. Instead of lacing across the bottom of the shoe, pull one side of the lace down through the eyelet above your big toe. Pull it 4 to 5 inches (10 to 13 cm) through. Then, insert the other tip of the lace through the next eyelet up on the same side. Pull it tight. Both laces should be hanging out of the inside part of your shoe.[15]
-
3Pull the bottom lace straight across to the parallel eyelet. Insert the lace from the outside in, so that, as you’re pulling it through, the tip should be going towards the tongue of the shoe. Pull it until the lace is taut going across.[16]
- Don’t move the upper lace just yet. It should still be hanging on the inside of the shoe.
-
4Pull the lace through the 3rd eyelet on the same side of the shoe. With the same lace, skip over the next eyelet. Insert it into the third eyelet on the same side of the shoe. Slide the lace through from the inside out, so that you’re pulling it away from the shoe.[17]
-
5Draw the other lace across to its parallel eyelet. Return to the lace on the inside of your shoe. Pull it across the tongue to the parallel eyelet, then insert it from the outside in, so that the tip is facing towards the shoe. Pull the lace all the way through.[18]
-
6Pull it through the eyelet just above the first lace, on the same side of the shoe. Draw the lace straight up the shoe, skipping over the next eyelet and inserting it into the 4th eyelet. Pull it through to the outside. Both laces should now be hanging off the outside of the shoe. [19]
-
7Continue this pattern until you get to the top of the shoe. Pull the bottom lace through the parallel eyelet, then draw it straight up, skipping one eyelet and pulling it through the next. Do the same with the other lace. Repeat until you get to the top of the shoe, then tie normally. Repeat the process on your other foot.[20]

Expert Q&A
-
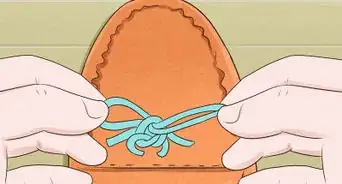
QuestionHow can I stop my running shoes from coming untied?
 Kai NgKai Ng is a USATF and RRCA Certified Running Coach at Run Coach Kai. Kai has competed in over 55 races and over 15 marathons, and has trained with 16x USA and World record holder Patti Catalano Dillonso. He specializes in coaching runners of all levels and showing people that everyone can be a runner. Kai is committed to helping his clients reach their goals by showing them how to run with proper form and holding them accountable to train consistently.
Certified Running CoachA lot of people, when they're making the second "bunny ear" loop, tend to take the shoelace and go around towards themselves and then back out around the loop. Instead of doing that, try taking that second shoelace and going around the outside, away from your body, to create that second loop. That can be really helpful.


References
- ↑ http://running.competitor.com/2015/05/photos/3-ways-to-lace-up-your-running-shoes_128380
- ↑ http://www.popularmechanics.com/adventure/sports/how-to/a15492/how-to-tie-running-shoes/
- ↑ https://www.youtube.com/watch?v=IijQyX_YCKA&feature=youtu.be&t=31s
- ↑ https://www.youtube.com/watch?v=IijQyX_YCKA&feature=youtu.be&t=46s
- ↑ https://youtu.be/IijQyX_YCKA?t=49s
- ↑ https://www.youtube.com/watch?v=IijQyX_YCKA&feature=youtu.be&t=56s
- ↑ https://runrepeat.com/top-10-running-shoe-lacing-techniques
- ↑ https://runrepeat.com/top-10-running-shoe-lacing-techniques
- ↑ https://runrepeat.com/top-10-running-shoe-lacing-techniques
- ↑ https://runrepeat.com/top-10-running-shoe-lacing-techniques
- ↑ https://runrepeat.com/top-10-running-shoe-lacing-techniques
- ↑ https://runrepeat.com/top-10-running-shoe-lacing-techniques
- ↑ https://runrepeat.com/top-10-running-shoe-lacing-techniques
- ↑ https://runrepeat.com/top-10-running-shoe-lacing-techniques
- ↑ https://www.youtube.com/watch?v=TWw958BlE4k&feature=youtu.be&t=1m
- ↑ https://www.youtube.com/watch?v=TWw958BlE4k&feature=youtu.be&t=1m22s
- ↑ https://www.youtube.com/watch?v=TWw958BlE4k&feature=youtu.be&t=1m32s
- ↑ https://www.youtube.com/watch?v=TWw958BlE4k&feature=youtu.be&t=1m40s
- ↑ https://www.youtube.com/watch?v=TWw958BlE4k&feature=youtu.be&t=1m40s
- ↑ https://www.youtube.com/watch?v=TWw958BlE4k&feature=youtu.be&t=1m40s
About This Article

The best way to tie your running shoes depends on how you want them to fit. For a more stable fit on any foot type, tie a heel lock or runner's loop by looping the laces through the top eyelets on the side of the shoe. Cross each lace under the opposite loop, pull taut, and tie. If your feet are narrow, tighten your shoes by lacing straight across the bottom, then pulling straight up to the next eyelet. Lace normally, skip one eyelet, then continue lacing. For more tips, including how to loosen your shoe if your feet are wide or swollen, read on!