This article was co-authored by wikiHow staff writer, Darlene Antonelli, MA. Darlene Antonelli is a Technology Writer and Editor for wikiHow. Darlene has experience teaching college courses, writing technology-related articles, and working hands-on in the technology field. She earned an MA in Writing from Rowan University in 2012 and wrote her thesis on online communities and the personalities curated in such communities.
This article has been viewed 16,874 times.
Learn more...
While the AutoCorrect feature is usually very helpful, it can get frustrating to have words in other languages or coding words changed. This wikiHow article will show you how to turn off AutoCorrect in Word using a Mac or Windows computer.
Steps
Turning Off AutoCorrect in Word with Windows
-
1Open your project in Word. You can open Word from the Start menu or find your Word file in File Explorer, right-click it, and select Open with > Word.
- The changes you are making will apply only to the current project in Word that you have open. If you want to turn off AutoCorrect in later projects, you will need to do this again.
-
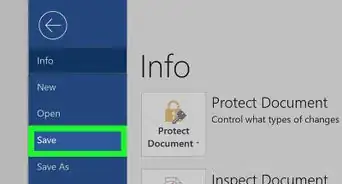
2Click the File tab and select Options. You'll see this in the editing ribbon with Home, Insert, and View.Advertisement
-
3Click Proofing. It's in the panel on the left side of your screen.
-
4Click AutoCorrect Options. Once you click Proofing, the right side of the window will change to reflect the current Proofing settings.
- Clicking AutoCorrect Options will open a new window with more options.
-
5Click the AutoCorrect tab. It might be on the second row of tabs.
-
6Click the box next to "Replace text as you type" to uncheck it . You can close the window and the changes will apply only to the project you're working on.[1]
- You might find spell check distracting as well, and can disable it. Go to File > Options > Proofing > Check spelling as you type > OK. To check your spelling manually, go to Review > Spelling & Grammar.[2]
- If you're using the web version of Word, go to the Review tab and click the arrow next to "Spelling & Grammar," then click AutoCorrections and Replace text as you type.
- For older versions of Word, you might find the AutoCorrect features under "AutoFormat" in the Format tab or in "Word Options" after clicking the "Office" button (it's the large circular button featured in Word 2007).


Turning off AutoCorrect in Word with Mac
-
1Open your project in Word. You can open Word from the Dock or find your Word file in Finder, right-click it, and select Open with > Word.
- The changes you are making will apply only to the current project in Word that you have open. If you want to turn off AutoCorrect in later projects, you will need to do this again.
-
2Hover your mouse over Word and click Preferences. The Word menu is in the menu bar at the top of your screen with the Apple logo. You may need to click Word to prompt the menu to drop-down.
-
3Click AutoCorrect. It's with an "ABC" icon next to a lightning bolt.
-
4Click the box next to "Replace text as you type" to uncheck it. You can close the window and the changes will apply only to the project you're working on.


References
About This Article

1. Open your project in Word.
2. Click the File tab and select Options.
3. Click Proofing.
4. Click AutoCorrect Options.
5. Click the AutoCorrect tab.
6. Click the box next to "Replace text as you type" to uncheck it.