This article was co-authored by wikiHow Staff. Our trained team of editors and researchers validate articles for accuracy and comprehensiveness. wikiHow's Content Management Team carefully monitors the work from our editorial staff to ensure that each article is backed by trusted research and meets our high quality standards.
The wikiHow Tech Team also followed the article's instructions and verified that they work.
This article has been viewed 253,464 times.
Learn more...
Although grouping data in Microsoft Excel can be a useful way to preserve consistent formatting, ungrouping it may be desirable if you wish to make sheet-specific changes. To ungroup sheets, right-click on one of the sheets and select "Ungroup" or press ⇧ Shift while clicking one of the grouped sheets. Similarly, ungrouping rows or columns is done by selecting the desired data range and choosing "Ungroup" from the "Data" tab (or using Windows/Mac keyboard shortcuts). Don’t forget to save your work before making changes to your groups!
Steps
Ungrouping Worksheets
-
1Identify the sheets that are grouped. The tabs for grouped sheets will be highlighted in a similar shading or color and the text on the tab of the active sheet in the group will be bold.
-
2Right-click one of the grouped sheet tabs and choose "Ungroup Sheets" from the pop-up menu. The sheets will ungroup and you can make changes without affecting all sheets.[1]Advertisement
-
3Alternately, Press ⇧ Shift while clicking an active sheet within the current group.[2]
-
4Regroup worksheets after making changes (optional). Press and hold Ctrl (Windows) or ⌘ Cmd (Mac) and left click the worksheet tabs you want grouped. The sheets will be grouped upon releasing the key.


Ungrouping Manual Data Groups
-
1Determine if your data were grouped manually or automatically. If your data was grouped with the “Group” button then it was done manually. Groups are sometimes created automatically by functions, like Subtotal, which can be identified by a “Subtitle” row under the grouped data.
-
2Click the “+” button to expand the group (if hidden). This button is placed to the left of the spreadsheet. If the group is already expanded, a “-” is shown instead. Expanding will reveal any hidden groups or rows.
-
3Click and drag to highlight all of the rows or columns in the group.
-
4Click the "Data" tab. This is located in the top menu bar and will bring up a set of data-specific controls.
-
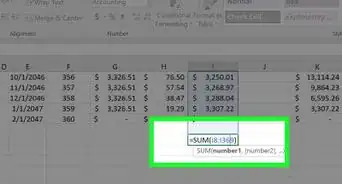
5


Ungrouping Automatic Data Groups
-
1Determine if your data were grouped manually or automatically. If your data was grouped with the “Group” button then it was done manually. Groups are sometimes created automatically by functions, like Subtotal, which can be identified by a “Subtitle” row under the grouped data.
-
2Click the "Data" tab. This is located in the top menu bar and will bring up a set of data-specific controls.
-
3Click the "Subtotal" button. This button is on the right of the data toolbar in the "Outline" section and will bring up a dialog box.
-
4Click the "Remove All" button. This button is in the lower left of the dialog box and will ungroup all data and remove the subtotals.[5]


References
- ↑ http://www.officetooltips.com/excel/tips/grouping_and_ungrouping_sheets.html
- ↑ http://www.howtoexcelatexcel.com/excel-tips-tricks/grouping-and-ungrouping-worksheets-in-excel/
- ↑ https://support.office.com/en-us/article/Outline-group-data-in-a-worksheet-21147cfc-44c9-42c4-8bce-62fb3e067d73l
- ↑ https://exceljet.net/keyboard-shortcuts/ungroup-rows-or-columns
- ↑ http://www.gcflearnfree.org/excel2013/20.3
About This Article