wikiHow is a “wiki,” similar to Wikipedia, which means that many of our articles are co-written by multiple authors. To create this article, 27 people, some anonymous, worked to edit and improve it over time.
This article has been viewed 1,033,118 times.
Learn more...
Microsoft Access is a database creation program that allows for anyone to easily maintain and edit a database. It is suitable for anything from small projects to large businesses, and is a very visual program. This makes it great for performing data entry, as you don’t need to work with tables and spreadsheets.
Steps
Creating a New Database
-
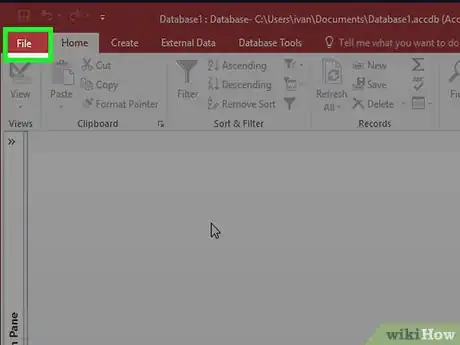
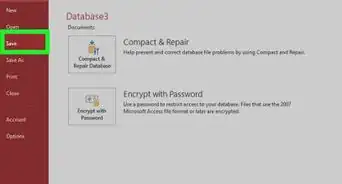
1Click the File tab and Select “New”. The database is what will contain all of your data in its various forms. You can choose to create a blank database, a blank web database, or pick from a variety of templates.
- A blank database is a standard Access database, and is good for local use. Creating a blank database will create one table as well.
- Web databases are designed to be compatible with Access’s web publishing tools. Creating a blank database will create one table as well.
- Templates are pre-built databases designed for a wide range of uses. Pick a template if you don’t want to spend a lot of time putting the database structure together.
-
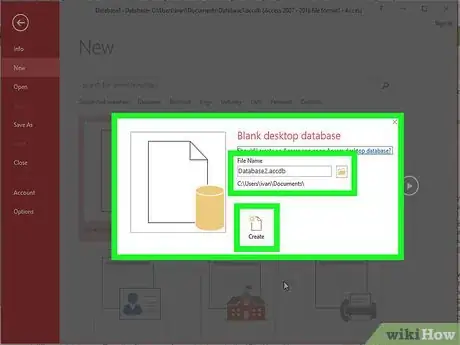
2Name your database. Once you’ve selected a database type, give it a name that reflects what it’s for. This will be especially helpful if you’re going to be working with several different databases. Type the file name of your database in the "File Name" box. Choose "Create" to generate the new database file.
Adding Data to the Database
-
1Determine the best structure for your data. If you are creating a blank database, you’ll want to think about the best way to organize your data, and add the appropriate structure. There are several ways that you can format and interact with your data in Access:
- Tables – This is the main way that data is stored in your database. Tables can be compared to spreadsheets in Excel: the data is organized in rows and columns. Because of this, importing data from Excel and other spreadsheet programs is a relatively straightforward process.
- Forms – Forms are the way that data is added to your database. While you can enter the data into the database directly into the tables, using forms allows for quicker and more visual data entry.
- Reports – These summarize and display the data in your database. Reports are for analyzing data and returning answers to specific questions, such as how much profit was made, or where customers are located. These are usually designed to be printed out.
- Queries – This is how you retrieve and filter your data. You can use queries to display specific entries from multiple tables. You can also use queries to create and update data.
-
2Create your first table. If you are starting a blank database, you will automatically begin with a blank table. You can begin entering your data into this table, either by hand or by copying and pasting from another source.
- Each piece of data should be give its own column (field), while each record should be a separate row. For example, each row would be a customer while each field would be a different piece of information about that customer (first name, last name, email address, phone number, etc.).
- You can rename the column labels to make it easy to tell what field is what. Double click the column heading to change the name.
-
3Import data from another source. If you want to import from a supported file or location, you can set Access to grab the information and add it to your database. This is useful for grabbing data off of a web server or some other shared resource.
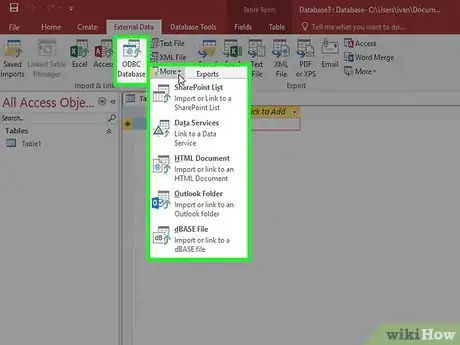
- Click the External Data tab.
- Select the file type that you are importing. In the “Import and Link” section, you will see a few options for data types. You can click the More button to see more option. ODBC stands for Open Database Connectivity, and includes databases such as SQL.
- Navigate to the location of the data. If it is on a server, you will need to provide the server address.
- In the next window, choose "Specify how and where you want to store the data in the current database." Choose "OK." Follow the steps to import your data.
-
4Add another table. You will want to keep your different records in different databases. This will help keep your databases running smoothly. For example, you may have a table of customer information and another table for order information. You will then be able to link the customer information into the order information table.
- In the Create section of the Home tab, click the table button. A new table will appear in your database. You can enter information in the same way you did for the first table.
Setting Table Relationships
-
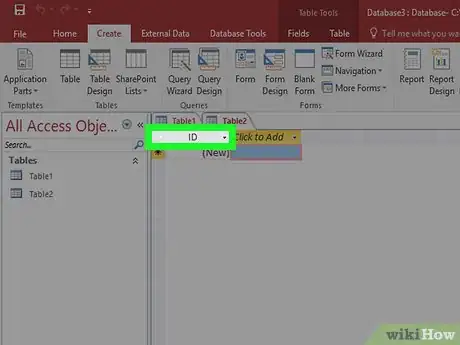
1Understand how keys work. Each table will have one primary key that is unique for each entry. By default, Access creates an ID column that increases in number for each entry. This is set as the primary key. Tables can also have foreign keys. These are fields that are linked with another table in the database. The linked fields would contain the same data.
- For example, in your Orders table, you may have a Customer ID field to track which customer ordered which product. You can create a relationship for that field with the ID field in your Customer table.
- Using relationships helps keep your data consistent, efficient, and readable.
-
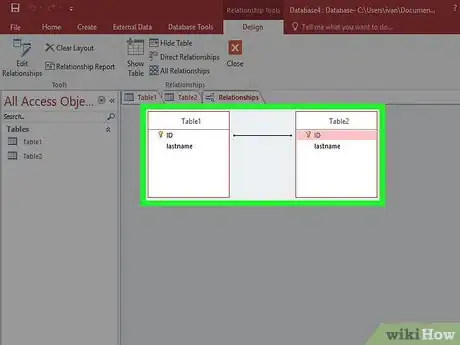
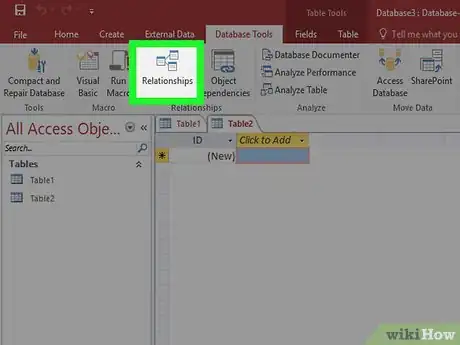
2Click the Database Tools tab. Click the Relationships button in the Relationships section. This will open a new window with an overview of all of the tables in the database. Each field will be listed underneath its table’s name.
- You will need to have created the field for the foreign key before you create the relationship. For example, if you want to use the Customer ID on the Orders table, create a field in the Orders table called Customer and leave it blank. Make sure it is the same format as the field you are linking (numbers in this case).
-
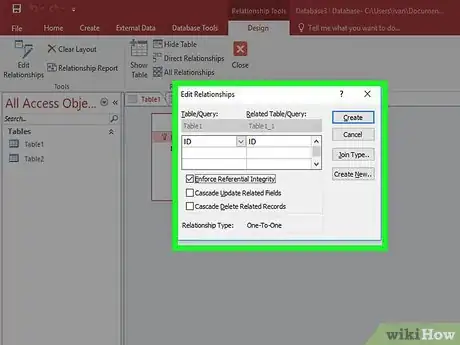
3Drag the field you want to use as a foreign key. Drop it to the field that you created for the foreign key. Click Create in the window that appears to set the relationship for the fields. A line will appear between the two tables, connecting the fields.
- Check the box to “Enforce Referential Integrity” when creating the relationship. This means that if data is changed in one field, the other field is automatically updated. This will help keep your data accurate.
Making Queries
-
1Understand the role of queries. Queries are actions that let you quickly view, add, and edit the data in your database. There are a wide variety of query types, ranging from simple lookups to the creation of new tables based on existing data. Queries are essential tools for building reports.[1]
- Queries are broken down into two main types: Select and Action. Select queries pull data from tables and can make calculations. Action queries can add, edit, and delete data from tables.
-
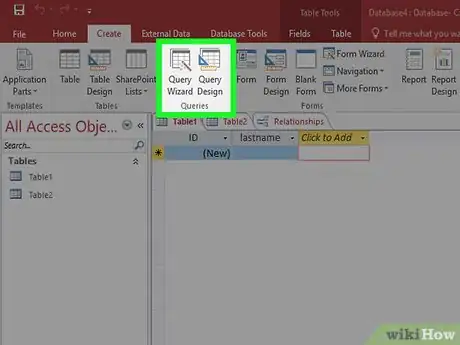
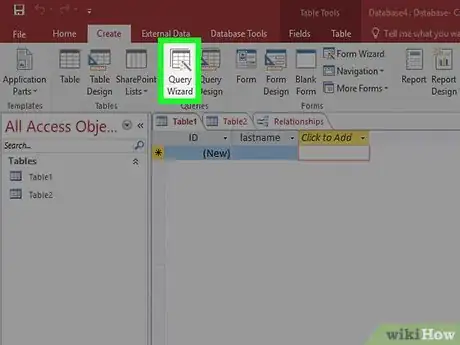
2Use the Query Wizard to create a basic Select query. If you want to create a basic select query, use the Query Wizard to walk you through the steps. You can access the Query Wizard from the Create tab. This will allow you to view specific fields from a table.
Creating a Select Query with Criteria
-
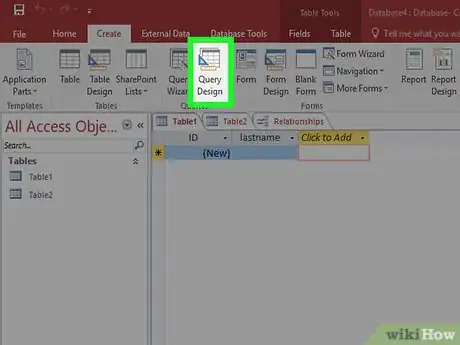
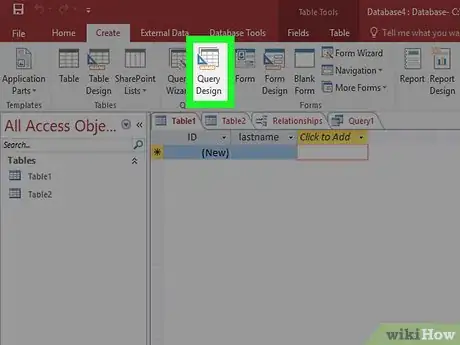
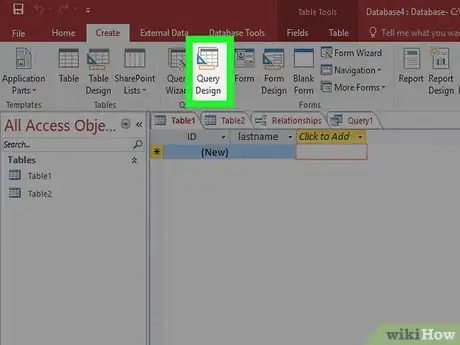
1Open the Query Design tool. You can use criteria to narrow down your select query and only display the information you need. To start, click the Create tab and select Query Deign.
-
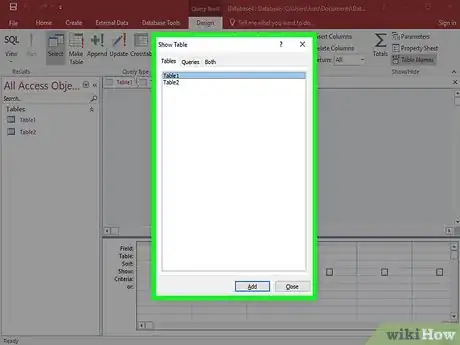
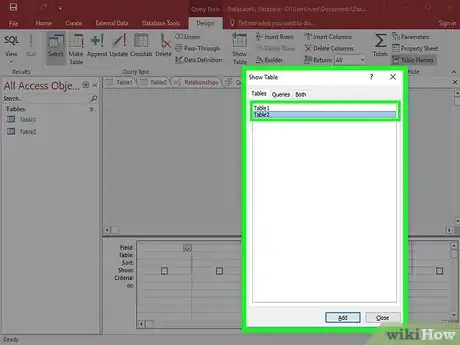
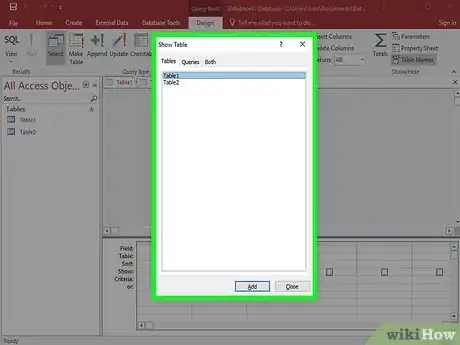
2Choose your table. The Show Table box will open. Double-click the table that you want to run the query on, and then click Close.
-
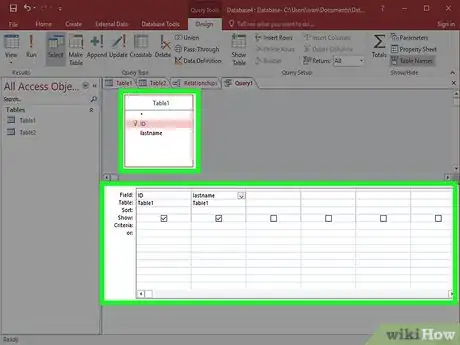
3Add fields to be retrieved. Double-click on each field in the table that you want to add to the query. The fields will be added to the Design grid.
-
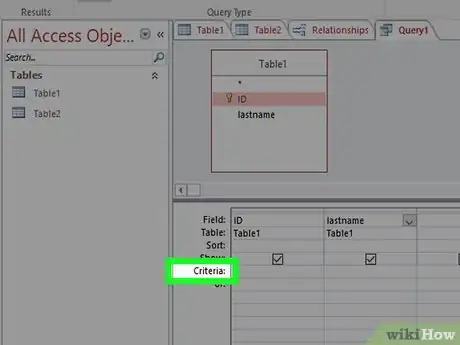
4Add your criteria. You can use several different types of criteria, such as text or functions. For example, if you wanted to only display prices higher than $50 from your “Prices” field, you would enter
>=50into the criteria. If you wanted to only show customers from the UK, you would typeUKinto the Criteria field.- You can use multiple criteria per query.
-
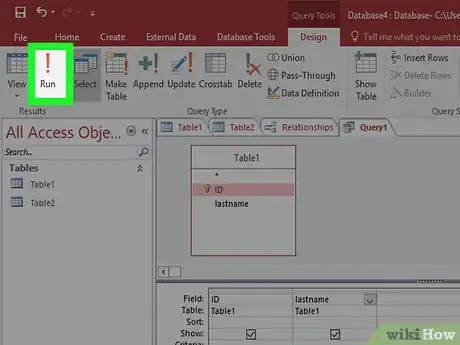
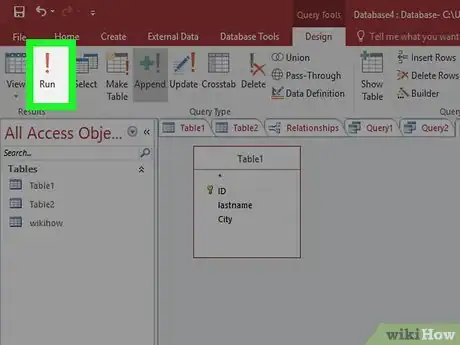
5Click Run to see your results. The Run button is located on the Design tab. Your Query results will be displayed in the window. Press Ctrl + S to save the query.
Creating a Select Query with Parameters
-
1Open the Query Design tool. A parameter query will allow you to specify what you want to retrieve each time the query is run. For example, if you have a database with customers from various cities, you can run a parameter query to ask which city you want to display results for.
-
2Create a select query and specify the table(s). Add fields to be retrieved in the query by double-clicking them in the table overview.
-
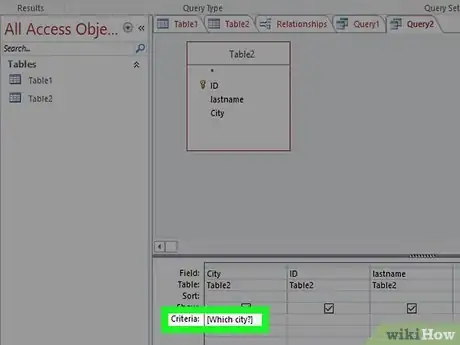
3Add a parameter to the Criteria section. Parameters are denoted by “[]” around the parameter. The text inside the brackets will be shown in the prompt that appears when the query is run. For example, to prompt for the city, click the Criteria cell for the city field, and type
[Which city?].- You can end parameters with “?” or “:”, but not with “!” or “.”
-
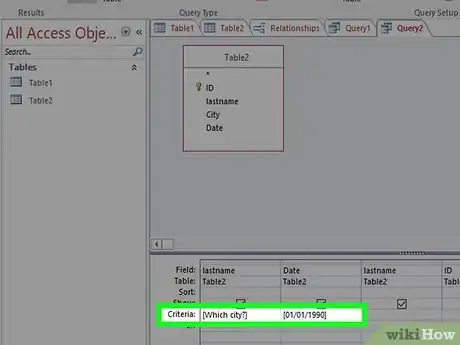
4Make a multi-parameter query. You can use multiple parameters to create a custom range for your query results. For example, if the field is a Date field, you can return a range of dates by typing
Between [Enter starting date:] And [Enter ending date:]. You will receive two prompts when you run the query.[2]
Creating a Make Table Query
-
1Click the Create tab and select Query Design. You can use queries to pull specific data from existing tables and create a new table with this data. This is especially useful if you want to share specific parts of your database, or create specific forms for subsets of your database. You will need to create a regular select query first.
-
2Select the table(s) that you want to pull data from. Double-click on the tables that you want to pull your data from. You can pull from multiple tables if necessary.
-
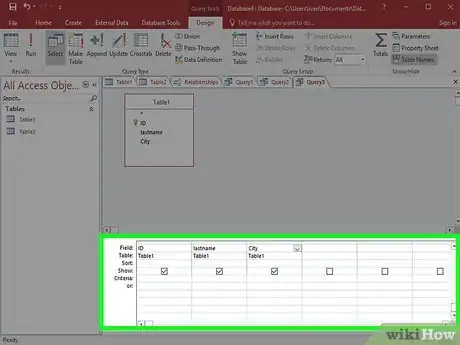
3Select the fields that you want to retrieve data from. Double-click each field that you want to add from the table overview. It will be added to your query grid.
-
4Set your criteria. If you want to specify specific data from a field, use the criteria section to set the filter. See the “Creating a Select Query with Criteria” section above for more details.
-
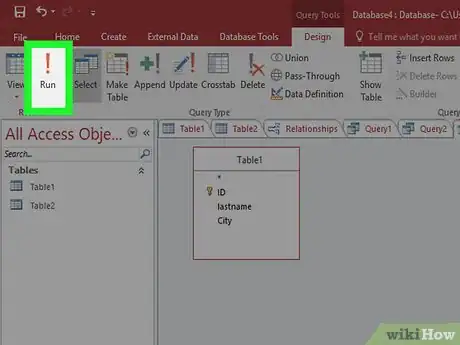
5Test your query to ensure that it returns the results you want. Before you create your table, run the query to ensure that it is pulling all of the correct data. Adjust your criteria and fields until you get all of the data that you want.
-
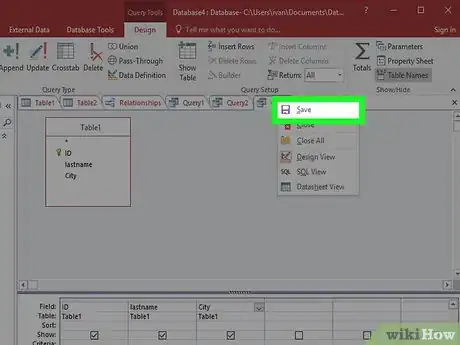
6Save the query. Press Ctrl + S to save the query for later use. It will appear in your navigation frame on the left side of the screen. Click on the query to select it again and then click on the Design tab.
-
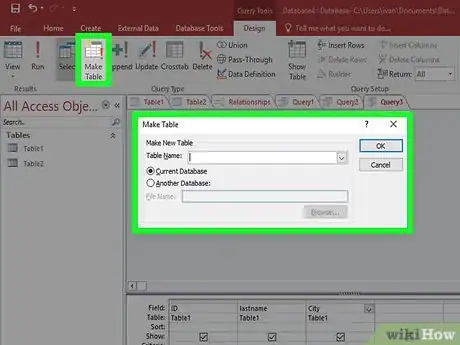
7Click the “Make Table” button in the Query Type group. A window will appear asking for your new table name. Enter the name for the table and click OK.
-
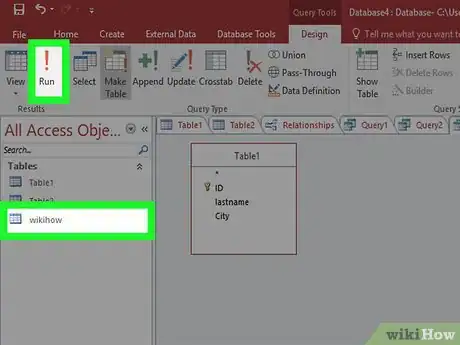
8Click the Run button. Your new table will be created with the query you established. The table will appear in your navigation frame on the left.
Creating an Append Query
-
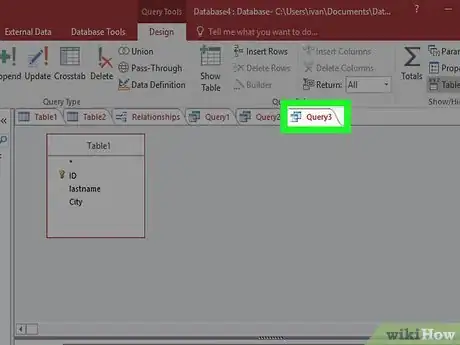
1Open a previously created query. You can use an append query to add data to a table that already exists from another table. This is useful if you need to add more data to a table you created with a make table query.
-
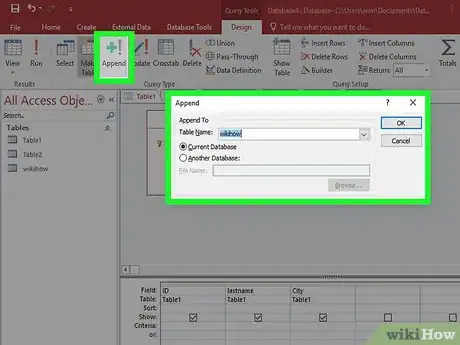
2Click the Append button in the Design tab. This will open the Append dialog box. Select the table you want to append.
-
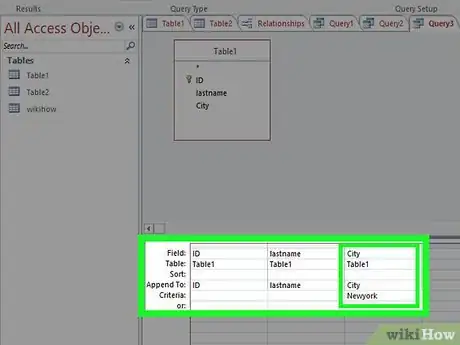
3Change the criteria of your query to match what you want to add. For example, if you created a table with the criteria “2010” for the Year field, change it to the year you want to add, such as “2011”.
-
4Set where you want the data appended. Make sure to set the correct fields for each column that you are appending. For example, when using the above changes, data should be appending to the Year field on the Append To row.
-
5Run the query. Click the Run button on the Deign tab. The query will be run and the data will be added to the table. You can open the table to verify that the data was added correctly.
Creating and Using Forms
-
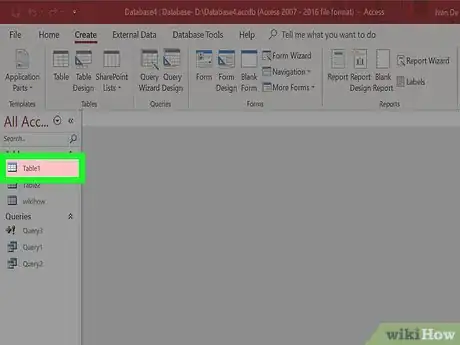
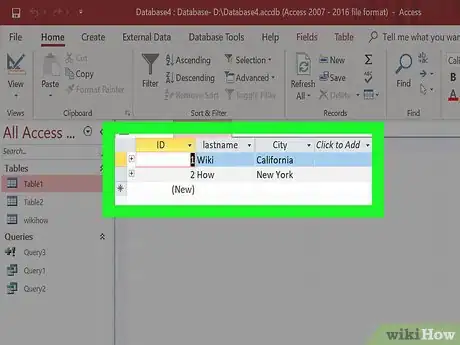
1Select the table that you want to create a form for. Forms allow you to easily see the data for each field, as well as quickly switch between records or create new ones. Forms are essential for extended periods of data entry, as most people find them much easier to work with than tables.
-
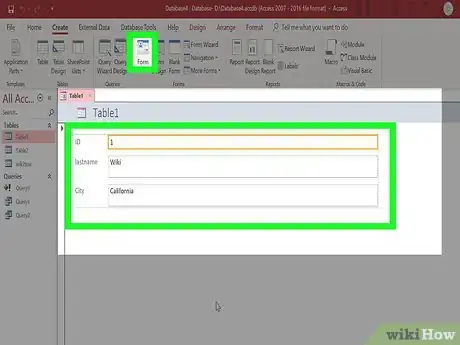
2Click the Form button in the Create tab. This will create a form based on the fields contained in the table automatically. Access does a pretty good job of automatically creating fields that are the correct size, but you can resize and move around any elements on the form that you want.
- If you don’t want a specific field to be displayed on the form, you can right-click on it and select Delete.
- If your tables have relationships, a datasheet will appear beneath each record, showing the connected data. You can edit your connected data this way much easier. For example, each sales rep in your database may have a customer database attached to their record.
-
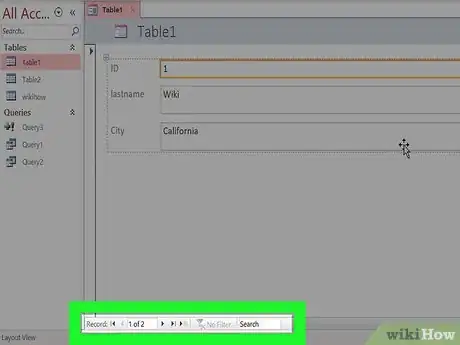
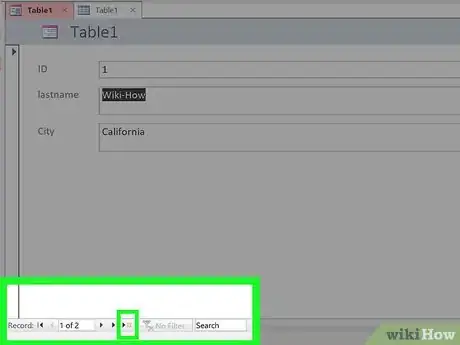
3Navigate your new form. The arrow buttons at the bottom move from record to record. The fields will be populated by your record data as you switch between them. You can use the buttons on the edges to move to the first or last record.
-
4Click the datasheet button to use the table. This is located in the upper-left corner, and will allow you to start changing the values of your table by using the form.
-
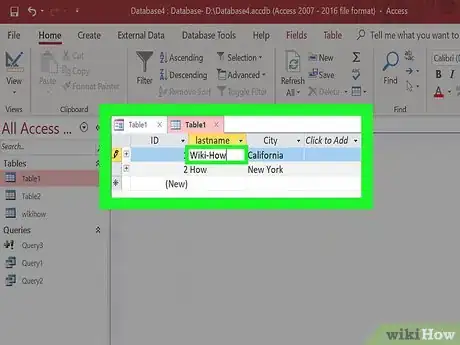
5Make changes to existing records. You can edit the text in any field of each record to change the data in the table. The changes will reflect automatically in the table, as well as in any connected tables.
-
6Add new records. Click the “Add Record” button near the navigation buttons to create a new record at the end of the list. You can then use the fields to input data into the blank record in the table. This is a much easier way to add new information than through the table view.
-
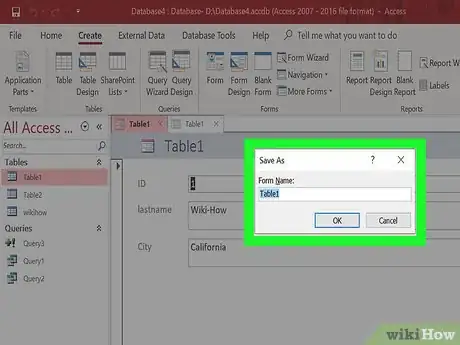
7Save the form when finished. Make sure to save your form by pressing Ctrl + S so that you can easily access it again later. It will appear in your navigation frame on the left side of the screen.
Creating a Report
-
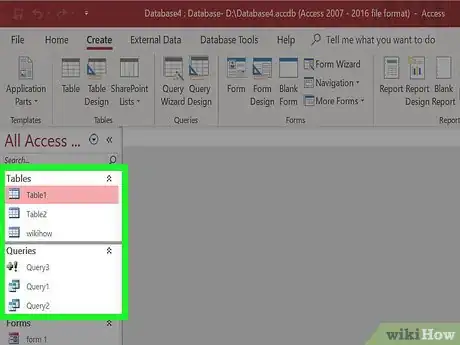
1Select your table or query. Reports allow you to quickly display summaries of your data. They are often used for income and shipping reports, and can be tailored to just about any use. Reports draw data from either tables or queries that you have created.
-
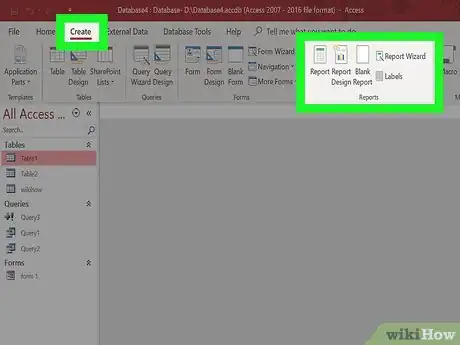
2Click the Create tab. Select the type of report you want to create. There are a few different ways you can go about creating a report. Access can create your report for you automatically, or you can create a custom one.
- Report – This will create an auto-report with all of the data from your source. Nothing will be grouped, but for small databases this is probably sufficient for showing what you need.
- Blank Report – This will create an empty report that you can fill with your data as you see fit. You will be able to choose from any available field to create a custom report.
- Report Wizard – The report wizard will guide you through the report creation process, allowing to to choose and group your data, and then format it accordingly.
-
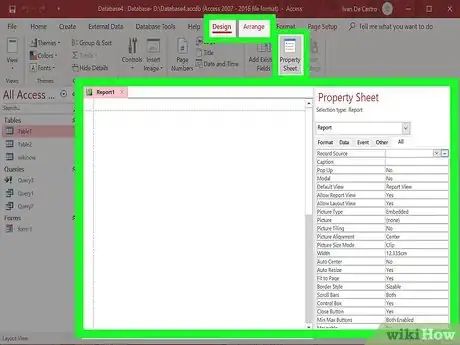
3Set a source for a blank report. If you’ve selected to create a blank report, you’ll need to select a source for it. First, click the Arrange tab and then select Property Sheet. Alternatively, you can also press Alt + Enter.
- Click the down arrow next to the Record Source field. A list of your available tables and queries will appear. Select one and it will be assigned to the report.
-
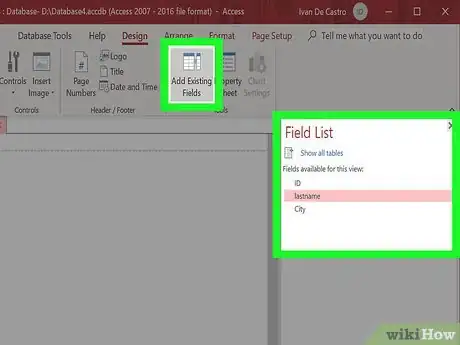
4Add fields to your report. Once you have a source, you can start adding fields from it to your report. Click the Format tab, and then click Add Existing Fields. The Field List will appear in the right frame.
- Click and drag the fields you want to add into the Design frame. The record will appear in the report. As you add additional fields, they will be lined up automatically with existing fields.
- You can resize fields by clicking on the edges and dragging the mouse.
- Delete fields from the report by clicking on the heading and pressing the Delete key.
-
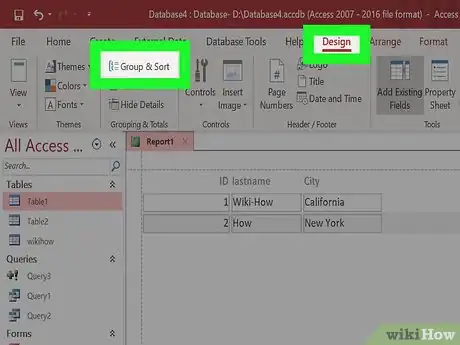
5Add groups to your report. Groups allow you to quickly parse information in a report, as they allow you to organize related information. For example, you may want to group sales by region or by salesperson. Groups allow you to do this.
- Click the Design tab, click the Group & Sort button.
- Right-click on any part of the field you want to add to a group. Select Group On from the menu.
- A header will be created for the group. You can adjust the header to whatever you want to label the group.
-
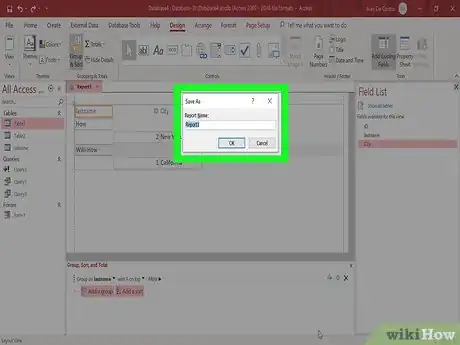
6Save and share your report. Once your report is finalized, you can save it and then share it or print it like any document. Use this to share company performance with investors, contact information to employees, and much more.
Community Q&A
-
QuestionHow do I put a password on a Microsoft Access database?
 Community AnswerIn the File tab, you can click 'encrypt with password'. Type in the password and encrypt it.
 -
QuestionHow do I make the Access Database I have open to a specific form?
 Community AnswerGo to where your form is listed in your computer window. Right-click on the form, then choose "Open With". Choose Microsoft Access. Alternatively, open Access, and got to "File>Open", (CTRL + O), and browse to the file you want to open.
 -
QuestionWhat kind of data can be used only with the Access database?
 Community AnswerFor any form of valid CSV (Comma Separated Value), Access, Word, Excel may be used. Integers, words, symbols, yes/no are all logical inputs for Access.
Warnings
- Some features in Access are not always available, depending on the type of database you created. For instance, you cannot share a desktop-only database on the Web, and some desktop features, such as query totals, will not work on a Web database.⧼thumbs_response⧽
References
About This Article
1. Click File > New to create a new database.
2. Create a table.
3. Import data from other sources.
4. Add additional tables.
5. Set up table relationships.
6. Use the Query Wizard to make a basic Select query.
7. Use Query Design for other queries.
8. Create a forms for tables.
