This article was co-authored by wikiHow staff writer, Travis Boylls. Travis Boylls is a Technology Writer and Editor for wikiHow. Travis has experience writing technology-related articles, providing software customer service, and in graphic design. He specializes in Windows, macOS, Android, iOS, and Linux platforms. He studied graphic design at Pikes Peak Community College.
The wikiHow Tech Team also followed the article's instructions and verified that they work.
This article has been viewed 595,827 times.
Learn more...
In Windows 10, My computer is no longer available. However, you can still hide a disk drive on in File Explorer using Disk Management. You can even create a secret mount point. This wikiHow teaches you how to hide a disk drive in File Explorer on Windows 10.
Steps
Using Disk Management
-
1Right-click the Windows Start menu. This displays a pop-up menu above the Windows Start drive.
-
2Click Disk Management. It's in the pop-up menu that appears when you right-click the Windows Start menu. This opens the Disk Management applications.Advertisement
-
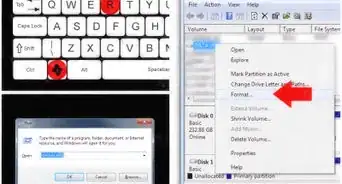
3Right-click the disk drive you want to hide. This displays a menu next to the drive. You can right-click the drive name in the list at the top, or the drive allocation tiles at the bottom of Disk Management.
-
4Click Change Drive Letter and Paths. This opens a separate window that allows you to add, change, or remove the drive letter.
-
5Make sure the drive is selected and click Remove. The drive should be highlighted in blue when it is selected. Clicking Remove removes the drive letter from the drive. An alert will appear.
-
6Click Yes. It's in the alert that appears when you remove the letter of the disk drive. The alert informs you that some programs may not work properly if the letter is missing. Click Yes to continue. This removes the letter from the disk drive.
- Removing the drive letter from the disk drive will prevent it from appearing in File Explorer. If that's all you want, you can stop here. Continue to the next step if you want to create a hidden folder on a separate drive that you can use to access the hidden disk drive. [1]
- Removing or changing the letter of a disk drive may prevent programs that are dependent on that drive from functioning correctly.
-
7Right-click the drive with the missing drive letter. This opens a menu next to the drive.
-
8Click Change Drive Letter and Paths. This opens a separate window that allows you to add, change, or remove the drive letter.
-
9Make sure the drive is selected and click Add. The drive should be highlighted in blue when it is selected. Clicking Add displays options to add a new drive letter, or mount the drive in a different location.
-
10Click Mount in the following empty NTFS folder. It's the second radio option in the "Add drive letter or path" window.
-
11Click Browse. It's to the right of the bar below "Mount in the following empty NTFS folder". This allows you to select a specific location where you can access the drive.
-
12Navigate to the location you want to create a folder to access the hidden drive. Double-click the drive you want to add the folder in, and then double-click the folder(s) you want to place the folder in.
-
13Click New Folder. It's to the right in the "Browse for drive path" window.
-
14Type a name for the folder and click Ok. This creates a new folder for the drive location. Give the folder a name you can remember, such as "Secret Drive" or "Hidden Drive."
-
15Click Ok. This will allow you to access the disk drive by clicking the mount folder you selected in Disk Management.
- For additional security, you can hide the folder that contains the drive mount location in File Explorer. That way it will only appear if show hidden files and folders in File Explorer.


Using Group Policy Editor
-
1Enable Group Policy Editor (Windows 10 Home Edition only). Group Policy Editor is available on all versions of Windows. However, it is disabled on Windows 10 Home Edition. Use the following steps to enable Group Policy Editor in Windows 10 Home Edition:[2]
-
2Press ⊞ Win+R. This opens the Run application on Windows. You can use Group Policy Editor to restrict access to drives on your computer.
-
3Type gpedit.msc and click Ok. This opens Group Policy Editor on Windows.
-
4Expand Administrative Templates below "User Configuration." It's in the sidebar to the left. To expand this option, either click the bracket to the left, or double click Administrative Templates.
-
5Expand Windows Components. It's below "Administrative Templates" in the sidebar to the left.
-
6Click File Explorer. It's below "Windows Components." Clicking this option will display administrative template options in the main window on the right.
-
7Double-click Hide these specific drives in My Computer. It's one of the options below "Settings" in the main window on the right. This option hides the specified drives in My Computer and File Explorer. This does not prevent users from accessing the drive through other methods.
- Alternatively, you can select "Prevent Access to drives from My Computer." This option allows users to browse to view the drive but not open folders or access the drive's contents.
-
8Click the radio option next to Enabled. It's the second option near the upper-right corner of the window.
-
9Select the drive you want to hide. Use the drop-down menu below "Pick one of the following combinations" to select which drive(s) you want to hide. You can select individual drives or a combination of drives.
- This does not include the option to hide external USB drives.
-
10Click Apply. It's in the lower-right corner of the window.
-
11Click Ok. It's next to Apply. This closes the window.


Unhidding a Hidden Disk Drive in Disk Management
-
1Right-click the Windows Start menu. This displays a pop-up menu above the Windows Start drive. If you decide you no longer want the disk drive to be hidden, use these steps to revert the hidden drive in Disk Management.
-
2Click Disk Management. It's in the pop-up menu that appears when you right-click the Windows Start menu. This opens the Disk Management applications.
-
3Right-click the drive that has no drive letter. This is the drive you hid in the previous method.
-
4Click Change Drive Letter and Paths. This opens a separate window that allows you to add, change, or remove the drive letter.
-
5Click Add. Since the drive doesn't have a drive letter, it will not appear in the "Change drive letters and paths for OS" window. Clicking Add displays options to add a new drive letter, or mount the drive in a different location.
-
6Click the option for "Assign the following drive letter." It's the first radio option in the window.
-
7Select a drive letter. Use the drop-down menu to the right of the radio option to select a drive letter to assign the drive. It's best that you select the same drive letter that it had before you removed the drive letter.
-
8Click Ok. This adds the drive letter back to the drive. You can now view the drive in File Explorer.


Community Q&A
-
QuestionWhat do I download to hide my drive?
 Community AnswerDon't download anything. Do it manually in Windows by following the tutorial. Using 3rd-party software is risky.
 -
QuestionWhat do I do if I restarted and now it is showing that Bootmgr is missing?Community AnswerYou remove/disconnect the device, then put it back in.
-
QuestionWhat do I do if this doesn't work?Community AnswerYou could try looking for other guides if this didn't help you. Try searching on the internet or for video tutorials. You could also ask if people know how to do it at your local computer repair shop.
Warnings
- Removing the letter from a disk drive may prevent programs that rely on that disk drive from functioning properly.⧼thumbs_response⧽
- Any user of the computer with Administrative Rights can change the Settings in Group Policy Editor. Realize your disk drives are not as secure as originally thought.⧼thumbs_response⧽
- If you are using the "Hide these specific drives in My Computer" option, your hard disk drives are still accessible by typing the Drive Letter in address bar or "Run".⧼thumbs_response⧽


References
About This Article

1. Right-click the Windows Start menu and click Disk Management.
2. Right-click a drive and click Change Drive Letter and Paths.
3. Highlight the drive and click Remove.
4. Click Yes.