This article was co-authored by wikiHow Staff. Our trained team of editors and researchers validate articles for accuracy and comprehensiveness. wikiHow's Content Management Team carefully monitors the work from our editorial staff to ensure that each article is backed by trusted research and meets our high quality standards.
The wikiHow Video Team also followed the article's instructions and verified that they work.
This article has been viewed 94,146 times.
Learn more...
Milk paint is a milk-based paint made from all-natural ingredients that has been used since the time of the ancient Egyptians. It’s made by curdling milk with vinegar and lime, then adding pigment to the milk curds and mixing to create paint. Milk paint is non-toxic and delivers a matte, almost antique-looking finish that is very long-lasting.
Ingredients
- 1 gallon (3.7 liters) skim milk
- 2 cups (473 ml) white vinegar
- 4 ounces (112 grams) Hydrated Lime Type 5
- 7 ounces (200 grams) pigment (in the color of your choice)
Steps
Curdling the Milk
-
1Let the milk come to room temperature. To create milk paint, the milk must be at room temperature before you begin the process of curdling. If your milk is refrigerated, take it out of the fridge and wait for it to reach room temperature.[1]
- Make sure that you use fresh skim milk. Powdered milk or milk that is full or partial fat does not work to make milk paint.
- Don’t warm the milk, just let it sit out. Warming the milk past 115 degrees Fahrenheit (46 degrees Celsius) breaks down the proteins of milk.
-
2Combine the milk and vinegar. When the milk has reached room temperature, pour it into a large mixing bowl. Then add in the two cups of white vinegar and stir to incorporate.[2]
- Stop stirring once you have incorporated the vinegar.
Advertisement -
3Place the milk in a warm place for one to two days. After you mix the vinegar in with the milk, you should see that the milk solids have started separating at the top. This means that the milk is curdling. Once you see this, place the container with the curdling milk in a warm place and let it sit overnight or for up to two days.[3]
- Make sure not to stir or to shake the container of milk. This will disturb the formation of the curds.


Adding the Pigment
-
1Add water to the pigment. Place the pigment powder into a small mixing bowl, then add ¼ cup of water. Let the pigment soak in the water for around five minutes without stirring.[4]
-
2Make a paste with the pigment. After the pigment has soaked for around five minutes, use a spoon to mix the pigment and water until it achieves the consistency of a paste.[5]
-
3Add water to the lime powder. Place four ounces of hydrated lime type 5 into a plastic or glass bowl, being sure not to inhale the powder. Slowly pour in 1 ½ cups of water.[6]
- Try not to get the powder on your hands or eyes. Consider wearing a mask so that you don’t inhale it.
-
4Mix the lime powder and water to make a wet paste. Use a spoon to stir and mix the powder and water. Stir until all the powder is wetted and the mixture becomes a wet paste.[7]
-
5Line a colander with cheesecloth and put it in the sink. Place a sheet of cheesecloth or another kind of thin cloth inside a colander to line it. Then place the colander in the sink.[8]
-
6Pour the container of curdled milk over the colander. After you set up your colander, pour the container of milk over the colander. You should see that the chunks, or curds, of milk are caught in the cheesecloth while the liquid whey of the milk passes through.[9]
- The curds that you separate from the whey are also called quark
-
7Transfer the quark into a paint bucket. After you have separated the quark, dump the quark into a gallon paint bucket. If you see large chunks in the quark, break them up with a large spoon.[10]
-
8Add the lime paste to the quark. After you break up the big chunks in the quark, pour in the lime paste to the bucket of quark. Stir using a large spoon for a couple of minutes. The lime paste will work to break down the quark and make it smooth.[11]
- After a few minutes of stirring, the curds should have broken down. If they are still lumpy, let the mixture sit for 15-30 minutes.
-
9Stir in the pigment paste. After the mixture in the paint bucket has reached a smooth consistency, add the pigment paste. Stir to incorporate the pigment paste until the entire mixture is the same color.[12]
- The mixture should have the consistency of a light cream. If it is thick or sludgy, add water by the tablespoon and stir until it has a lighter consistency.
-
10Strain the paint through a cheesecloth. Place a piece of cheesecloth over another gallon bucket of paint. Then pour the milk paint over the cheesecloth into the other paint bucket.
- The cheesecloth will catch any remaining chunks of curd. Dispose of these chunks.


Using Milk Paint
-
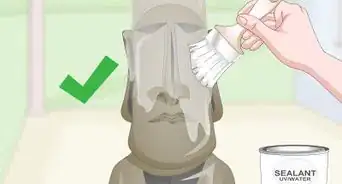
1Prepare the surface you are painting. Before you apply the milk paint, you need to make sure that the surface you are painting is smooth and ready to receive paint. If you are painting a wall, remove any nails or fixtures sticking out of the wall. If you are painting a piece of furniture, sand it so that the surface is smooth.[13]
-
2Stir the milk paint. Milk paint can be used as soon as it is finished being made. Before you use your milk paint, stir it well with a large spoon to make sure that all the ingredients are blended.[14]
- Stirring is especially important if you have let the paint sit.
- If you are worried that the paint won’t stick to the surface, add a measure of acrylic binder to the milk paint. Follow the instructions on the container to determine how much to add.
-
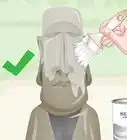
3Apply the first layer of paint. Use a bristle brush or a foam roller to apply the first layer of paint all over the surface you are painting. Don’t run the brush over the same area of paint too much, or it will leave large streaks.[15]
- Use a bristle brush if you like the look of antiqued finishes where you can see the faint lines of the brush. If you want a more uniform finish, use a foam roller.
-
4Let the first layer dry. Wait from an hour and a half to two hours to let the first layer of paint dry. If you begin to paint before the first layer is finished, the paint job won’t look clean.[16]
-
5Stir the paint and apply the second layer. Before you paint the second layer, give the milk paint a stir to make sure that the ingredients haven’t settled or separated. Then apply the second layer of paint.[17]
- Two layers of paint is often enough to coat a surface. If the paint job looks thin or you can still see the surface underneath, wait for the second layer to dry, then apply a third layer.
-
6Apply a topcoat if desired. Depending on what you are painting, you may wish to apply a topcoat. You can use any kind of topcoat you wish over milk paint, whether it be natural or acrylic/urethane. A topcoat helps to protect the paint job and can add a finish like a varnish, shellac or gloss.[18]
-
7Store milk paint in the fridge for up to three days. Put any leftover paint you may have in the fridge. You can keep milk paint for up to three days if you store it in the fridge. However, because the paint separates, it’s best used while fresh.[19]
-
8Finished.


Community Q&A
-
QuestionIs it necessary to use powdered lime for this application or can it be used on drywall?
 Community AnswerIf you are using milk paint on drywall, you may want to add an acrylic binder to the first layer for a more opaque finish.
 -
QuestionWhere do I hydrate lime type 5?
 Community AnswerDolomitic Type S hydrated lime is called slaked lime, or quick lime. It's a major process to make. You can buy it at Tractor Supply, or at any farm store or garden center.
 -
QuestionCan I use lime juice?Community AnswerLime juice should NOT be used as a substitute. Please follow the recipe for best results.


References
- ↑ http://www.bobvila.com/articles/milk-paint-recipe/#.WALmrhNViko
- ↑ http://www.bobvila.com/articles/milk-paint-recipe/#.WALmrhNViko
- ↑ http://www.bobvila.com/articles/milk-paint-recipe/#.WALmrhNViko
- ↑ http://www.bobvila.com/articles/milk-paint-recipe/#.WALmrhNViko
- ↑ http://www.bobvila.com/articles/milk-paint-recipe/#.WALmrhNViko
- ↑ http://www.bobvila.com/articles/milk-paint-recipe/#.WALmrhNViko
- ↑ http://www.bobvila.com/articles/milk-paint-recipe/#.WALmrhNViko
- ↑ http://www.bobvila.com/articles/milk-paint-recipe/#.WALmrhNViko
- ↑ http://www.bobvila.com/articles/milk-paint-recipe/#.WALmrhNViko
- ↑ http://www.bobvila.com/articles/milk-paint-recipe/#.WALmrhNViko
- ↑ http://www.bobvila.com/articles/milk-paint-recipe/#.WALmrhNViko
- ↑ http://www.bobvila.com/articles/milk-paint-recipe/#.WALmrhNViko
- ↑ http://www.designsponge.com/2010/08/before-and-after-basics-aging-furniture-using-milk-paints.html
- ↑ https://www.realmilkpaint.com/help/resources/how-to-mix-your-own-paints/
- ↑ http://www.designsponge.com/2010/08/before-and-after-basics-aging-furniture-using-milk-paints.html
- ↑ http://www.designsponge.com/2010/08/before-and-after-basics-aging-furniture-using-milk-paints.html
- ↑ http://www.designsponge.com/2010/08/before-and-after-basics-aging-furniture-using-milk-paints.html
- ↑ http://www.designsponge.com/2010/08/before-and-after-basics-aging-furniture-using-milk-paints.html
- ↑ http://www.earthpigments.com/milk-paint-with-lime/
About This Article

To make milk paint, start by allowing 1 gallon of skim milk to come to room temperature, then mixing in 2 cups of white vinegar. After the milk has sat in a warm place for 2 days, strain the mixture through a colander lined with cheese cloth and set it aside. In a separate bowl, add pigment powder to 1/4 cup of water and let it soak for 5 minutes. Next, make a paste of lime powder and water and stir it into the milk curds. Finally, mix in the prepared pigment and strain the mixture through the cheesecloth one more time before you paint with it. For advice on how to use milk paint for projects, read on!