This article was co-authored by wikiHow staff writer, Nicole Levine, MFA. Nicole Levine is a Technology Writer and Editor for wikiHow. She has more than 20 years of experience creating technical documentation and leading support teams at major web hosting and software companies. Nicole also holds an MFA in Creative Writing from Portland State University and teaches composition, fiction-writing, and zine-making at various institutions.
This article has been viewed 302,666 times.
Learn more...
Are you seeing Java errors like "JAVA_HOME is not defined correctly?" or "JAVA_HOME is set to an invalid directory?" If you've recently installed the Java Development Kit (JDK) or the Java Runtime Environment (JRE), you'll need to set your JAVA_HOME variables and configure the path so applications know where to find Java. This wikiHow article will show you the easiest ways to change or set the Java home path on Windows, macOS, and Linux.
Things You Should Know
- Before you can set JAVA_HOME, you'll need the full path to your JDK or JRE installation.
- Once you set the JAVA_HOME environment variable, you can run the command
echo $JAVA_HOMEto see the new path. - To set the Java home and path on Linux or macOS permanently (even after a reboot), add the environment variables to your .bashrc or .zshrc file.
Steps
Windows
-
1Find your Java installation directory. Assuming that you didn't change the path for the JDK or JRE during installation is not changed, it should be in a directory under C:\Program Files\Java. There are a few ways to find the full path:
- Open File Explorer, click This PC in the left panel, then navigate to C:\Program Files\Java. The directory you're looking for should have the name of the JDK version, such as C:\Program Files\Java\jdk-19.
- If you installed the JRE instead of the JDK, you'll have something like C:\Program Files\Java\jre1.8.0_351 instead.
- You can also open the command prompt and run the command wmic product where "Name like '%%Java%%'" get installlocation,Name. This will tell you the full path of the JDK, even if you haven't yet set JAVA_HOME.
-
2Open your Advanced System Settings. Here's how:
- Press the Windows key on your keyboard and type advanced system.
- Click View advanced system settings in the search results.
Advertisement -
3Click the Environment Variables button. You'll see it at the bottom-right corner of the System Properties window.
-
4Click the New… button under "User variables." You'll have two sections on this window—"User variables" and "System variables." You'll want to make sure you're clicking New under the first box (User variables).
- If you have multiple installations of the JDK and want to change JAVA_HOME to your new installation, select the current JAVA_HOME user variable and click Edit… instead.
-
5Type JAVA_HOME as the "Variable name."
- If you're editing the current JAVA_HOME path, you'll already have JAVA_HOME here. So, you can skip this step.
-
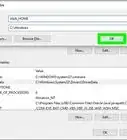
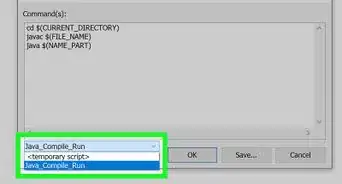
6Enter the full path to your JDK or JRE installation. For example, if the path is C:\Program Files\Java\jdk-19, enter that full path into the "Variable value" field.[1]
- If you're adding a second path to JAVA_HOME, just type a semicolon (;) after the first path, then enter the second path.
- If you're replacing an old JAVA_HOME path, just delete the current path and enter the new one.
-
7Click OK. This takes you back to the Environment Variables window.
-
8Select the Path user variable and click Edit. You should already have a variable in the "User variables" section called "Path." To make sure you can run the Java binaries, you'll need to edit your path to add the location of the JDK bin directory.
- If you want other users on this PC to be able to access Java binaries from the command line, repeat this step for the "Path" variable under "System variables" as well.
-
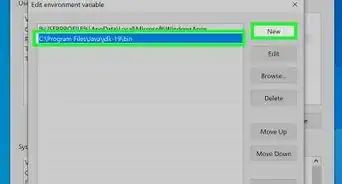
9Append the path to your Java /bin directory to the end of the path. You'll already have at least one directory in your path, which needs to stay in place. Here's how to add the Java bin directory:
- Click the New button at the top.
- Enter the full path to the JRE or JDK with \bin at the end. For example, C:\Program Files\Java\jdk-19\bin or C:\Program Files\Java\jre1.8.0_351\bin.
- Click OK.
-
10Click OK on all subsequent windows. This updates your JAVA_HOME variable and adds the Java binaries to your path.
- You won't need to restart your computer for the changes to take effect, but you will need to relaunch any apps that were trying to access Java.
- Open a new command prompt window and run the command echo %JAVA_HOME% to display the new path to JAVA_HOME.
- Make sure this is a new command prompt window. If you still have the same window open, the command will fail because it doesn't have the new environment variables.


macOS
-
1Open a Terminal window. To open Terminal, search for Terminal in Spotlight. Or, you can open Finder, click the Go menu, select Utilities, and choose the Terminal app.
-
2Type /usr/libexec/java_home and press ⏎ Return. This handy utility that comes preinstalled on macOS will tell you the full path to your Java installation, which you'll need to set JAVA_HOME.
- If you have more than one Java installation and want to see the paths to all of them, use /usr/libexec/java_home -V instead.
-
3Copy the path and paste it somewhere handy. Highlight the path to the Java installation you want to use as JAVA_HOME, press Cmd + V to copy it, then paste it into a sticky note or text file.
-
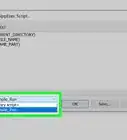
4Open your .zshrc file in a text editor. As long as you're using macOS Catalina or later, you'll be using the zsh shell by default, which means you'll add JAVA_HOME and the path to your .zshrc file.[2] If you're using an earlier version of macOS (or prefer the bash shell), replace .zshrc with .bashrc in these commands instead. Here's the easiest way to open the file:
- Type cd ~ and press Return.
- Type open .zshrc and press Return. This should open the file in a text editor.
- If the file is not found, type echo > .zshrc and press Return. Then, run open .zshrc again.
-
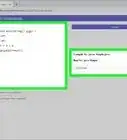
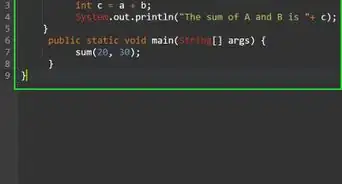
5Add these lines to the bottom of the file. Adding these lines ensures that JAVA_HOME will be set correctly even after you log off or open another window. If the file has existing contents, just scroll down past them to enter the following text on individual lines:
-
export JAVA_HOME=/Library/Java/JavaVirtualMachines/jdk-17.0.1.jdk/Contents/Home- Replace
/Library/Java/JavaVirtualMachines/jdk-17.0.1.jdk/Contents/Homewith the full path to the /Contents/Home directory of your Java installation if it's different.
- Replace
export PATH=$JAVA_HOME/bin:$PATH- Save the file and exit the text editor when you're finished.
-
-
6Type source .zshrc and press ⏎ Return. Once you've edited your profile, this command ensures that your environment variables will be updated for the current terminal window (and any other windows you open from now on).
-
7Type echo $JAVA_HOME and press ⏎ Return to confirm JAVA_HOME. You should now see the full path to JAVA_HOME.
- If you had any other windows open that were attempting to find Java binaries, close and reopen them.
- Shopping for PC accessories or office supplies? Check out our coupon site for Staples discounts or our coupon site for Office Depot.


Linux
-
1Open a terminal window. If you're logged in to your desktop environment, you can press Ctrl + Alt + T to launch a terminal window.
- This method will work in just about any version of Linux, including Ubuntu and Redhat.
-
2Find the location of your Java installation. One way you might find the Java install location is to run the which javac command, but this will only give you a symbolic link. Instead, run this command to find the location of the executable file:
- readlink -f `which javac`
- If that doesn't work, try running update-alternatives --list java.
- If neither of these commands works, run whereis java, which will usually result in a symbolic link like /usr/bin/java.
- Once you get the directory, find out where it links using ls -la /bin/java.
- If that points you to another directory, e.g., /etc/alternatives/java, run ls -la /etc/alternatives/java.
- At that point, you should see a much longer directory, which is actually the home to the Java binaries. For example, usr/lib/jvm/java-11-openjdk-arm64/bin/java. This is the directory you want.
-
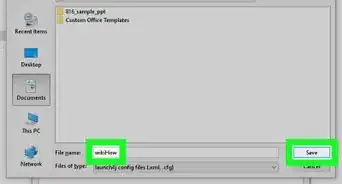
3Set the JAVA_HOME path. Now that you have the location of Java, you can add the path to your .bashrc file (if you're using the bash shell), .zshrc (for the zsh shell), or the equivalent for your shell.[3] Run both of the following commands, replacing the path with the path to your JDK or JRE installation, and "bashrc" with your shell's login script:
echo "export JAVA_HOME=/usr/lib/jvm/java-11-openjdk-arm64" >> ~/.bashrcecho "export PATH=$PATH:$JAVA_HOME/bin" >> ~/.bashrc
-
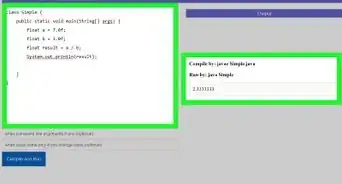
4Type source .bashrc to apply the changes to the current terminal window. Though you've already set the home for Java and added the path to its binaries permanently, the changes won't take effect in your current terminal window until you run this command.
- At this point, you can run echo $JAVA_HOME to see the location of Java on your system.


-Step-42.webp)


References
About This Article