This article was co-authored by wikiHow staff writer, Jack Lloyd. Jack Lloyd is a Technology Writer and Editor for wikiHow. He has over two years of experience writing and editing technology-related articles. He is technology enthusiast and an English teacher.
The wikiHow Tech Team also followed the article's instructions and verified that they work.
This article has been viewed 1,301,881 times.
Learn more...
This wikiHow teaches you how to install Ubuntu Linux on your Windows or Mac computer without erasing your current operating system.
Things You Should Know
- You can create Ubuntu installation media on a writable DVD or a USB flash drive.
- When you install Ubuntu alongside your current operating system, you can choose which operating system to use at boot time.
- If you're installing Ubuntu on a PC, you may need to change the boot device order in the BIOS to successfully boot from the installation media.
Steps
Getting Ready
-
1Make sure that your computer can run Linux. Your computer must meet the following system requirements:[1]
- 2 GHz dual core processor
- 2 gigabytes of RAM (system memory)
- 25 gigabytes of hard drive space
- A DVD drive or USB port on your computer, you'll first need to create an installer by placing the Ubuntu ISO file on a disc or flash drive.
- If you use a DVD, a standard 4.5GB disc will be plenty.
- If you choose to use a flash drive, make sure it is at least 2GB.
-
2Download the Ubuntu Linux ISO file. To do so:
- Go to https://www.ubuntu.com/download/desktop
- Scroll down and click Download to the right of your preferred version, the latest LTS release is 20.04.1.
- Scroll down and click the Not now, take me to the download link.
- Wait for the download to start or click the download now link.
Advertisement -
3Burn the ISO file onto a DVD. You can also use a flash drive, but you'll need to format it for either FAT32 (Windows) or MS-DOS (FAT) (Mac) and then use UNetBootin or Rufus (recommended) to make the flash drive recognizable by your computer's operating system.
-
4Partition your computer's hard drive. Creating a partition sections off a determined part of your hard drive, allowing that part to function as a separate hard drive. This is what you'll install Linux onto, so your partition will need to be at least five gigabytes in size.
- The Ubuntu support page recommends at least 25 gigabytes of free space.
-
5Make sure that your installer is inserted. Your DVD or flash drive should be inserted into or attached to your computer. Once you're certain that the installer is connected and you've performed the rest of the steps in this section, you can proceed to installing Ubuntu Linux on your Windows or Mac computer.
Installing on Windows
-
1
-
2
-
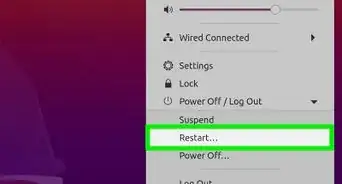
3Click Restart. It's in the Power pop-up menu. Doing so will restart your computer (hold "Shift" key when clicking to disable safe boot).
-
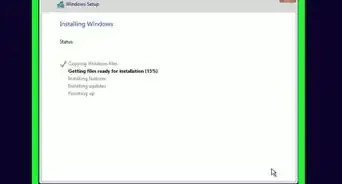
4Wait for the Linux installation window to appear. Once your computer finishes restarting and you're back at the desktop, you should see the installation window appear. This will usually happen within a few minutes.
- Depending on your security settings, you may need to log into your computer before the desktop appears.
- If you're using a USB flash drive and the Linux installation window doesn't appear, restart your computer and open the BIOS, then find the "Boot Order" section, select the USB drive option (usually Removable Devices) with the arrow keys, and press the + button to move the USB flash drive to the top.
-
5Select a language, then click Continue. Click the language that you want to use for Ubuntu, then click Continue in the bottom-right corner.
-
6Click Install Ubuntu. It's on the right side of the window.
-
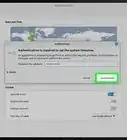
7Check both boxes on the "Preparing to install Ubuntu" page. Check the "Download updates while installing Ubuntu" box and the "Install third-party software for graphics..." box.[2]
-
8Click Continue. It's in the bottom-right corner of the window.
-
9Check the "Erase disk and install Ubuntu" box. This option is at the top of the window.
-
10Click Install Now. It's in the bottom-right corner.
-
11Click Continue when prompted. Doing so will begin the Ubuntu installation process.
-
12Select a region, then click Continue. Click a time zone block on the world map to select a region.
-
13Select a keyboard layout, then click Continue. To do this, click a language on the left side of the window, then click a version of the language (e.g., US) on the right side.
-
14Enter your user information. Fill out the following fields:
- Your name - Your first and last name.
- Your computer's name - The name that you want your computer to use. Make sure that this isn't too complicated.
- Pick a username - Type in a username that you'd like to use for your Ubuntu profile.
- Choose a password - Enter a password. This is what you'll use to sign into your computer.
- Confirm your password - Re-enter the password.
-
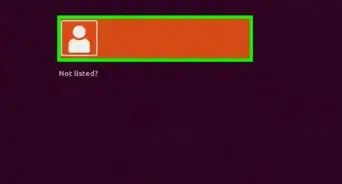
15Select a login option. Check either "Log in automatically" or "Require my password to log in" in the middle of the page.
-
16Click Continue.
-
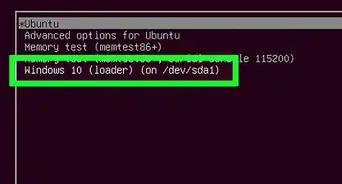
17Click Restart Now when prompted. Doing so will bring up a screen on which you can select your preferred operating system (e.g., Ubuntu or Windows).
-
18Select Ubuntu and press ↵ Enter. This will boot your computer into Ubuntu Linux rather than opening Windows again. You now have Linux installed on your Windows computer.


Installing on Mac
-
1
-
2Click Restart…. It's near the bottom of the drop-down menu.
-
3Click Restart Now when prompted. Doing so will prompt your Mac to begin restarting.
-
4Immediately hold down the ⌥ Option key. Do this right after clicking Restart Now. You'll need to continue doing this until instructed otherwise.
- If you're booting from a DVD, don't do this. Instead, skip to the "Wait for the Linux installer window to appear" step.
-
5Release the ⌥ Option key when the boot manager window appears. Once you see a window with different hard drive options appear, you can release the ⌥ Option key.
-
6Select your flash drive's name and press ⏎ Return. Use the arrow keys to select it. Doing so will start your computer from the flash drive.
-
7Wait for the Linux installer window to appear. If you're booting from a DVD, this may take a few minutes.
-
8Select Install Ubuntu and press ⏎ Return. This will open the Ubuntu installer program.
-
9Select a language, then click Continue. Click the language that you want to use for Ubuntu, then click Continue in the bottom-right corner.
-
10Click Install Ubuntu. It's on the right side of the window.
-
11Check both boxes on the "Preparing to install Ubuntu" page. Check the "Download updates while installing Ubuntu" box and the "Install third-party software for graphics..." box.[3]
-
12Click Continue. It's in the bottom-right corner of the window.
-
13Check the "Install Ubuntu alongside Mac" box. You'll find this at the top of the window.
-
14Click Install Now. It's in the bottom-right corner.
-
15Click Continue when prompted. Doing so will begin the Ubuntu installation process.
-
16Select a region, then click Continue. Click a time zone block on the world map to select a region.
-
17Select a keyboard layout, then click Continue. To do this, click a language on the left side of the window, then click a version of the language (e.g., US) on the right side.
-
18Enter your user information. Fill out the following fields:
- Your name - Your first and last name.
- Your computer's name - The name that you want your computer to use. Make sure that this isn't too complicated.
- Pick a username - Type in a username that you'd like to use for your Ubuntu profile.
- Choose a password - Enter a password. This is what you'll use to sign into your computer.
- Confirm your password - Re-enter the password.
-
19Select a login option. Check either "Log in automatically" or "Require my password to log in" in the middle of the page.
-
20Click Continue.
-
21Click Restart Now when prompted. Doing so will bring up a screen on which you can select your preferred operating system (e.g., Ubuntu or Windows).
-
22Select Ubuntu and press ↵ Enter. Only do this if prompted. Your computer will boot into Ubuntu rather than MacOS, signifying that you have successfully installed Ubuntu Linux on your Mac.


Community Q&A
-
QuestionCan I use Ubuntu if I'm not tech savvy?
 Community AnswerYes. Ubuntu is intended to be used by anyone.
 -
QuestionWill I still be able to view .pdf files with Ubuntu?
 Joseph CosciaCommunity AnswerYes. Ubuntu comes with a PDF reader called Evince.
 -
QuestionIs it possible to burn on a pen drive?
 Community AnswerYes! Try UNetbootin or Rufus to create a live USB.
Warnings
- Even though Linux has a reputation for being incredibly safe, make sure to apply security updates and patches when they become available.⧼thumbs_response⧽
- If you ever find someone telling you to enter a command along the lines of sudo rm -rf / —no-preserve-root, this is a trick and will brick your Linux installation.⧼thumbs_response⧽


References
About This Article
To install Ubuntu Linux on a Windows computer, you'll need to create an installation key by downloading the Ubuntu installation file and burning it to a USB drive, after which point you can reboot your computer into the BIOS and select the USB drive to boot from it. You'll then follow the Ubuntu installation instructions. To add Ubuntu to a Mac, you'll use the Ubuntu installation file and your Mac's Bootcamp utility.