This article was written by Stan Kats and by wikiHow staff writer, Nicole Levine, MFA. Stan Kats is the COO and Chief Technologist for The STG IT Consulting Group in West Hollywood, California. Stan provides comprehensive technology & cybersecurity solutions to businesses through managed IT services, and for individuals through his consumer service business, Stan's Tech Garage. Stan has over 7 years of cybersecurity experience, holding senior positions in information security at General Motors, AIG, and Aramark over his career. Stan received a BA in International Relations from The University of Southern California.
There are 12 references cited in this article, which can be found at the bottom of the page.
This article has been viewed 221,404 times.
If you're the administrator of a local network, enabling file sharing will ensure that your users always have access to important files. You'll always able to control which folders are shared and what level of access to give your users. As long as the computer hosting the shared folder is connected to the local network, the shared folder will be accessible to all who need it.
Steps
Windows 10
-
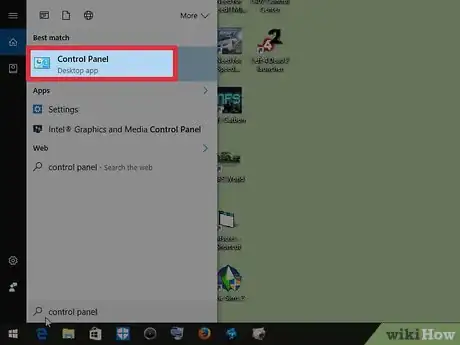
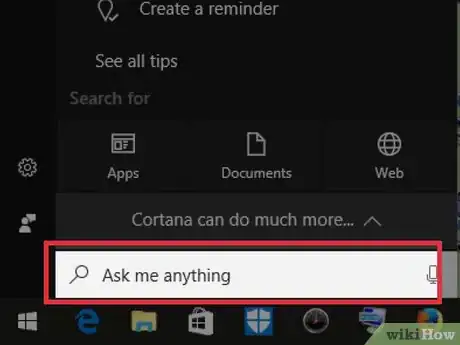
1Press ⊞ Win+S to launch Windows Search. You can share any folder on your Windows 10 system with other users on your local network. When you press this key combination, a search box will appear.
-
2Type “Control Panel” and press ↵ Enter. Now you'll see the Control Panel.Advertisement
-
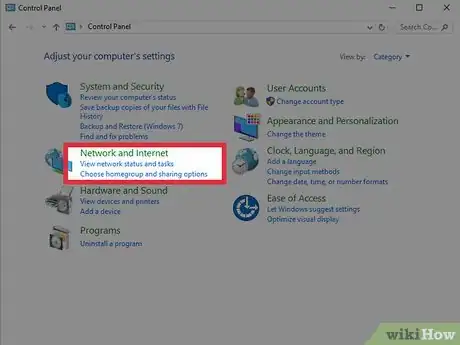
3Click the “View network status and tasks” link. This link appears just beneath the “Network and Internet” header in the main pane.[1]
-
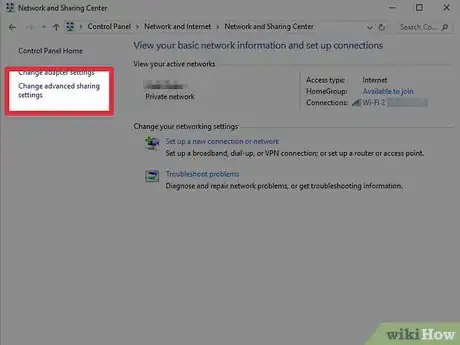
4Click “Change advanced settings.” Now you'll see options for File and Printer sharing.
-
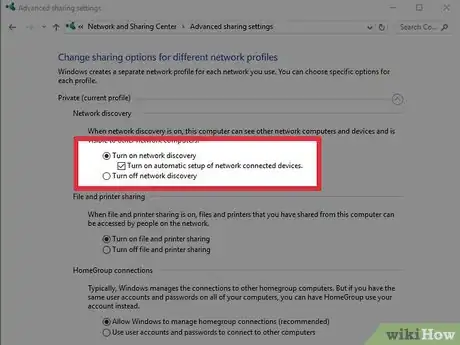
5Select “Turn on file and printer sharing” and click “Save Changes.” If you are prompted to enter your Administrator password to save the changes, do so. Note: Screenshot shows "Turn on network discovery", it should have been File and printer sharing [2]
-
6Press ⊞ Win+S to launch Windows Search. Now that File Sharing is enabled, you can share a folder on your system.
-
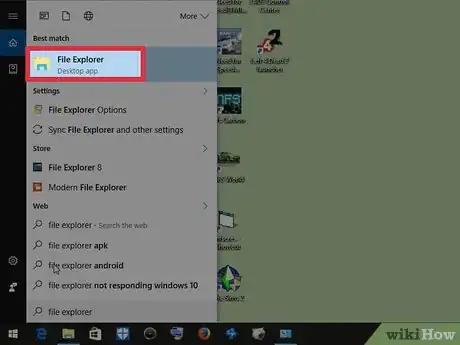
7Type “File Explorer” and press ↵ Enter. The File Explorer will open on your desktop.
-
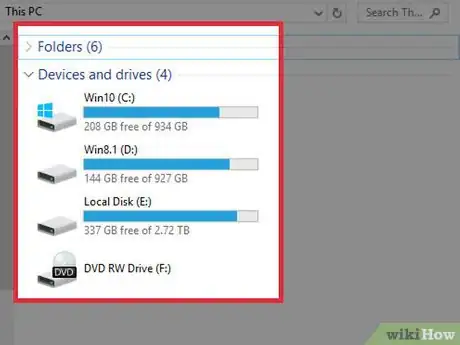
8Navigate to the folder you want to share. You'll need to select a folder to share rather than an individual file. Use the navigation pane on the left side of Explorer to browse for the folder.
-
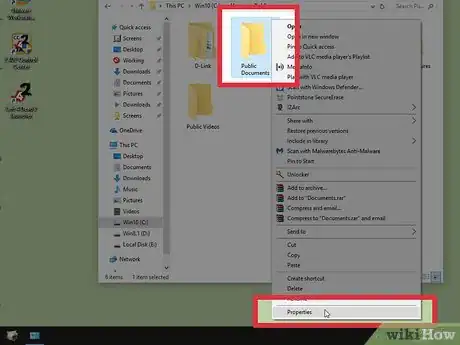
9Right-click the folder and select “Properties.” A Properties panel for this folder will appear on the screen.[3]
-
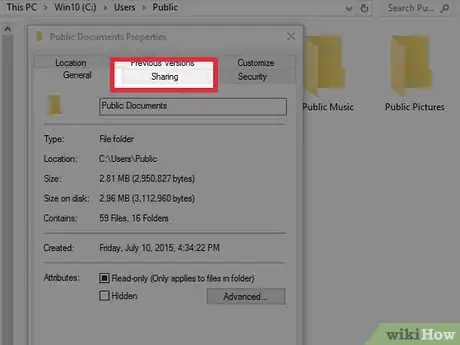
10Click to the “Sharing” tab. Since the folder is not yet shared, you'll see “Not Shared” just below its name under “Network File and Folder Sharing.”
-
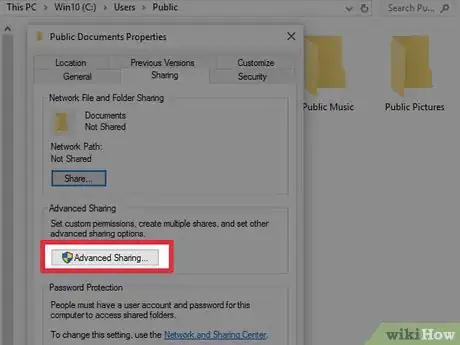
11Click the “Advanced Sharing” button. The contents of this window are mostly grayed-out.
-
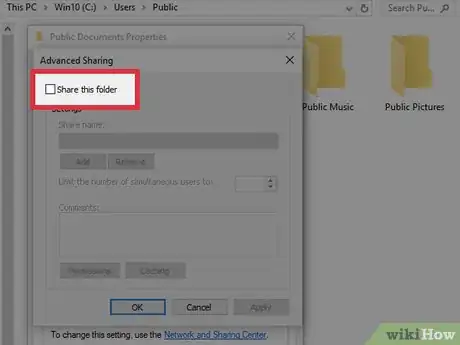
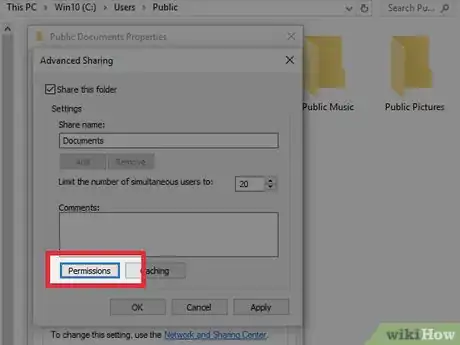
12Place a check next to “Share this folder.” The previously grayed-out contents are now editable.
-
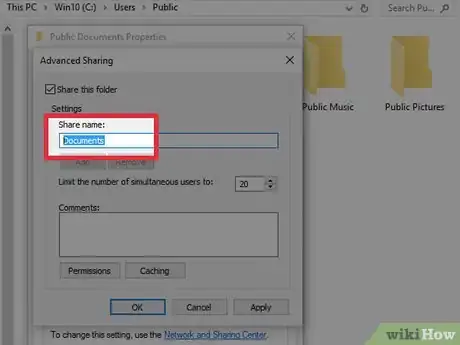
13Type a name for the shared folder under “Shared Name.” The name you type here is what other users will see when they access the folder.
-
14Click the “Permissions” button. Now you'll set the permissions for all users on the network who will access the folder.[4]
-
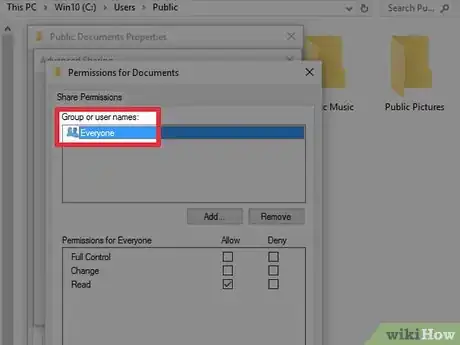
15Click to highlight the “Everyone” group. When this group is selected, you'll be able to change everyone on the network's permissions for this folder at once.
- If you'd rather just share the folder with one person, click “Add” and then select the person's username from the list. Then, click to select that user.
-
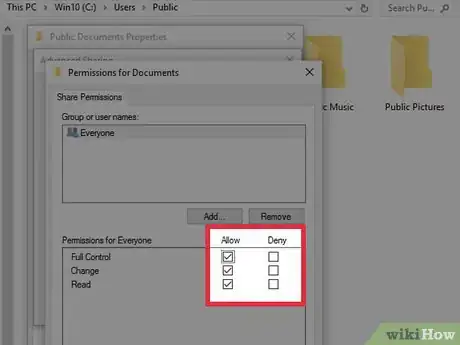
16Set the permissions for the user(s) you selected. Place checks next to “Allow” or “Deny” for each of the following options:
- Full Control: Allows everyone to read, delete, and edit files in this folder. This also grants this user the ability to change permissions on the folder.
- Change: Allows everyone to read, delete, and edit files in the folder but not change permissions.
- Read: Allows everyone to view files in the folder and run programs. Users cannot change files in the folder if this is the only option allowed.
-
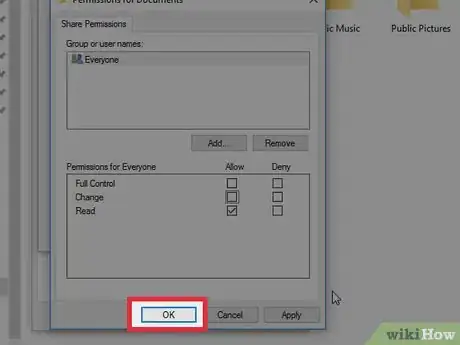
17Click “OK” to save your changes. The folder is now shared.
Windows 8.1
-
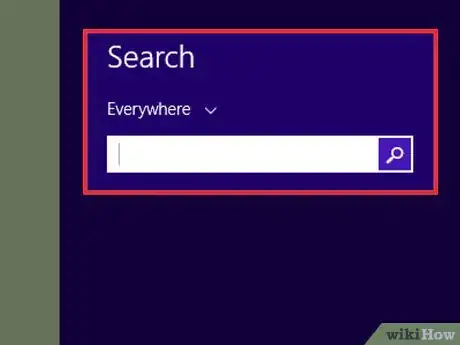
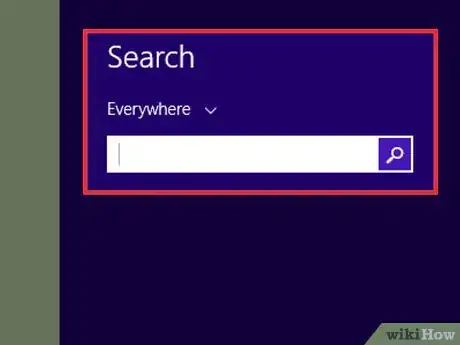
1Press ⊞ Win+S to launch Windows Search. Before you can share files from your Windows 8.1 computer with the rest of your local network, you'll need to make the computer “discoverable.”[5]
-
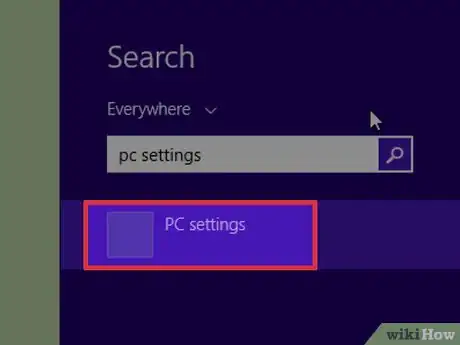
2Type “PC Settings” and press ↵ Enter. The PC Settings screen will appear.
-
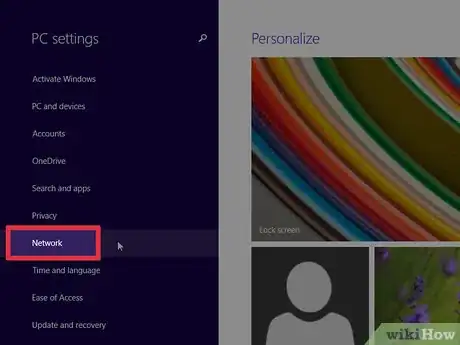
3Click the “Network” link. A list of networks will appear in the right panel.
-
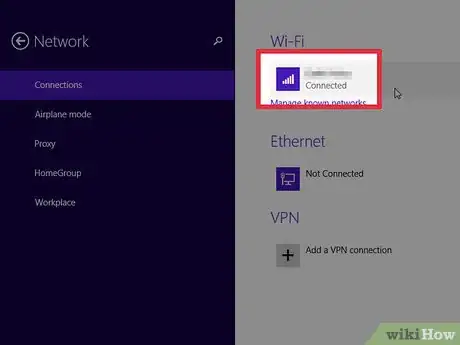
4Click the name of the network you're connected to. If you see more than one network listed, use the one that says “connected” beneath its name.[6]
-
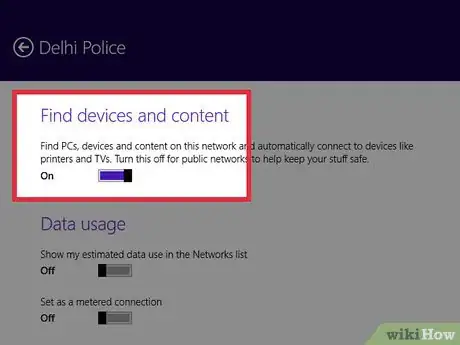
5Flip the “Find Devices and Content” switch to On. Once you do this, the computer will be discoverable on the network, which means that other users on the network will be able to find the folder(s) you share.
-
6Press ⊞ Win+S to launch Windows Search. Now you'll get ready to share your first folder.
-
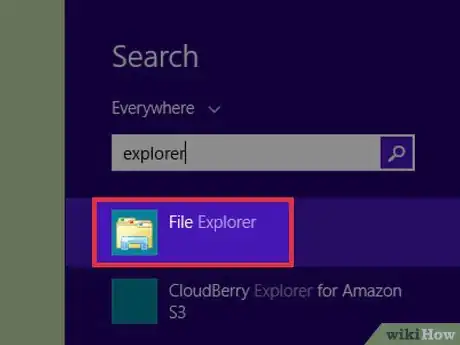
7Type “Explorer” and press ↵ Enter. This will launch the Windows File Explorer.
-
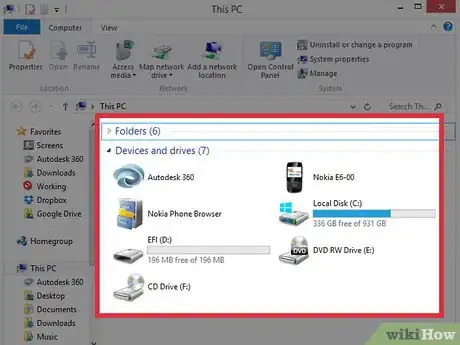
8Navigate to a folder you want to share. Use the sidebar on the left to navigate your folder structure until you find the folder you want to share with other users on the network.[7]
-
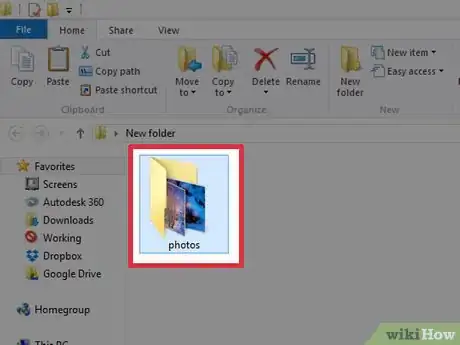
9Click to highlight the folder you want to share. Don't double-click—just click once.
-
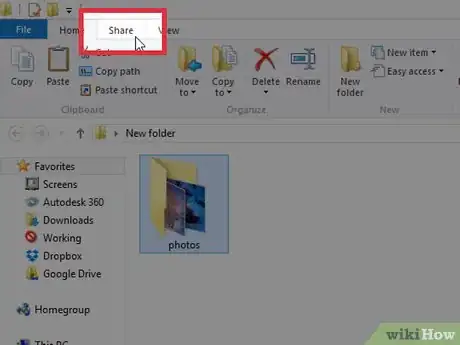
10Click to the “Share” tab at the top of the Explorer. Some sharing options will appear at the top of this tab.
-
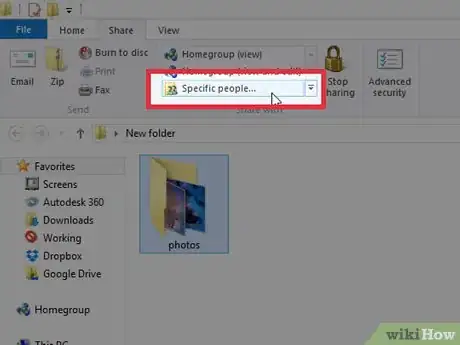
11Click “Specific People…” in the “Share With” area. The “File Sharing” dialog will appear.
-
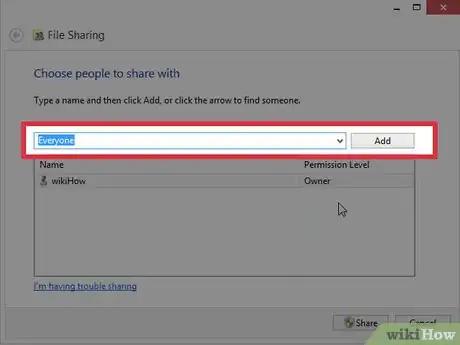
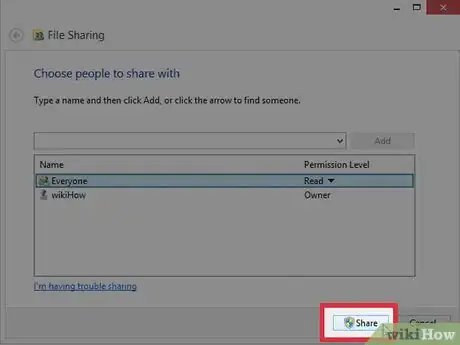
12Type “Everyone” into the box and click “Add.” This allows everyone on the network access to this folder. You'll be able to define which type of access they have in just a moment.
-
13Click “Share” to share the folder. The folder is now shared with members of the network. To see your files, they can open the File Explorer and click the “Network” icon.
-
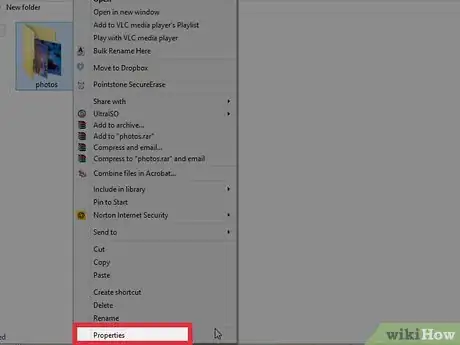
14Right-click on the shared folder and select “Properties.” Now you'll decide the type of access that “Everyone” has. The Folder Properties screen will appear.[8]
-
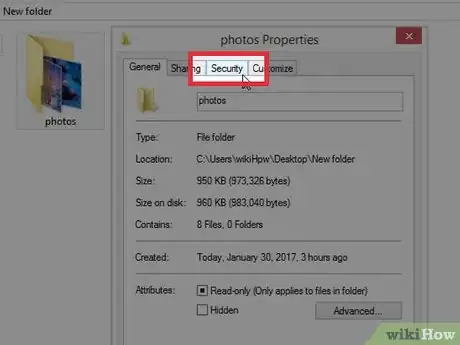
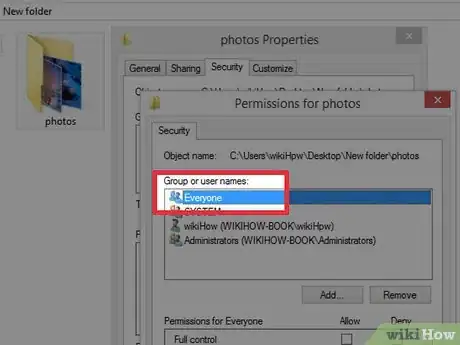
15Click to the “Security” tab. This dialog shows all the security settings for the folder.
-
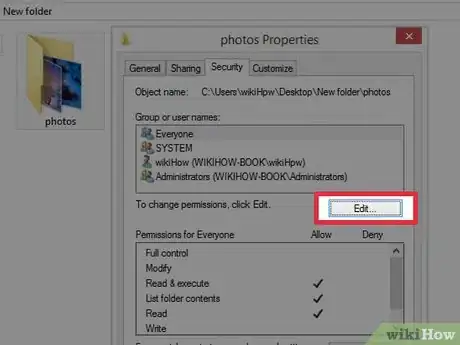
16Click the “Edit” button. This will open the “Permissions for [folder]” screen.[9]
-
17Select “Everyone” from the “Group or user names” list. If you don't see “Everyone” listed:
- Click “Add.”
- Type “Everyone” into the blank.
- Click “Add.”
-
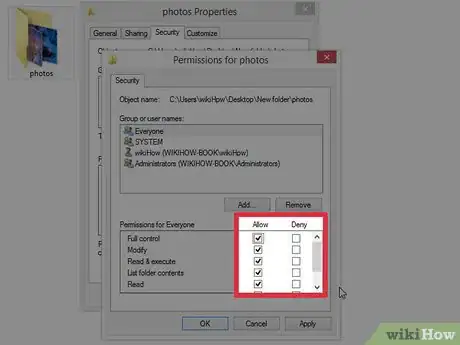
18Set the permissions for the user(s) you selected. Under “Permissions for (Everyone)”, decide what sort of access you'd like to provide:
- Full Control: Allows everyone to read, delete, and edit files in this folder. This also grants this user the ability to change permissions on the folder.
- Change: Allows everyone to read, delete, and edit files in the folder but not change permissions.
- Read and execute: Allows everyone to view files in the folder and run programs. Users cannot modify files in the folder if this is the only option selected.
- List folder contents: Allows users to see a list of files in the folder.
-
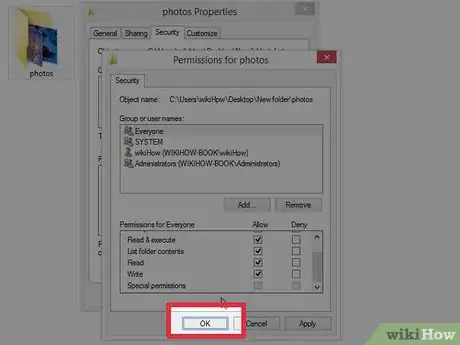
19Click “OK” to save your permissions. The files are now accessible by users connected to your network.
macOS
-
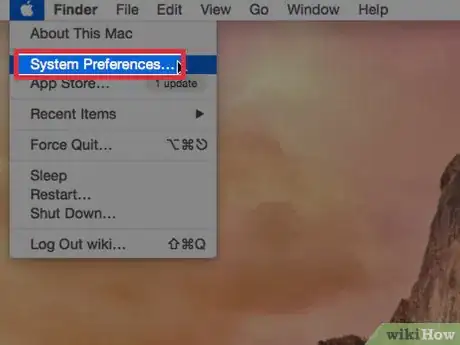
1Open the Apple menu and select “System Preferences.” You can share files from your macOS system with other users on your local network (even if they are using Windows). The first thing you'll need to do is enable File Sharing.
- You'll need to have a local network already set up to use this method.
-
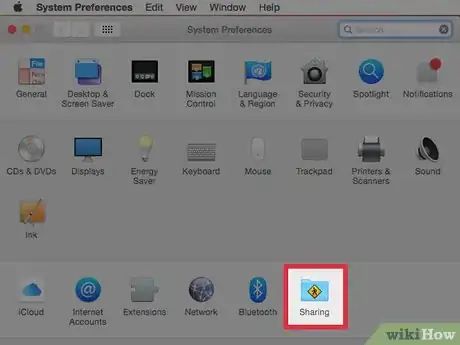
2Click to the “Sharing” pane. This is where you can change sharing options and security permissions for users on your system.[10]
-
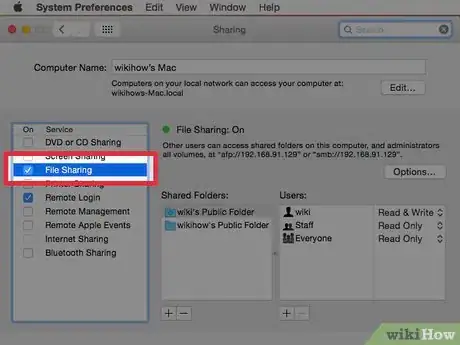
3Place a check in the box next to “File Sharing.” When this box is checked, you'll see “File Sharing: On” on the main pane.[11]
-
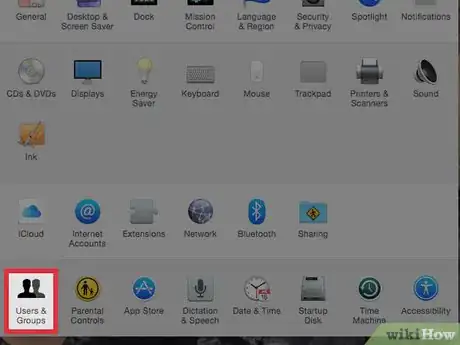
4Return to System Preferences and select “Users & Groups.” If you want to be able to share a folder with Windows users on your network, you'll need to create a special account for them.[12]
-
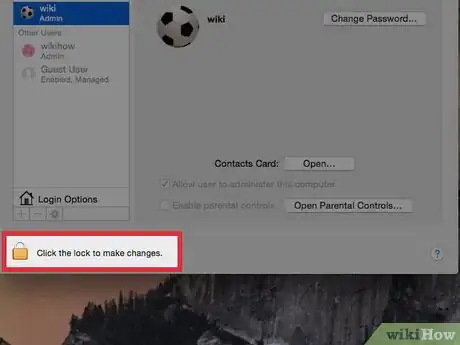
5Click the padlock to log in as an Administrator. This will give you permission to add a new account to the system.
-
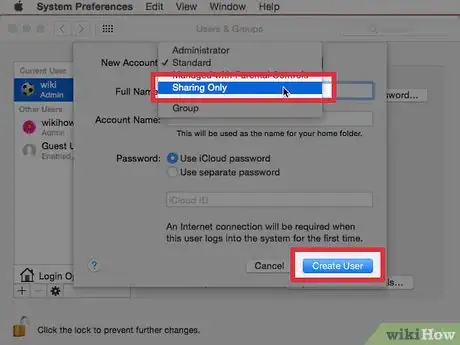
6Create the new user account. Here's how to configure the account so it's used only for sharing:
- Click the “+” to add a new account.
- Select “Sharing Only” from the “New Account” menu.
- Select “Use separate password” rather than the cloud option.
- Enter a username and password for the account.
- Click “Create User.” When Windows users access the shared folder, they'll need to use this username and password to log in.
-
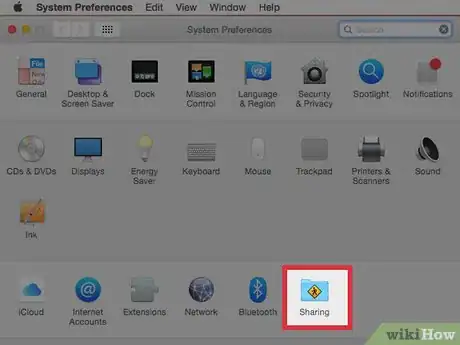
7Return to System Preferences and select “Sharing.” Now you'll decide which folders to share.
-
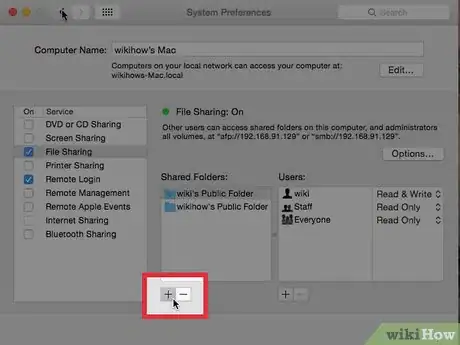
8Click on the (+) icon below "Shared Folders." A navigation window will appear.[13]
-
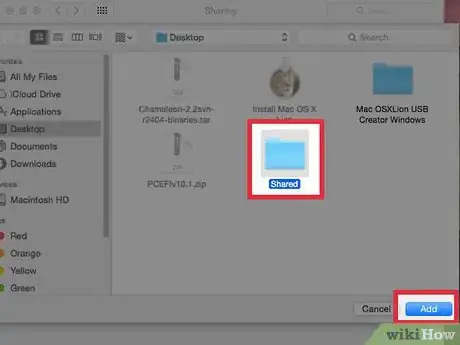
9Select a folder you want to share and click “Add.” The folder name will now appear under “Shared Folders.”
-
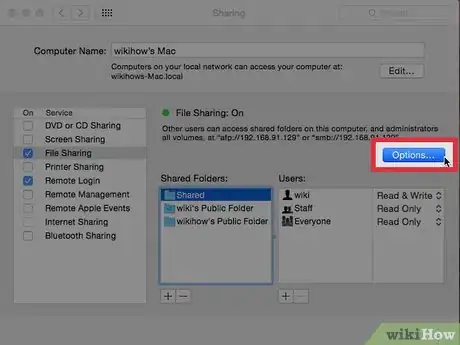
10Select the shared folder and click the “Options…” button. Here you'll see options for file sharing protocols.
-
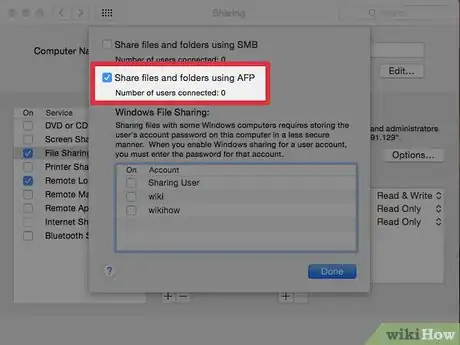
11Check “Share files using AFP.” This tells your Mac to share files with AFP (Apple Filing Protocol).
-
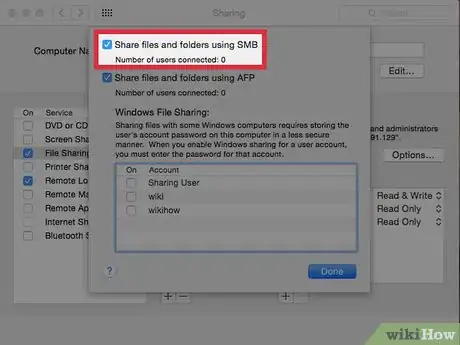
12Check “Share files using SMB” if you want to share with Windows computers. If you will never need to share with a Windows computer on your network, you can skip this step.
-
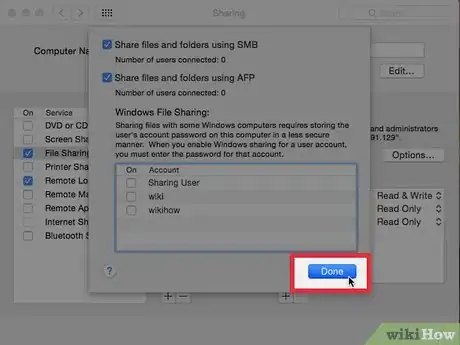
13Click “Done.” Now you'll return to the Sharing screen.
-
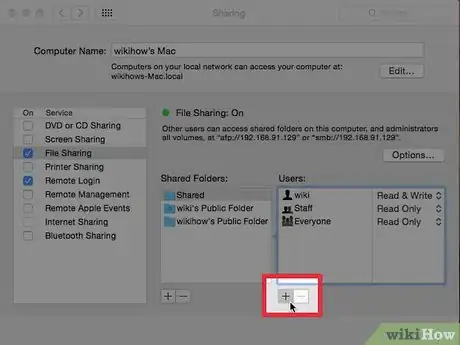
14Click the “+” beneath the “Users” box. A list of user accounts and groups will appear.
-
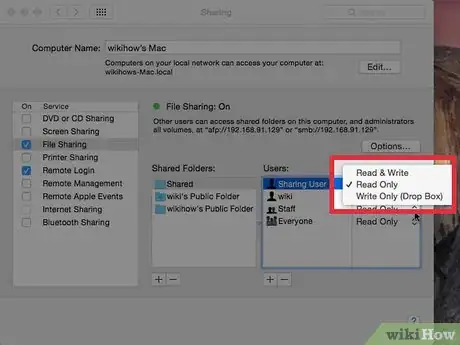
15Set permissions for your special Windows user account. Select the user account you just created, and then select either “Read,” “Read and Write,” or “Write” from the list on the right.
- Choose “Read & Write” if you want the Windows users to be able to read, edit, and delete items in this folder.[14]
- Choose “Write” if you want users to be able to use this folder as a “drop box” but not be able to edit or delete files.
- Alternatively, you can leave this on “Read” so nobody else can modify the folder.
-
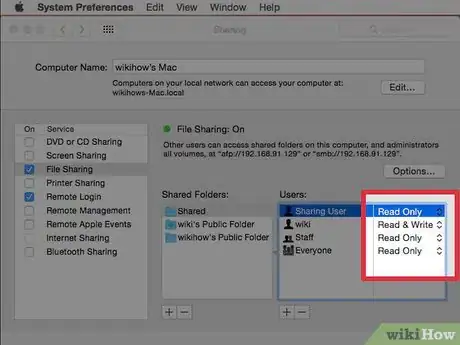
16Set the permissions for everyone else on the network. By default, all users on the network (the “Everyone” group) have Read access. This means they can view files in the shared folder but not make changes. To change this:
- Click to select “Everyone” in the Users list.
- Choose “Read & Write” from the right panel if you want users on the network to view, edit, and delete files in this folder.
- Select “Write” to use this folder as a “drop box,” so that people can copy files there but not view or modify anything.
- Alternatively, you can leave this on “Read” so nobody else can modify the folder.
-
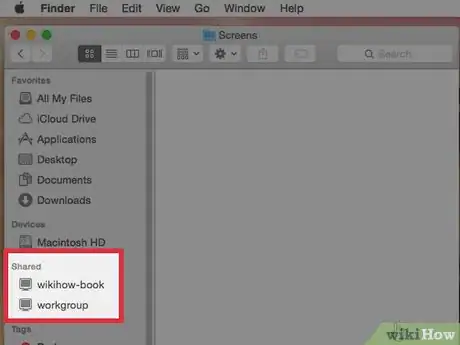
17Access the shared folder from another Mac on the network. Now that the folder is shared, any user on your network should be able to locate it in Finder beneath “Shared.”[15]
- If the folder does not appear under “Shared,” browse the network by double-clicking “All…” and the folders should appear.
-
18Locate the sharing address for Windows users. If you enabled SMB for Windows users, here's how to locate the address to which they'll connect:[16]
- Open System Preferences
- Open the Sharing pane.
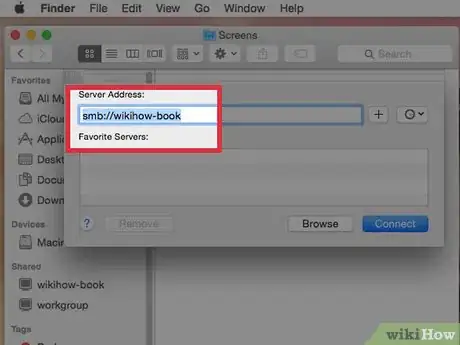
- Make note of the IP address that starts with “smb” (e.g. smb://172.1.1.1).
- Windows users will connect to this address and log in with the account you created earlier. They'll be able to view any files shared with that user upon a successful login.
Windows 7
-
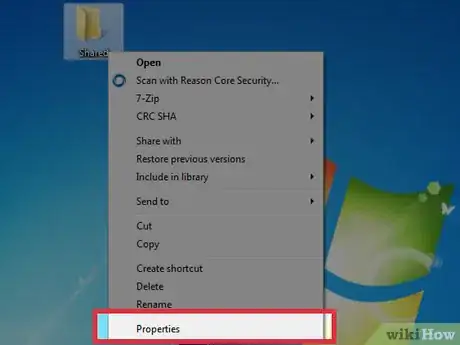
1Right-click a folder to share and select “Properties.” The System Properties panel will open.
-
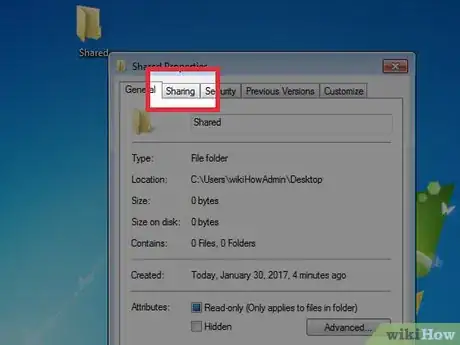
2Click to the “Sharing” tab. Now you'll see “Network File and Folder Sharing” and “Advanced Sharing.”
-
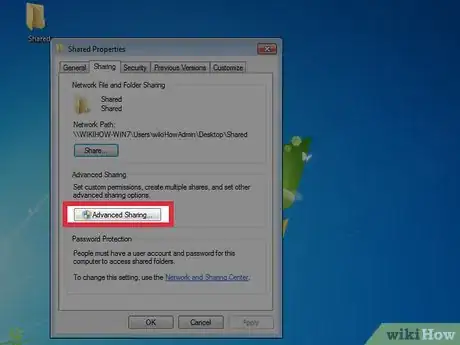
3Click the “Advanced Sharing…” button. This will open the Advanced Sharing properties panel.
-
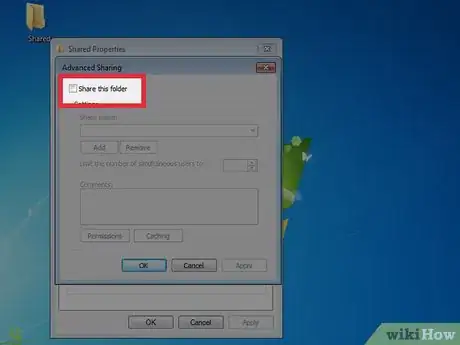
4Place a check next to “Share this folder.” Now you'll be able to set sharing parameters for this folder.
-
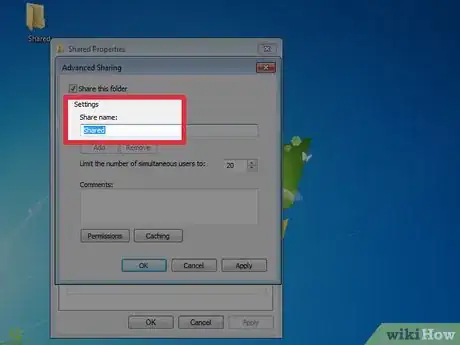
5Type a name for the folder in the “Share Name” field. When the folder is shared on the network, this is the name others will see.
-
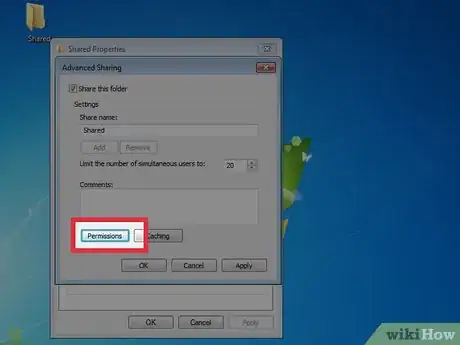
6Click “Permissions.” Now you'll be able to decide who gets to see or modify the folder.
-
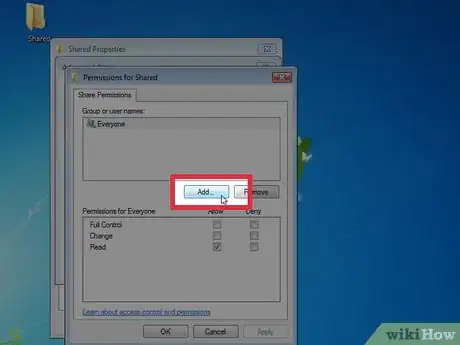
7Click “Add” and select a user with whom you want to share the folder. If you want to share the folder with everyone one your Windows network, select “Everyone.” This is common for basic file sharing on a local network.
-
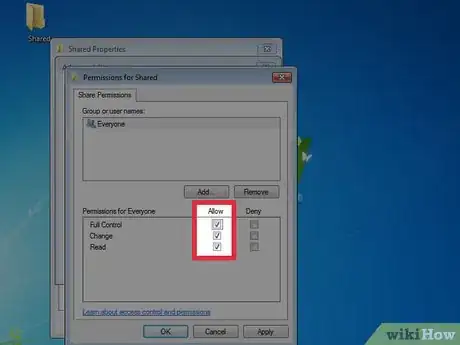
8Set the permissions for the user(s) you selected. Under “Permissions for (Everyone)”, set the permissions:
- Full Control: Allows everyone to read, delete, and edit files in this folder. This also grants this user the ability to change permissions on the folder.
- Change: Allows everyone to read, delete, and edit files in the folder but not change permissions.
- Read: Allows everyone to read all files in the folder but not make changes.
-
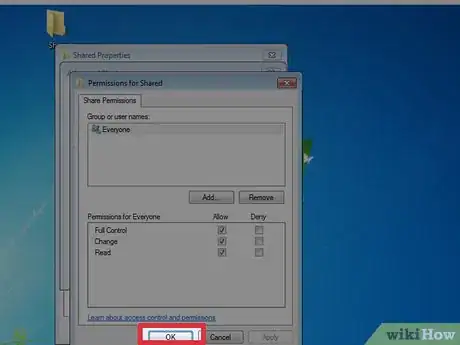
9Click “OK.” Now you'll need to make some quick modifications to the Everyone user group.
-
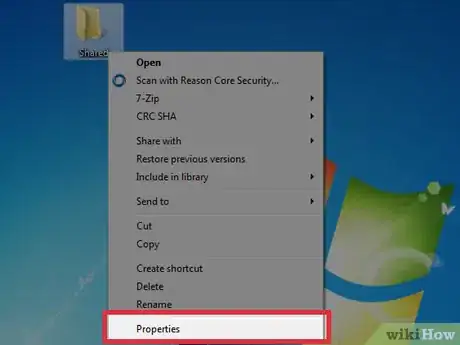
10Right-click the folder to share and select “Properties.” This should be the same folder you just shared.
-
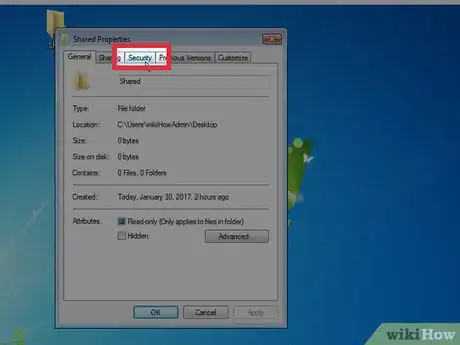
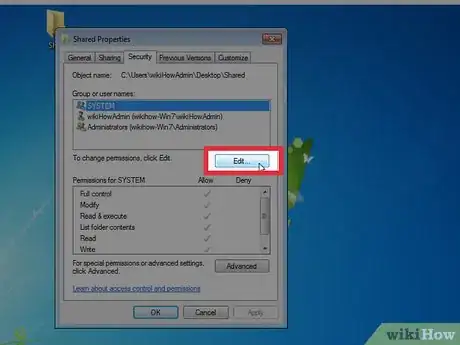
11Click to the “Security” tab. This tab is right next to the “Sharing” tab you clicked earlier.
-
12Click the “Edit” button. Now you'll see the user permissions screen.
-
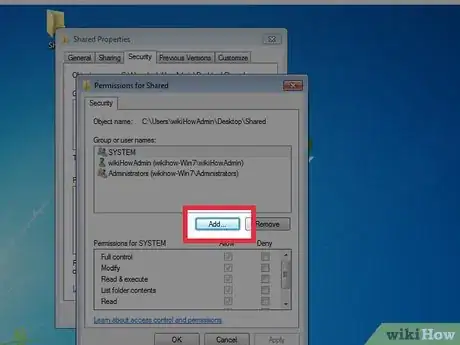
13Click the “Add…” button. This button appears just below the “Group or user names” box.
-
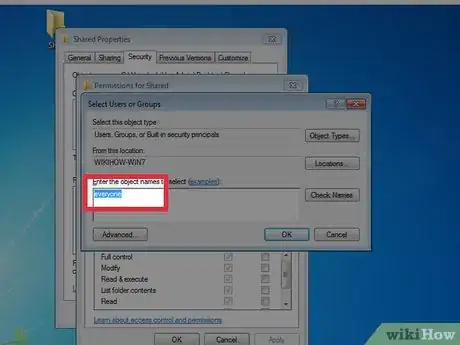
14Type “Everyone” into the empty field and click “OK.” You'll return to the user permissions screen.
-
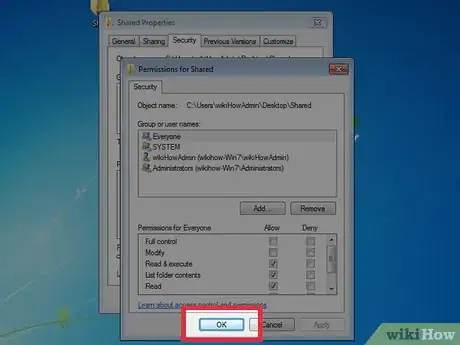
15Click “OK” again to save your changes. Keep clicking “OK” buttons until there are no more “OK” buttons to click.
-
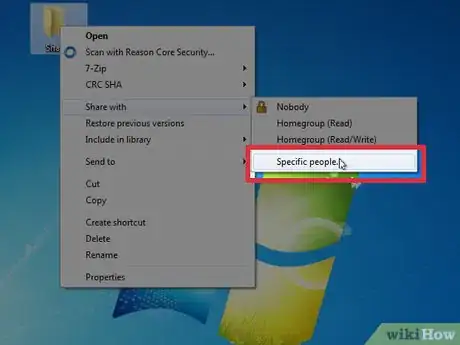
16Right-click another folder and select “Share.” Now when you want to share more folders, you'll be able to add the “Everyone” group quickly. Here's how to do it on another folder.
-
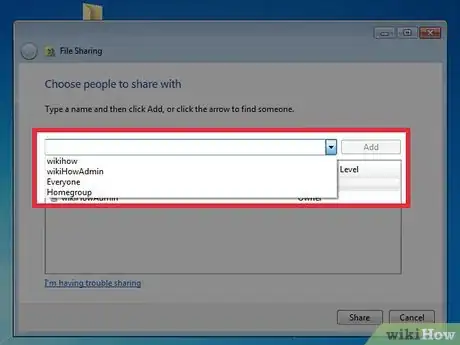
17Select users with whom you'd like to share the file. Select “Everyone” to set the permissions for Everyone.
-
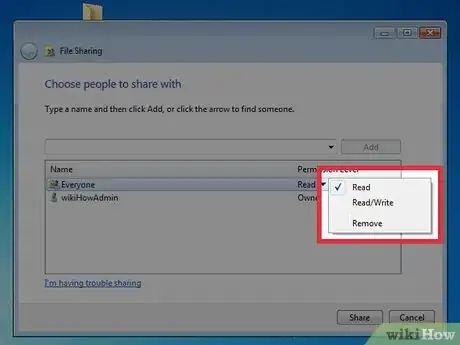
18Set the permissions for Everyone and click “OK.” Just as you did earlier, decide whether you want Everyone to have Full Control, Change, or Read access to the folder. You'll be able to do this with any folder in the future.
Windows Vista
-
1Connect the computer to the network. You can enable file sharing on a Windows Vista computer to make any file or folder accessible to others in the same Workgroup.[17] Connect the computer to the network on which you'd like to share files.
-
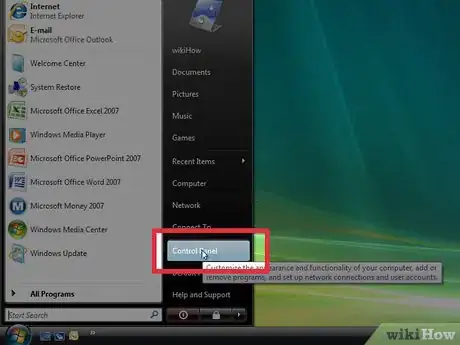
2Click the Start menu and select “Control Panel.” Before you can share files, you'll need to make some changes in the Network and Sharing Center.
-
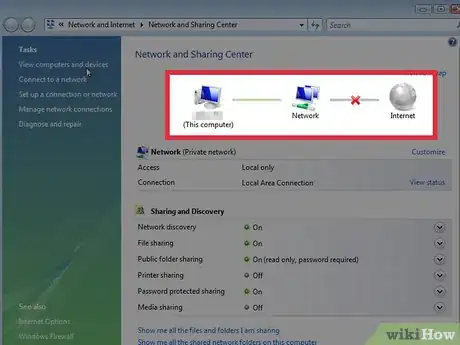
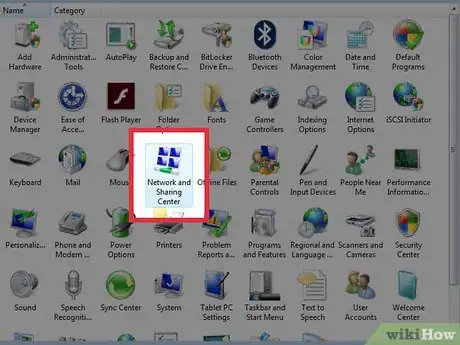
3Click the "Network and Sharing Center” link. You should see your computer name at the top of the screen, and network information just below.
-
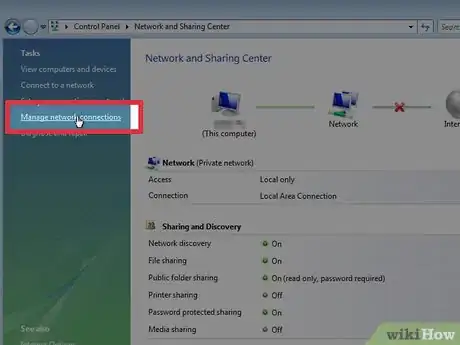
4Click the “Manage network connections” link. You'll see this link at the top left corner of the Network and Sharing Center.[18]
-
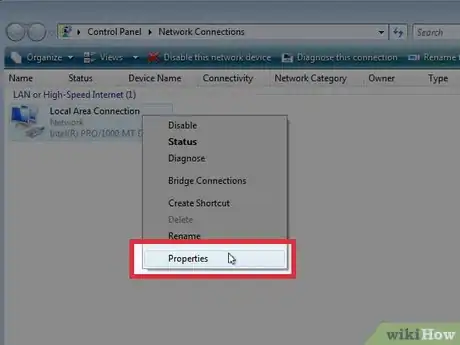
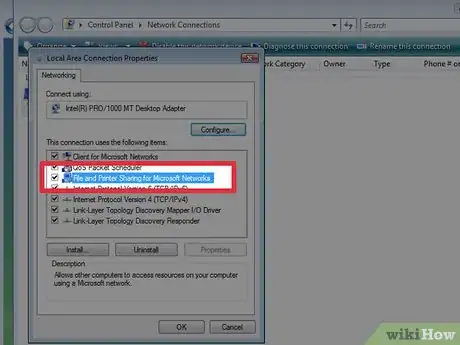
5Right-click the icon for your network connection and select “Properties.” This will open the connection properties screen.[19]
- If you are prompted by Windows to enter your Administrator password or approve changes, you can do so now (and at any other point in this method).
-
6Place a check mark next to “File and Printer Sharing for Microsoft Networks.” This service needs to be active to share files across the network.
-
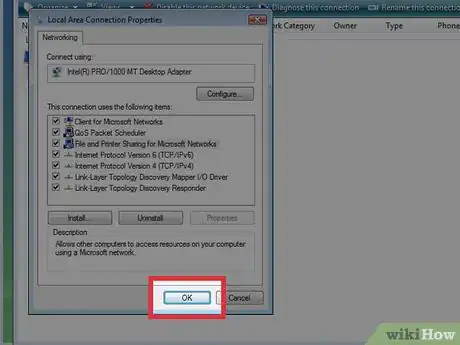
7Click “OK” to approve the changes. The window will close and you'll return to the Network and Sharing Center.
-
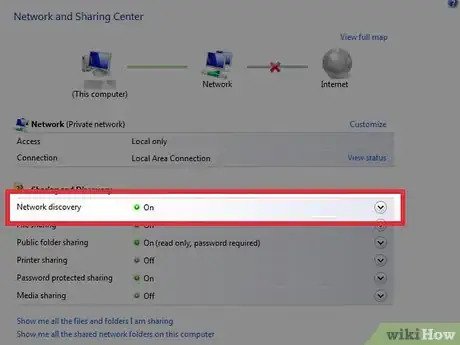
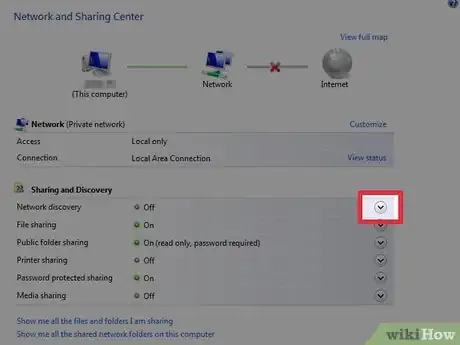
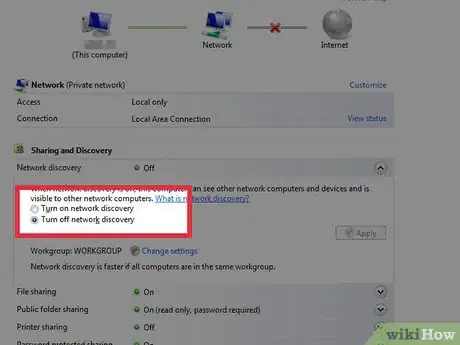
8Turn on Network Discovery. If you see a green circle and the word “On” next to “Network Discovery,” skip to the next step. Otherwise, click the down-arrow next to “Network Discovery” and click “Turn on network discovery.”[20]
-
9Click the downward-facing arrow next to “File Sharing.” This will expand the File Sharing settings panel.
-
10Select “Turn on File Sharing.” The circle next to “File Sharing” will turn green.
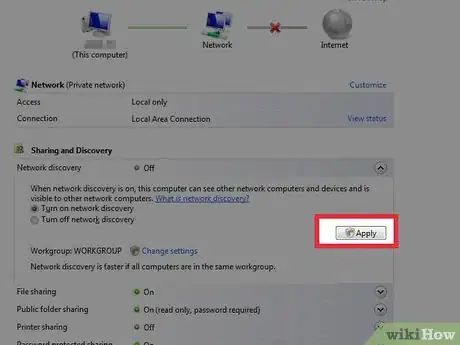
-
11Click “Apply.” If prompted to enter your password, do so.
-
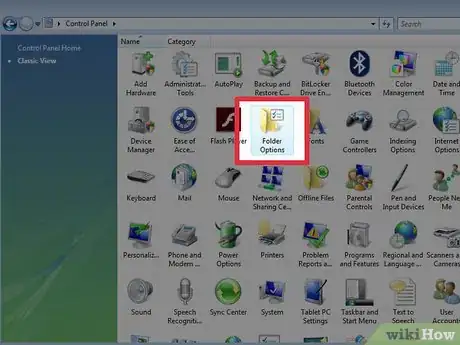
12Double-click “Folder Options” in the Control Panel. Now you'll see a dialog box full options with checkboxes next to them.
- If you don't see this icon, switch to Classic View by clicking the “Classic View” link in the left menu.[21]
-
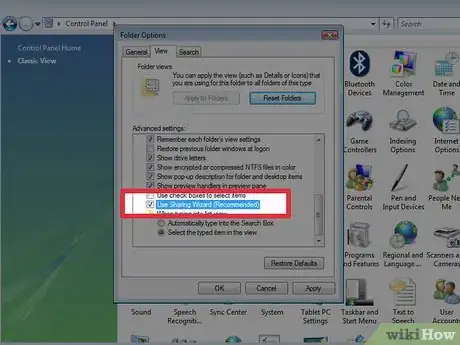
13Check “Use Sharing Wizard” and click “OK.” This will make it easy to share files across the network just by right-clicking a file or folder.
-
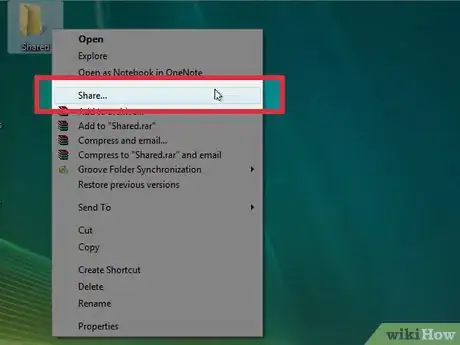
14Share a file or folder. When you're ready to share a file or folder with the network, just right-click on it and click “Share” to open the Sharing Wizard.
-
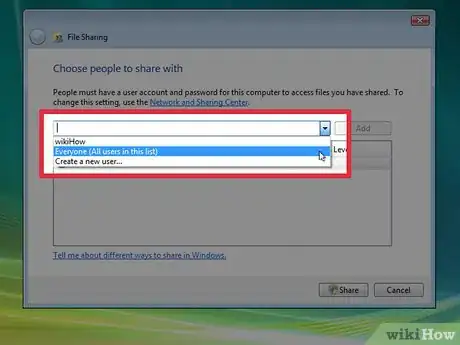
15Choose who to share the file with. Select the users with whom you'd like to share the file or folder and click “Share.” The file will now be shared with that user.[22]
Expert Q&A
-
QuestionHow can I share files between two laptops?
 Stan KatsStan Kats is the COO and Chief Technologist for The STG IT Consulting Group in West Hollywood, California. Stan provides comprehensive technology & cybersecurity solutions to businesses through managed IT services, and for individuals through his consumer service business, Stan's Tech Garage. Stan has over 7 years of cybersecurity experience, holding senior positions in information security at General Motors, AIG, and Aramark over his career. Stan received a BA in International Relations from The University of Southern California.
Cybersecurity Expert There are various suitable ways you can do this. There are file sharing services, like Microsoft's OneDrive, Dropbox and Google Drive. These are the 3 most popular services. There is also a built-in networking feature between Windows and Mac OS - to use this, create a shared folder and grant access to the other machine and pull the files across. That is a little more complex though, so it's always easiest to use the sharing services.
References
- ↑ http://www.isunshare.com/windows-10/turn-on-or-off-file-and-printer-sharing-in-windows-10.html
- ↑ http://www.isunshare.com/windows-10/turn-on-or-off-file-and-printer-sharing-in-windows-10.html
- ↑ http://www.geeksquad.co.uk/articles/how-to-set-up-file-sharing-on-windows-10
- ↑ http://www.geeksquad.co.uk/articles/how-to-set-up-file-sharing-on-windows-10
- ↑ http://www.geeksquad.co.uk/articles/file-sharing-windows-8-1
- ↑ http://www.geeksquad.co.uk/articles/file-sharing-windows-8-1
- ↑ http://www.geeksquad.co.uk/articles/file-sharing-windows-8-1
- ↑ https://technet.microsoft.com/en-us/library/cc754344(v=ws.11).aspx
- ↑ http://www.digitalcitizen.life/take-ownership-and-change-permissions-files-and-folders
- ↑ https://support.apple.com/en-us/HT204445
- ↑ https://support.apple.com/en-us/HT204445
- ↑ http://support.auralic.com/hc/en-us/articles/206855007-Create-network-shared-folder-on-Mac-OS-X
- ↑ http://support.auralic.com/hc/en-us/articles/206855007-Create-network-shared-folder-on-Mac-OS-X
- ↑ http://support.auralic.com/hc/en-us/articles/206855007-Create-network-shared-folder-on-Mac-OS-X
- ↑ https://support.apple.com/en-us/HT204445
- ↑ http://support.auralic.com/hc/en-us/articles/206855007-Create-network-shared-folder-on-Mac-OS-X
- ↑ https://www.vistax64.com/threads/simple-file-sharing-enable.126910/
- ↑ https://www.vistax64.com/threads/file-sharing-turn-on-or-off.126388/
- ↑ https://www.vistax64.com/threads/file-sharing-turn-on-or-off.126388/
- ↑ https://www.vistax64.com/threads/simple-file-sharing-enable.126910/
- ↑ https://www.vistax64.com/threads/simple-file-sharing-enable.126910/
- ↑ https://technet.microsoft.com/en-us/library/bb727037.aspx
About This Article
1. Open Control Panel.
2. Click View network status and tasks.
3. Click Change advanced sharing settings.
4. Select Turn on file and printer sharing.
5. Click Save changes.
6. Open File Explorer.
7. Right-click the folder to share and select Properties.
8. Click Advanced Sharing.
9. Select "Share this folder" and name the share.
10. Click Permissions to set permissions.
11. Click OK.

